

100 Car Maintenance Tasks You Can Do on Your Own
 Updated: Feb. 23, 2021
Car maintenance seems daunting at first, but start small and work up the car repair ladder. Here are 100 car repair tasks and maintenance you can do yourself.
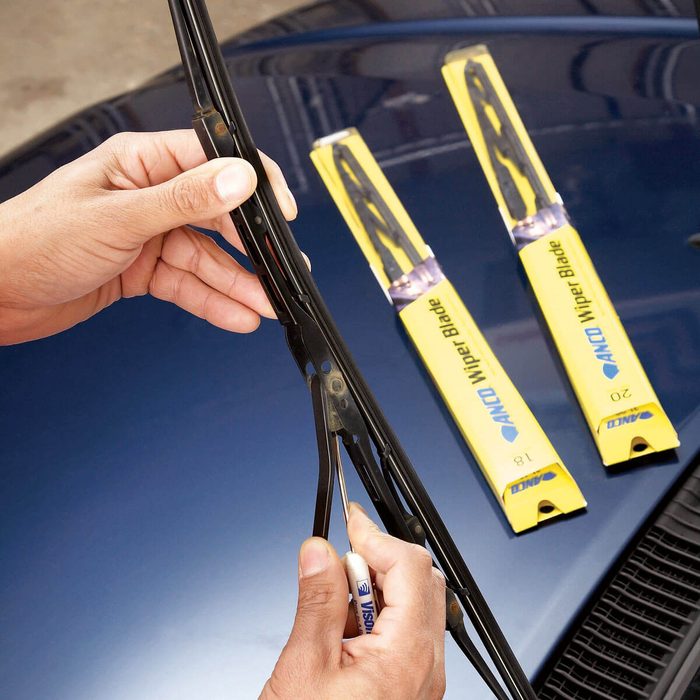
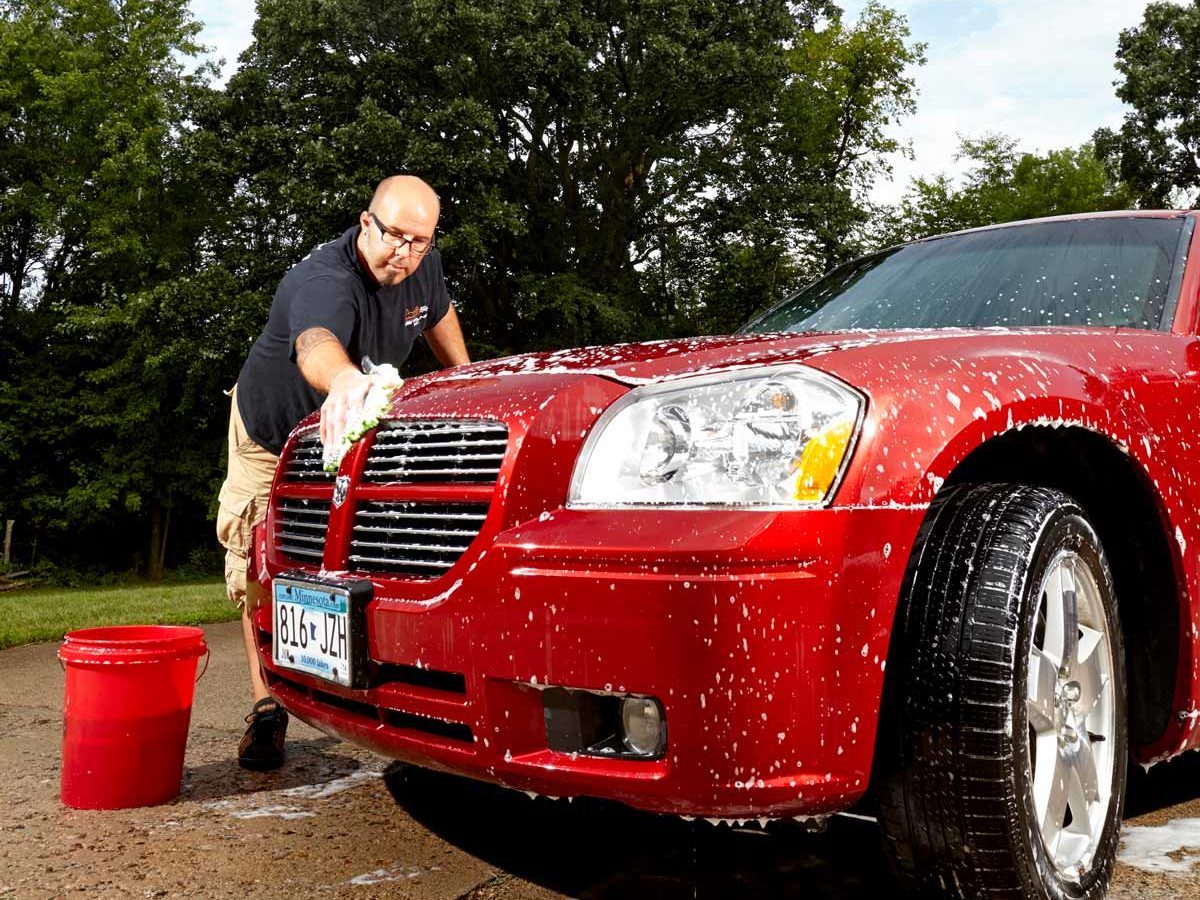
Replace Your Wiper Blades
It’s easy to tell when your blades need replacing. Simply press the washer button and see if your blades wipe clean. If they streak, they’re toast. The auto parts store will have lots of economy blades, but go with a name brand instead. They cost more than economy blades, but their higher-quality rubber wipes better, has better UV protection and lasts longer. Follow the installation instructions on the package. Be sure you have a firm grip on the wiper arm once you remove the old blade. If it gets away from you, it can hit the windshield with enough force to crack it.
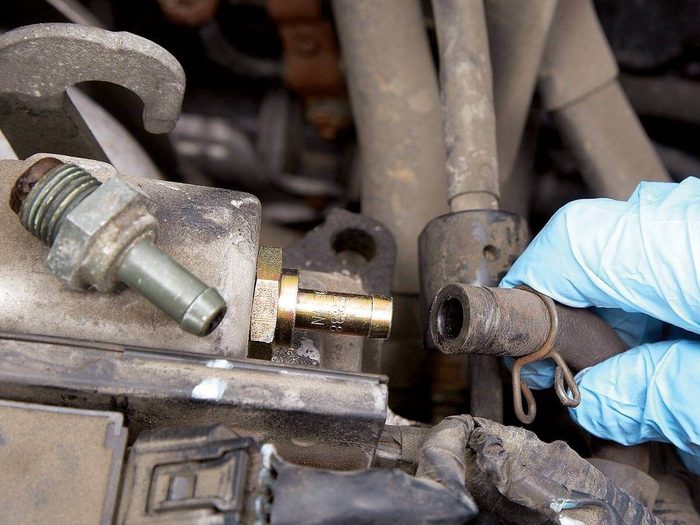
Shake Your PCV Valve
This sounds complex, but it’s not. If your car has a PCV valve (some late-model cars don’t), pull it out every other oil change. In most cases, you’ll find the valve on the top of the engine, connected to a vacuum hose. Some late-model cars don’t have PCV valves, so don’t beat yourself up trying to find it. Slide the vacuum hose off the valve and unscrew the valve. Then perform the world’s easiest diagnostic test: Shake it. If it makes a metallic clicking sound, it’s good. If it doesn’t make noise or sounds mushy, replace it. But don’t replace it on appearance alone—all used PCV valves look dirty.
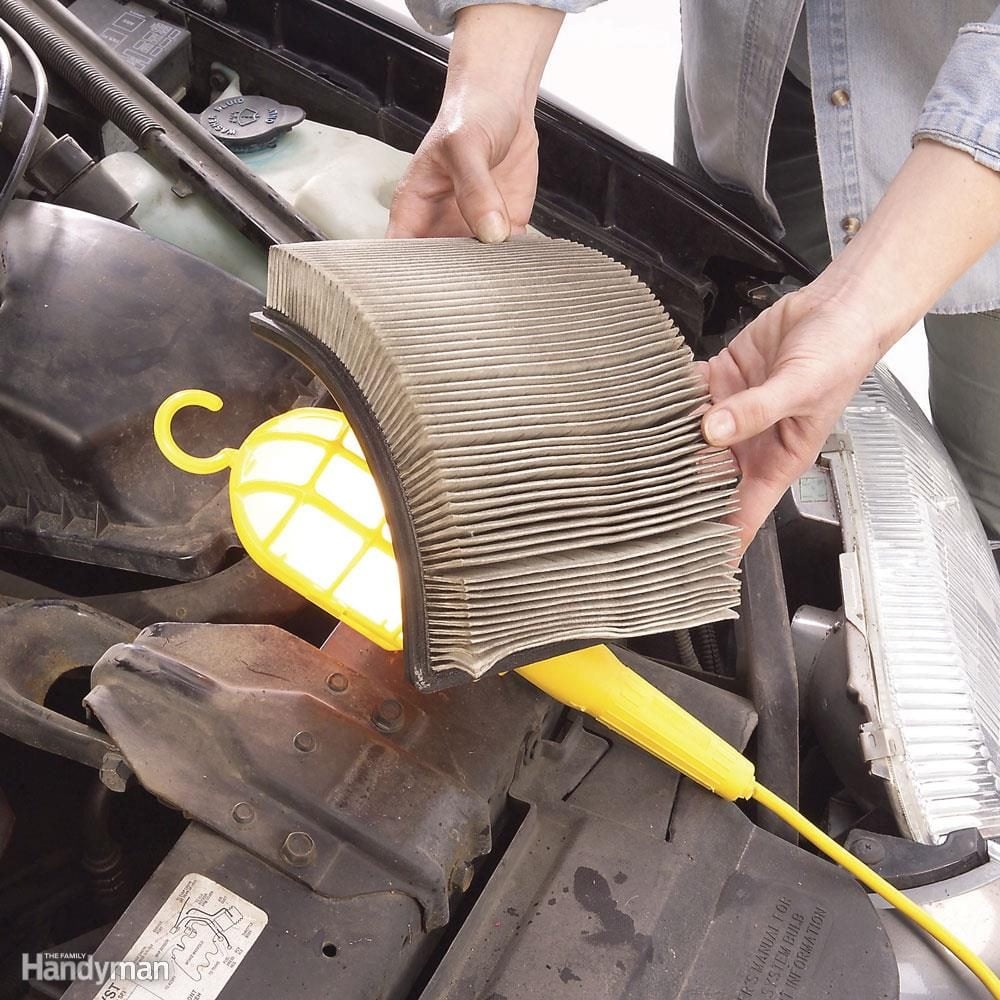
Replace Engine Air Filter
Inspect and replace your engine air filter. Just unscrew or unclip the air filter box retainers and remove the old filter. Then hold a shop light behind the filter to see how much light passes through. If the filter blocks 50 per cent of more of the light, replace the filter. If not, put it back in, secure the air filter box cover and keep driving.
Get the full step-by-step on changing your air filter!
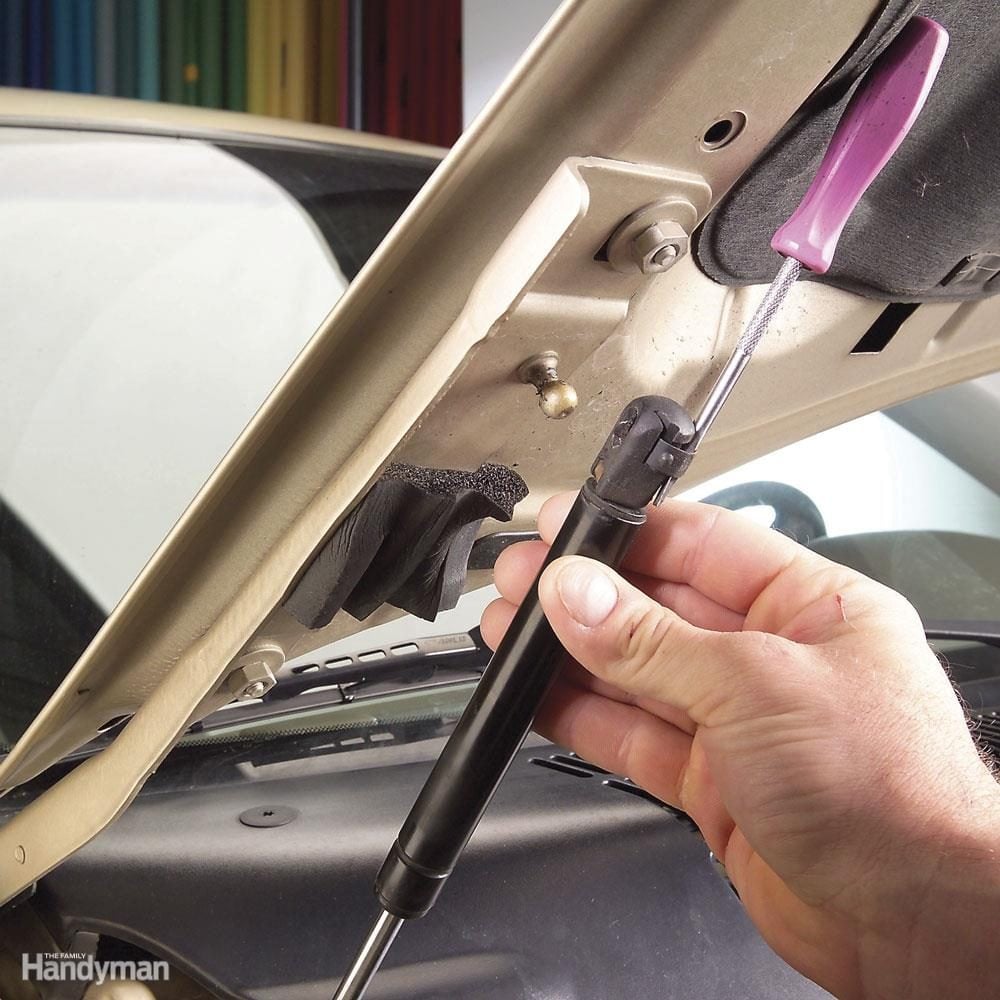
Gas Lifts
Why risk your noggin when you can replace gas lift cylinders yourself? Just buy new lifts at any auto parts store. Then have a helper hold the hood or liftgate while you disconnect and replace the worn lifts. Many styles simply unbolt using a metric socket set. Others connect with a ball and socket style connection held in place with a spring clip. To disengage the spring clip, simply shove a small flat blade screwdriver between the clip and the cylinder. Then pull the cylinder off the ball stud.
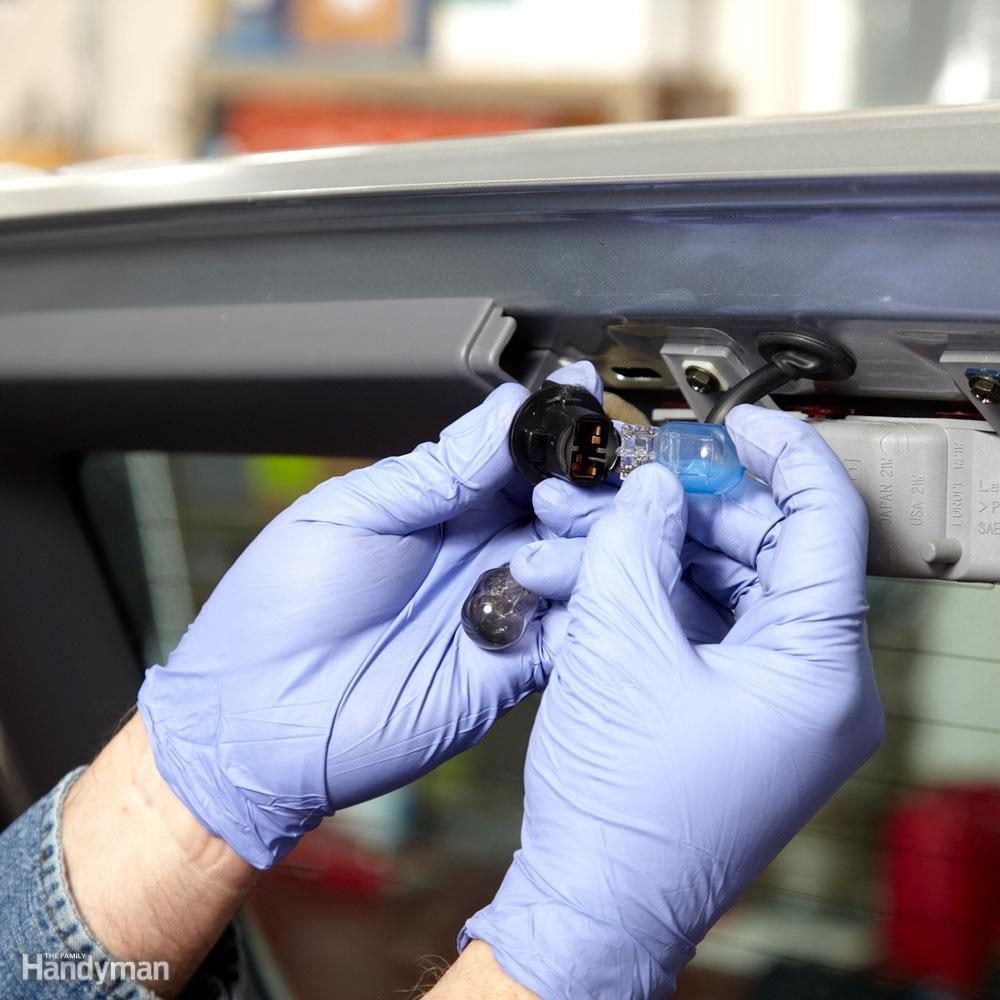
Replace Non-Headlight Bulbs
To access burned out license plates, side marker and fog light bulbs, just remove the retaining screws and pry off the lens. Pull the bulb straight out of the socket. Handle the new bulb with gloved hands or hold it with a paper towel to prevent skin oils from depositing on the thin glass. Then push the bulb into the socket until it clicks. Reinstall the lens and you’re done.
Here are more car problems you can diagnose—and fix—yourself!
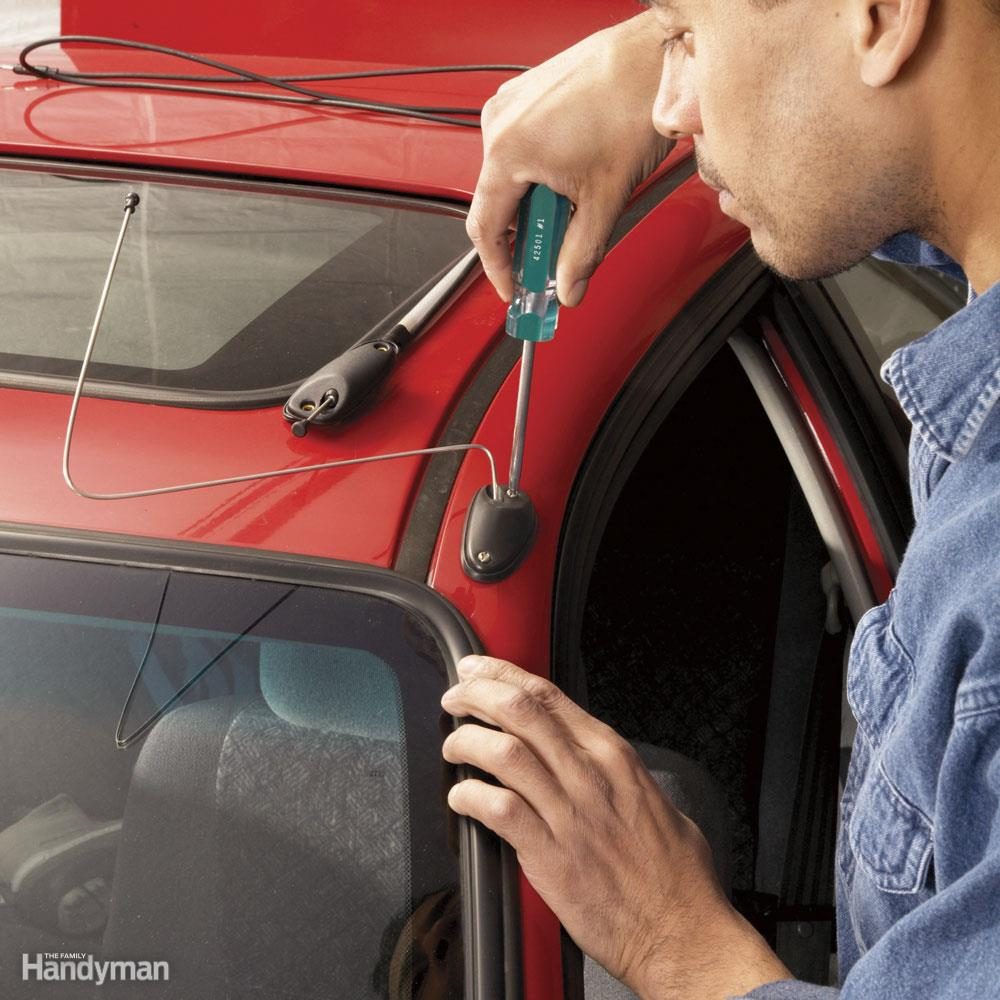
Replace That Broken Antenna
Replacing a fender mount antenna mast is easy. Just unscrew the remaining portion of the mast and buy a replacement mast at any auto parts store. Replacing a pillar mount antenna is a bit more involved but is still a DIY fix. Disconnect the antenna cable from your radio and connect heavy string to the end. Then unscrew the antenna mount from the pillar and pull the old antenna and the string straight out. Attach the new antenna cable to the string, pull the cable back into the vehicle and connect it to your radio. Then secure the new antenna to the pillar using the screws provided.
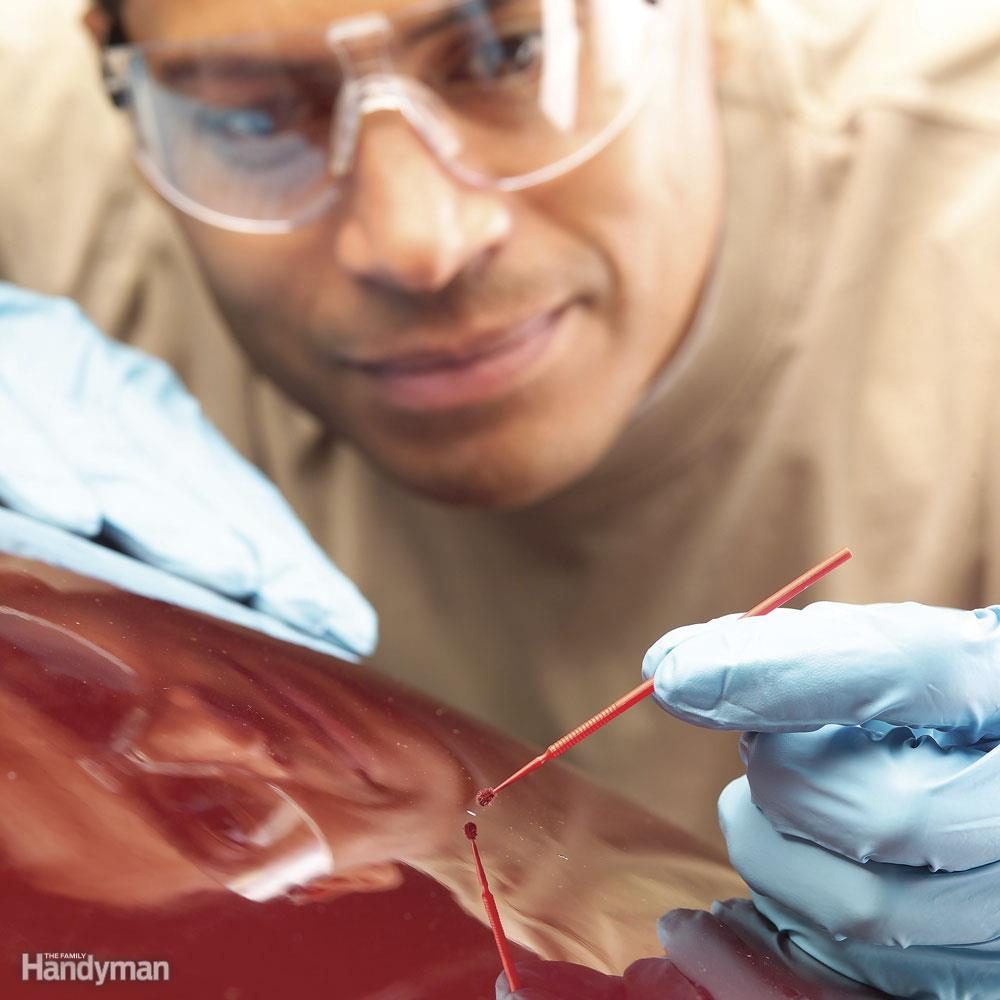
Touch up Chipped Auto Paint
If you don’t cover paint chips with touch up paint, they’ll rust and then you’ll have a much bigger problem on your hands. The actual touch up is easy. Just buy touch up paint, fine tip paint applicators and wax and grease remover from any auto parts store. Clean the chip with the wax and grease remover and let it dry. Then dip the applicator in the paint and dab it onto the chip. Don’t add too much or the paint will drip. Let it dry completely and apply wax after 30 days.
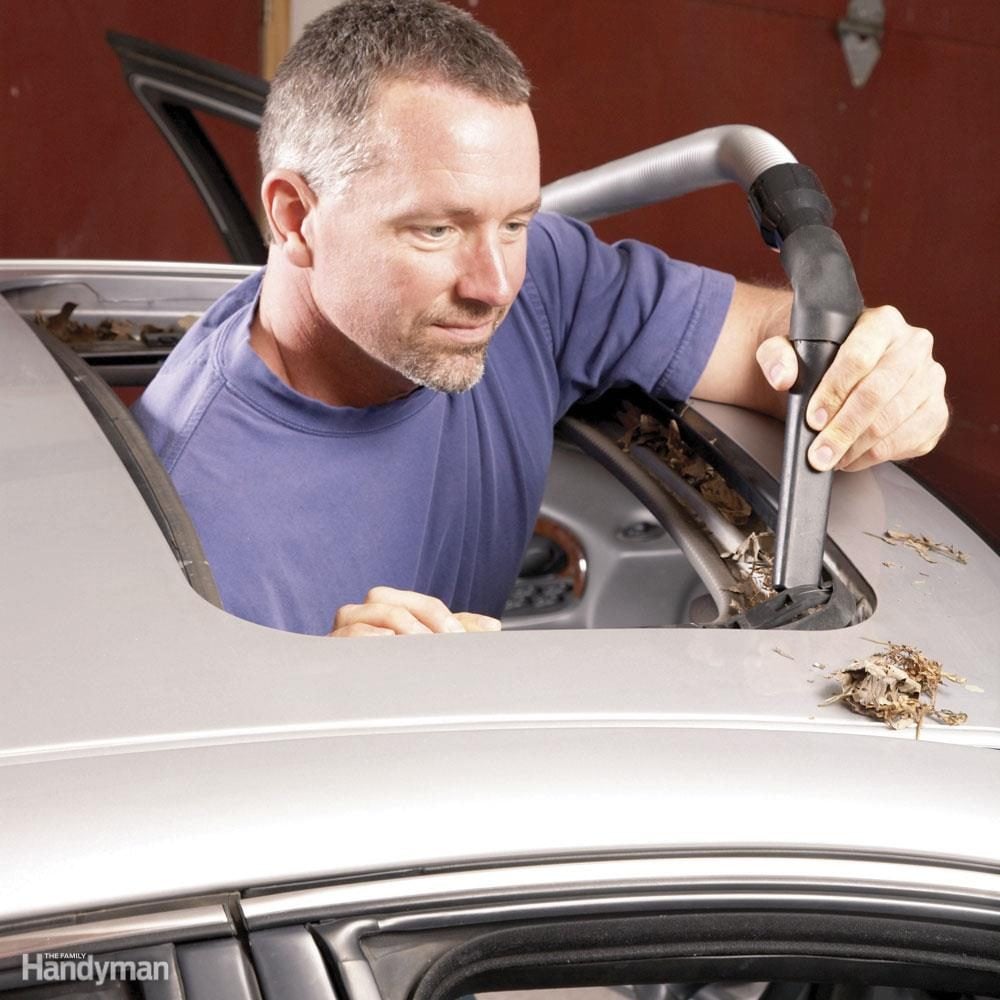
Fix That Leaky Sunroof
If raindrops keep falling on your head, it’s probably because your sunroof drains are clogged. That’s something you can fix yourself in just a few minutes. Open the sunroof and look for drain holes in the front and rear corners of your sunroof. Once you locate the drains, duct tape a small rubber or plastic tube to the end of your shop vacuum and suck out any debris stuck in the drains. Then dribble water into each drain and check under the car to see if it’s draining onto your driveway or garage floor. If the drain is still plugged, buy a speedometer cable from an auto parts store. Insert the cable into the drain and gently push it down the drain as you spin the cable with your fingers. Don’t push too hard because you can puncture the drain tubes and they’ll dump water into your dash area. Flush the drain after snaking it with the speedometer cable. If it now runs free, you’re done and shouldn’t have any more water coming inside your vehicle.

Fix Small Dents and Door Dings
If you can patch a wall, you can patch a dent in your car. You’ll need various sandpaper grits, a small can of autobody filler and cream paste and plastic applicators. Start by sanding the dent down to bare metal with coarse grit sandpaper. Then feather the edges. Clean the dents with wax and grease remover. Then mix the body filler and apply a very light skim coat to fill in the sandpaper scratches. Allow the filler to set up and then build up the repair with additional layers no more than 1/4-in. thick per application. Feather the final coat so it levels with the painted areas. After it cures, sand until smooth. Then apply a cream filler to the entire area to fill in any pinholes. Let it cure and do a final sand. Then you can paint the area with touch up paint.
Learn more about fixing car dents!
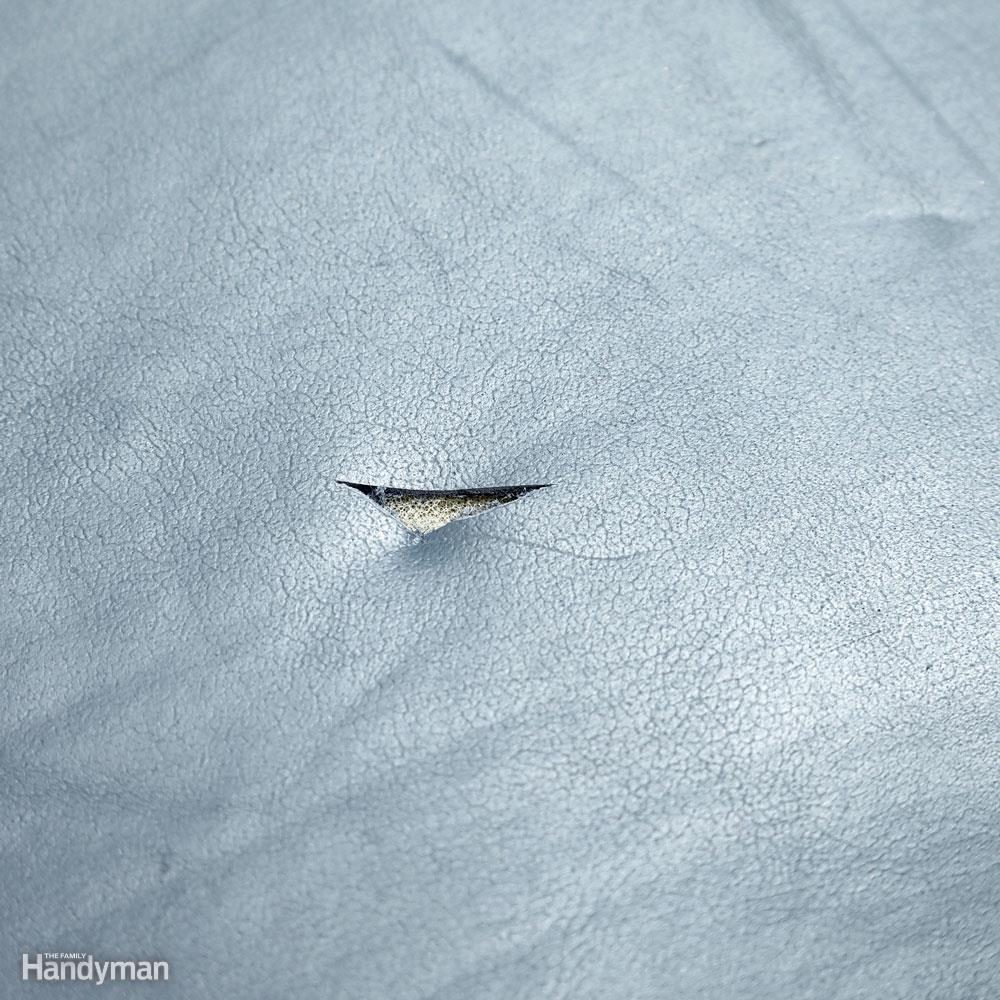
Fix Tears in Leather and Vinyl
Upholstery shops charge almost $200 to fix tears in your seats. You can do it yourself in a few hours with a vinyl and leather repair kit (less than $20) from any auto parts store. You’ll have to practice a bit to get the right colour mix and it might not be a perfect match when you’re done, but it’s a heck of a lot better than driving around with torn seats. Start by gluing reinforcing fabric onto the underside of the torn vinyl or leather. Then mix the heat-set filler to match your fabric colour and apply it to the tear. Next, find a textured mat that most closely resembles the texture of your vinyl or leather and place it onto the liquid filler. Heat the patching tool with a clothes iron and press it onto the textured mat. Remove the patching tool, but leave the textured mat in place until the patch cools. Then peel it off.
Check out the full story on repairing leather.

Replace Your Cabin Air Filter
A clogged cabin air filter can damage your car’s blower motor and cause your AC to run longer and harder in the summer. Cabin air filters are easy to access and replace and you’ll save about $30 by doing it yourself. Buy a replacement cabin air filter at any auto parts store and ask the clerk to print out the installation instructions. Cabin air filters are usually located in the air ducts behind the glove box in late model vehicles. However, some car makers locate them in the cowling or console area. Just remove the access covers and slide out the old filter. Note the direction of the airflow arrows so you can install the new filter in the proper orientation. Then reinstall the covers and you’re done.
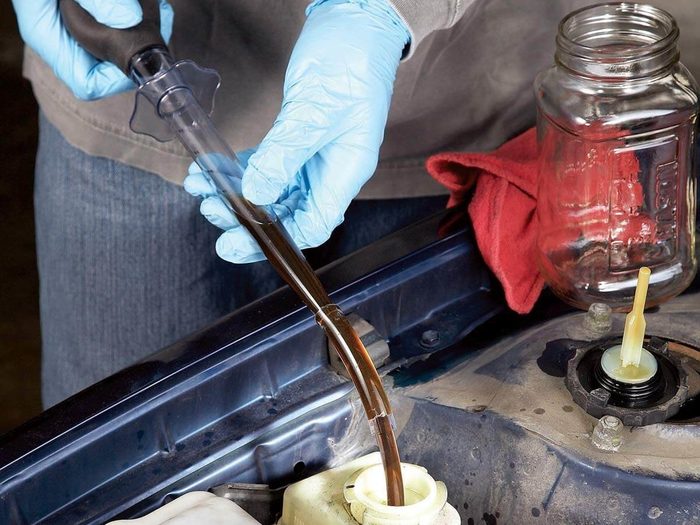
Change Power Steering Fluid
There aren’t any test strips for power steering fluid, so you’ll have to rely on the manufacturer’s service recommendations or general rule-of-thumb (two years). Use the turkey baster method to remove the old power steering fluid. Suck out all the fluid (engine off) as shown. Then refill the reservoir with fresh fluid. Start the engine and let it run for about 15 seconds. Repeat the fluid swap procedure until you’ve used up the full quart.
Note: Never substitute a “universal” power steering fluid for the recommended type, and never add “miracle” additives or stop-leak products. They can clog the fine mesh filter screens in your steering system and cause expensive failures.
These 10 overlooked services can extend the life of your car.
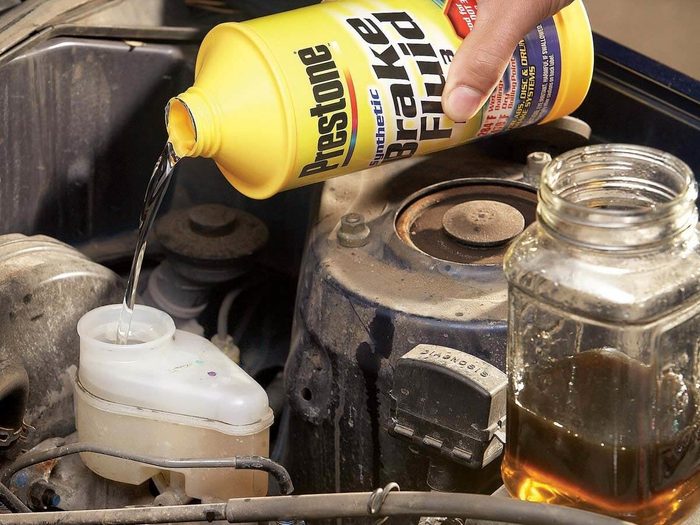
Swap Out Brake Fluid
Some carmakers recommend replacing brake fluid every two years or 24,000 miles. Others don’t mention it at all. But it’s easy to test your brake fluid. Just dip a test strip into the fluid and compare the colour to the chart on the packaging. You can’t do a complete brake fluid flush yourself, but you can do the next best thing—a fluid swap. This procedure won’t replace all the old fluid with fresh, but you’ll introduce enough new fluid to make a difference. Use a baster to suck out the dark brown brake fluid (brake and power steering fluids are incompatible, so use a different baster for each). Squirt it into a recycling bottle. Refill the reservoir with fresh brake fluid as shown. Then drive the vehicle for a week to mix the new fluid with the old. Repeat the procedure several times over the next few weeks until the fluid in the reservoir retains its light honey colour.
Note: The brake fluid may damage the baster’s rubber bulb, so don’t suck the fluid all the way into the bulb.
Every car owner should look out for these things when checking brakes.

Chalk Marker Under Hood
Keep track of when you last changed the oil, air filter, spark plug, etc., by jotting it down under your car’s hood. Use a chalk marker to make notes on a flat surface, such as an air filter cover, so you never forget important maintenance tasks.
Can’t remember when your car had its last oil change? This hack can help!
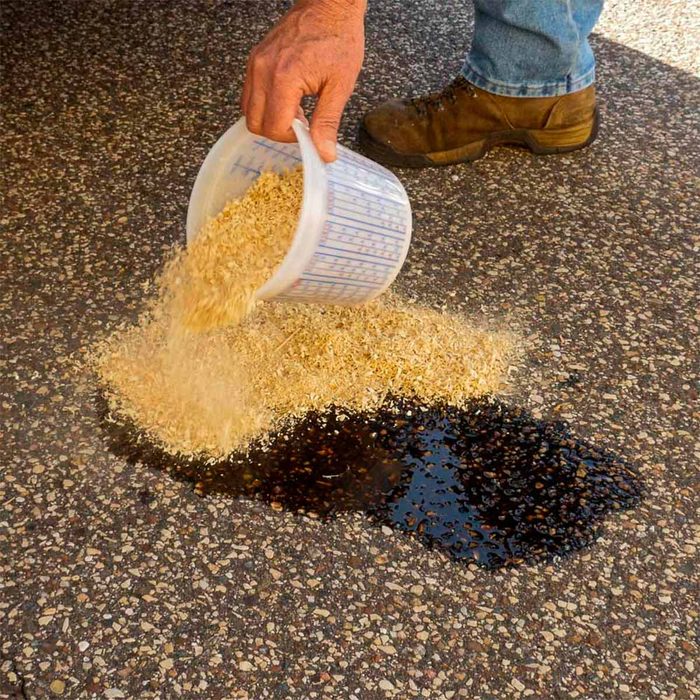
Use Sawdust to Soak Up Spills
Pick up used oil spills on the driveway or in the garage using sawdust. The material is readily available in most home workshops—just open up the dust-collection bags on your orbital sander, miter saw, etc. Pour sawdust over the spill, let it soak up the liquid for about 20 minutes, and then sweep it up. the bench outdoors.
Find out why you should never keep your phone in your glove compartment.
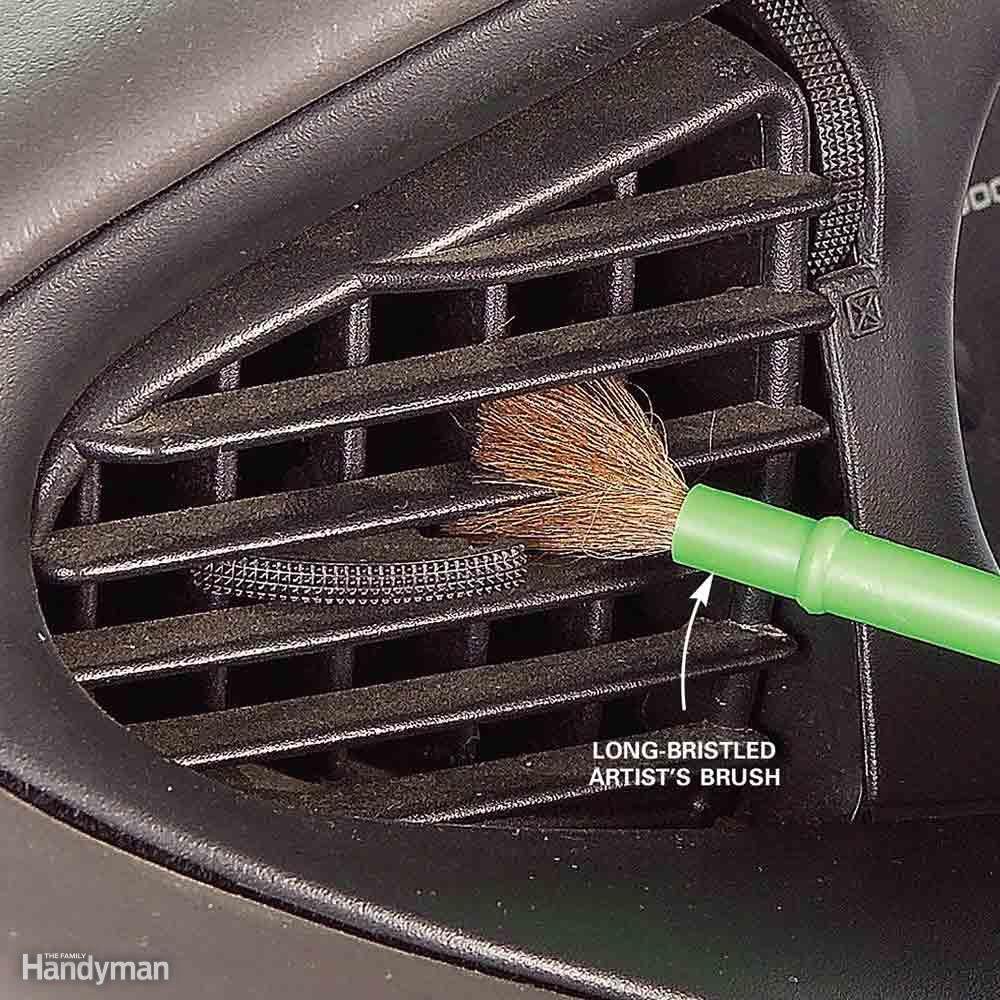
Brush Out the Air Vents
These louvers are a real magnet for dust, and a vacuum with a brush attachment just won’t get it all. Take an inexpensive artist’s paintbrush and give it a light shot of furniture polish. Work the brush into the crevices to collect the dust. Wipe the brush off with a rag and move on to the next one.
Don’t miss how to get rid of the smoke smell in your car.
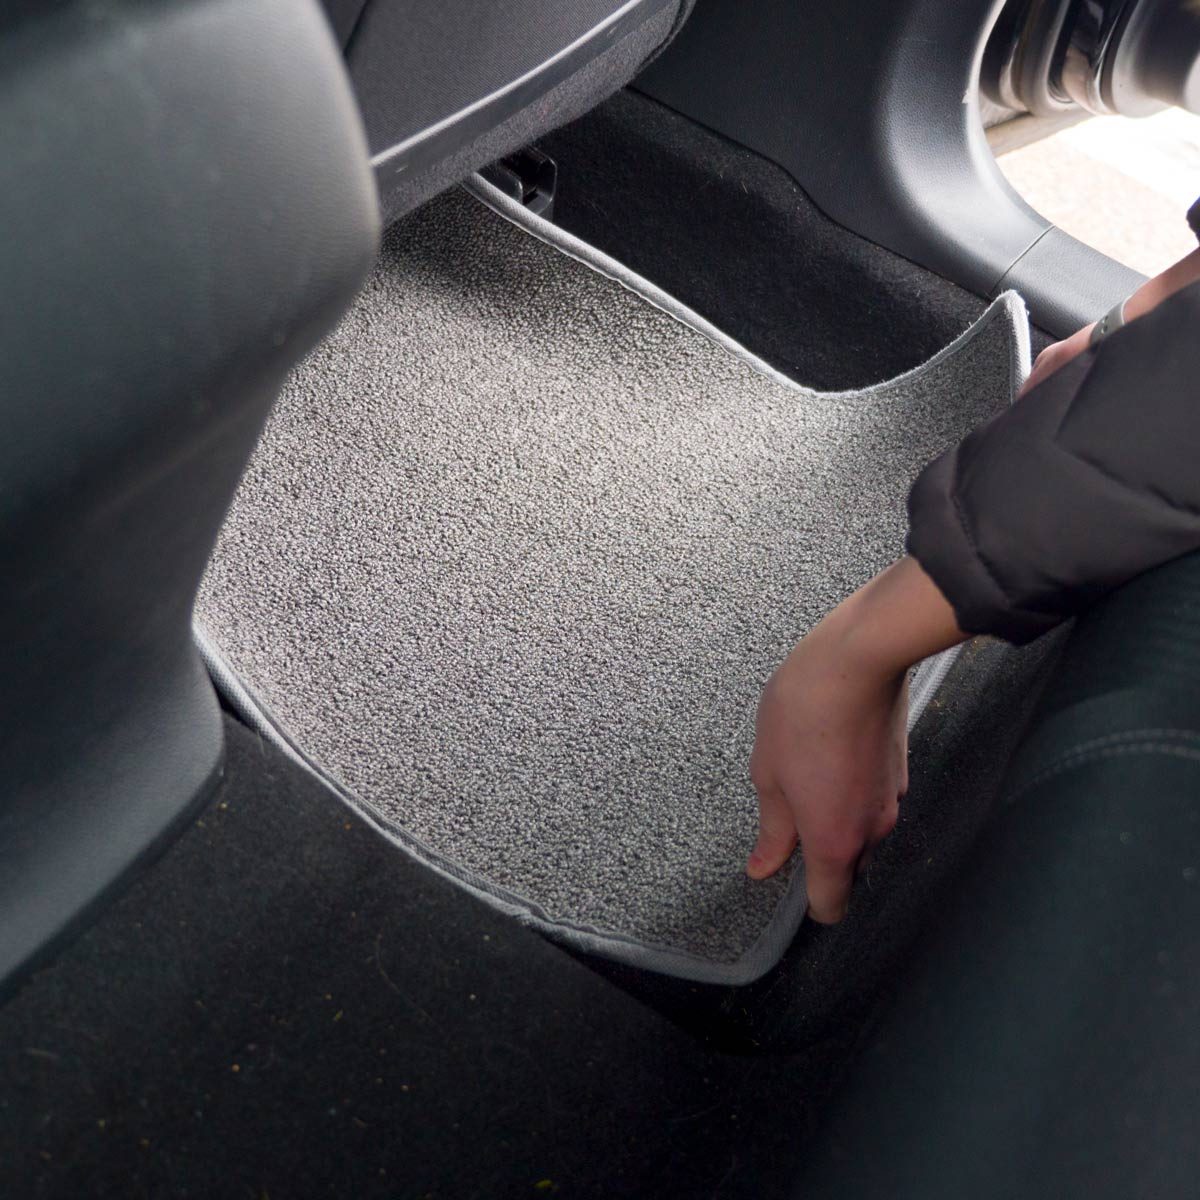
DIY Car Mats
Here’s an easy automotive hack: buy carpet squares from Home Depot and use them as car mats in your back seats. Another option is to use carpet scraps to make these DIY car mats.
Check out these car cleaning accessories that will restore your ride.
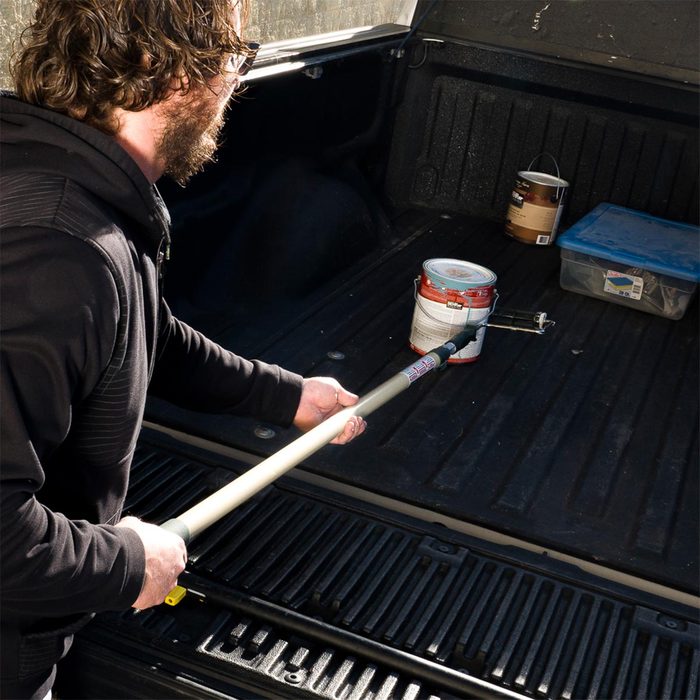
Truck Bed Reach Stick
Keep an extension handle with a paint roller on the end in your truck bed for easy loading and unloading. You won’t have to climb in and out, saving you time and saving your back!
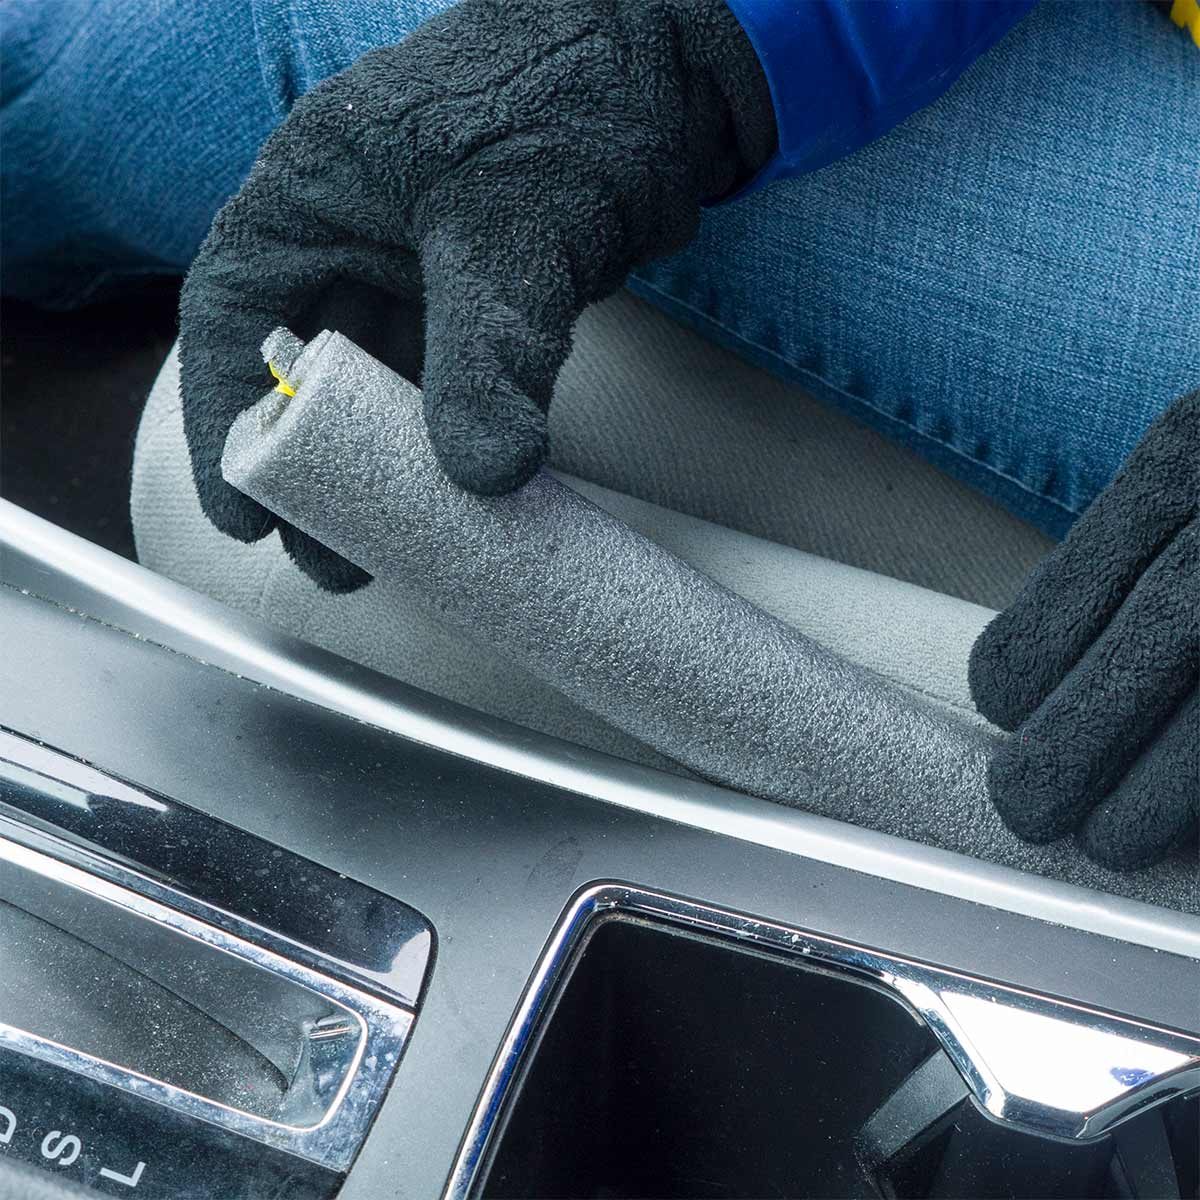
Pipe Insulation Car Hack
Reader James Goldstein came up with a genius solution for preventing items such as keys or cell phones from falling between the seats and the console in a vehicle, which can be hard to retrieve and even dangerous if it happens while driving.
Here are more car hacks that’ll make driving so much easier!
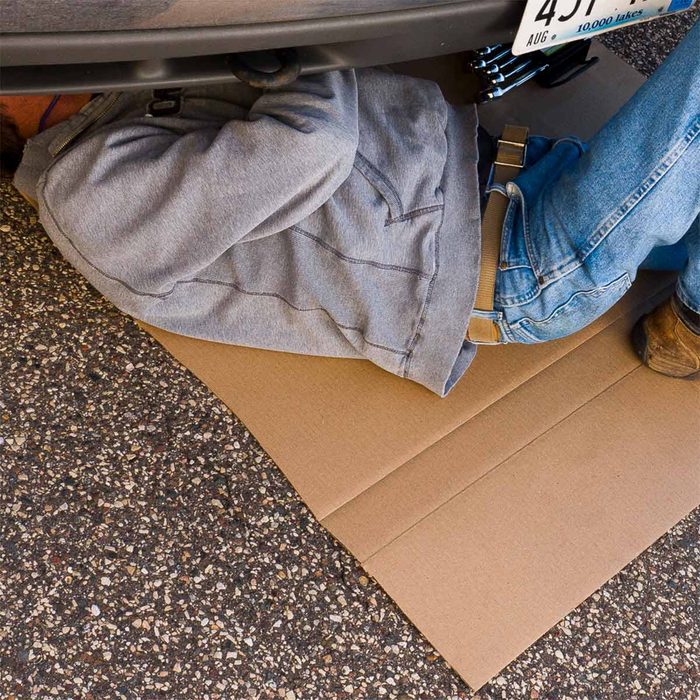
Cardboard Drop Cloth
Save large pieces of cardboard from boxes that you bring into your home. Store them along a wall in your garage or workshop so they’re at the ready when you’re working on a messy project such as refinishing furniture or changing the oil in your car. A large slab of cardboard makes a perfect disposable drop cloth.
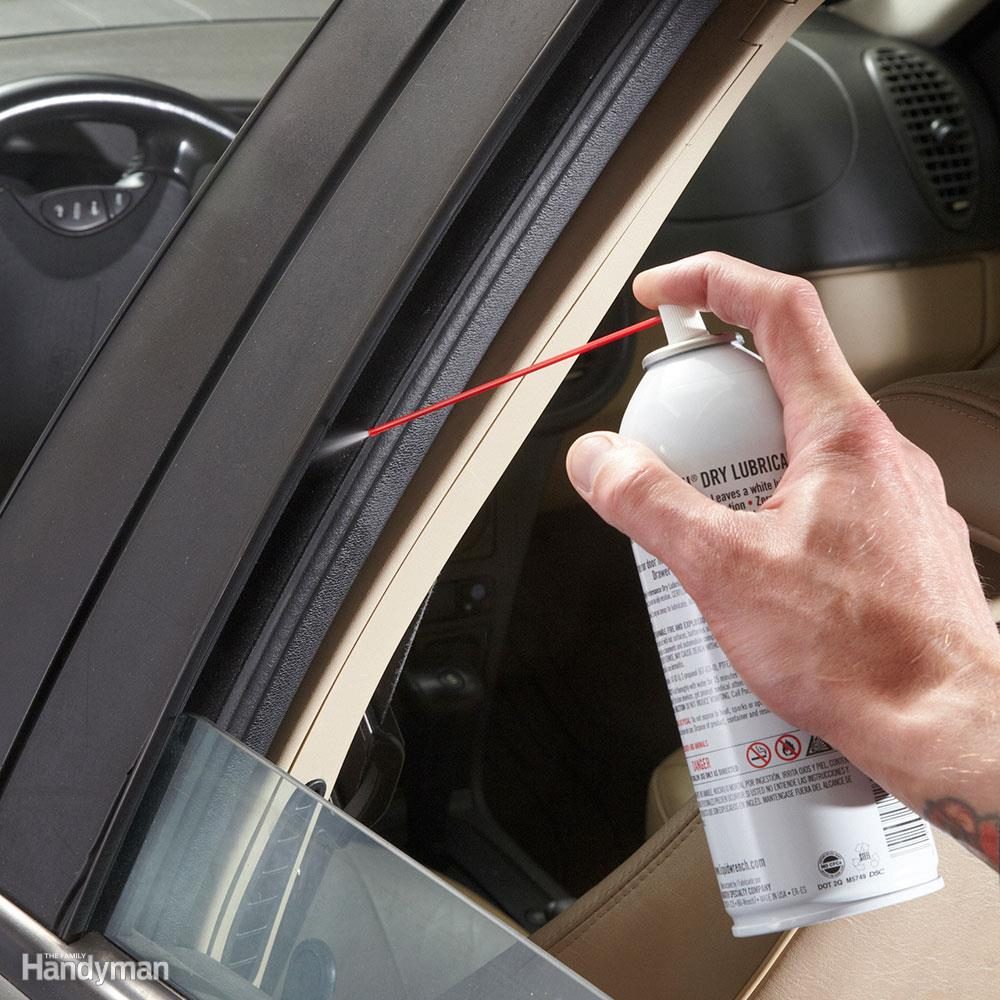
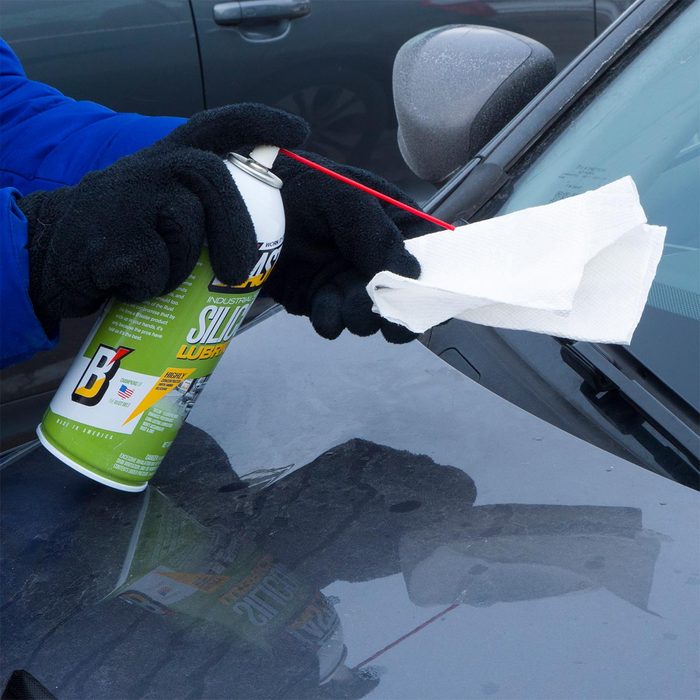
Lubricate Window Tracks
Freezing water can seep into the window tracks and create drag when you try to open the window. That drag can damage the window regulator cables, costing you almost $300. You can avoid the problem entirely by lubricating the window tracks with spray silicone or dry teflon spray lubricant. Lower the window and shoot the spray right into the front and back window track. Apply enough lube so it drips all the way down the track. Then operate the window through several open and close cycles to spread the lube along the entire track. Use glass cleaner and a paper towel to remove any spray that lands on the glass.
This genius hack will keep your car windows from fogging up.
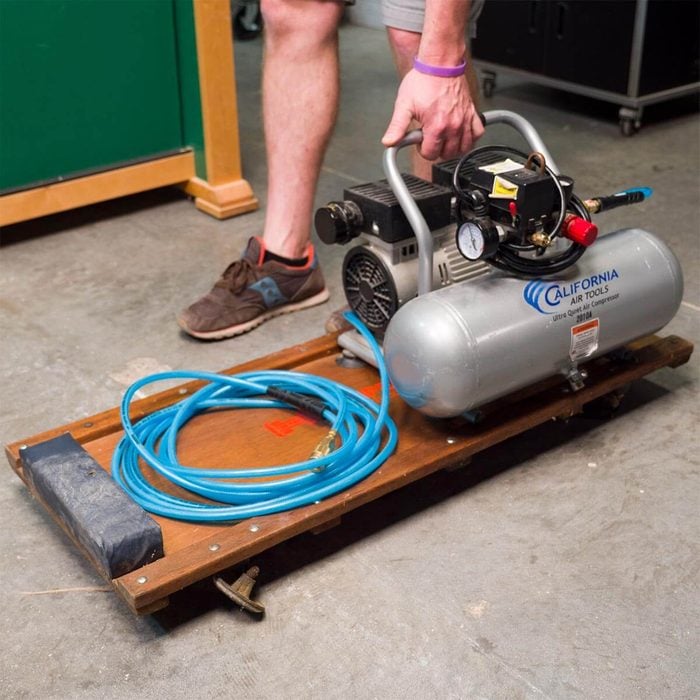
Compressor Creeper
Save your back by storing your air compressor on a mechanic’s creeper, so you can easily tote it around your workshop or garage. Depending on the size of your compressor, you may be able to store your hose on the creeper, too.
This is how often you should really clean the inside of your car.

Saltwater for your Car
Running late and you don’t have a windshield scraper in the car? So try a saltwater mix. Road salt mixed with some water will remove the thin layer of ice when the temperature dips below zero. And then use your wipers to push the slush away. Since salt isn’t great for your car, use this method sparingly.
Find out why you should keep a nail file in your car every winter!
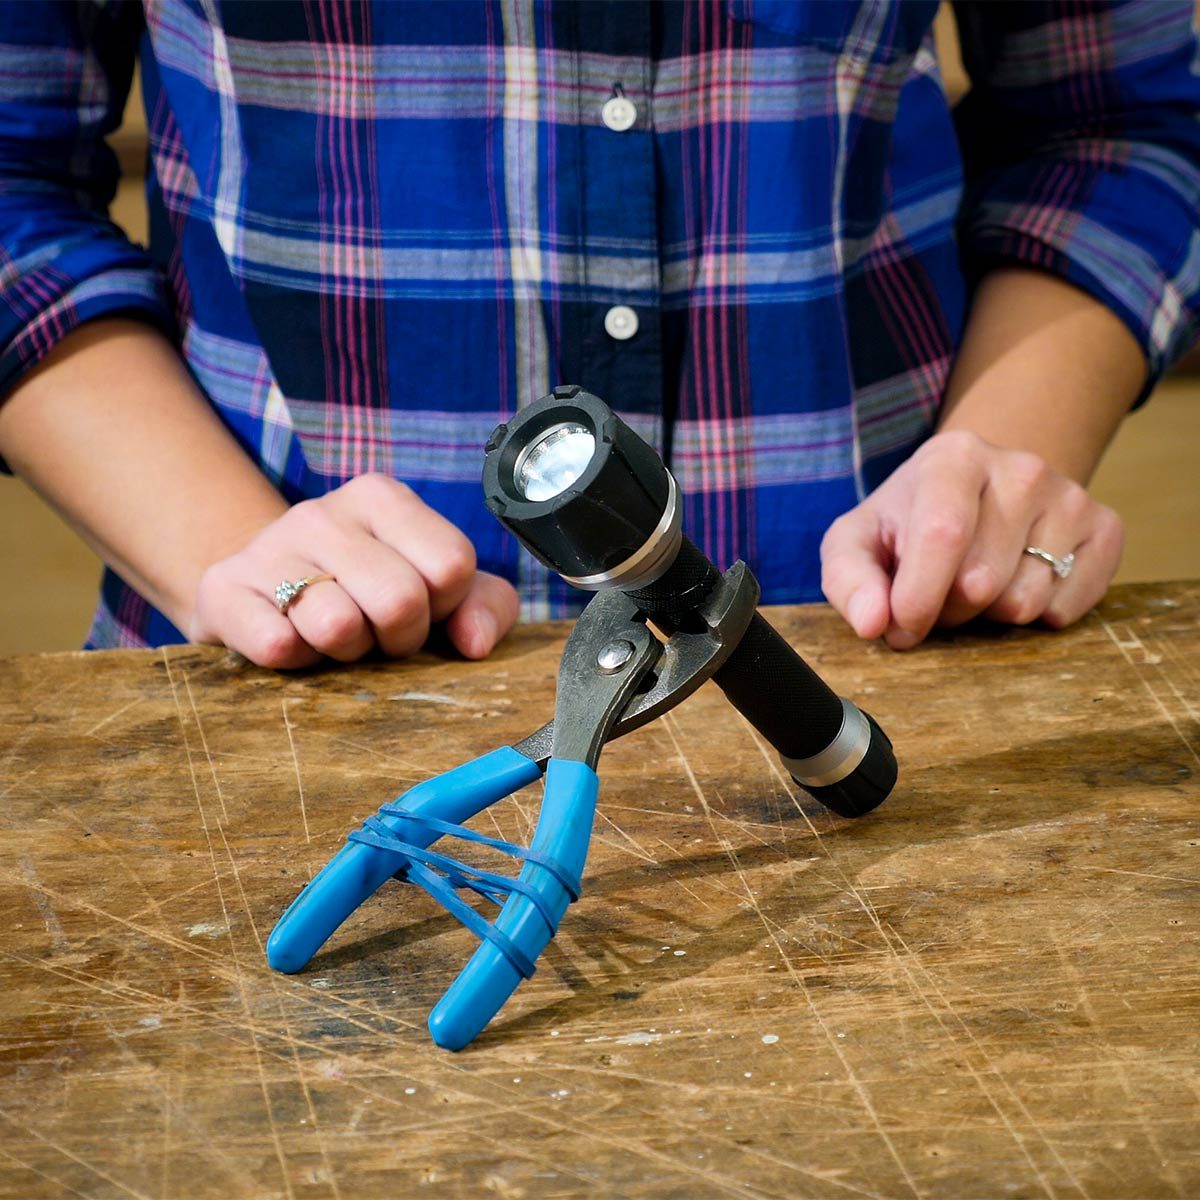
Hands-Free Light Hack
Make a hands-free light in a snap with a flashlight, a pair of pliers and a rubber band. Place the flashlight in the jaws of the pliers; then wrap a rubber band around the handles of the pliers. That’s it! Point the light wherever you need it.
Spray Silicone Lubricant on Wiper Blades
Eliminate screechy windshield wiper blades by first wiping them down with soap and water; then apply a coat of spray silicone lubricant to the rubber blades. The silicone will keep the blades working smoothly (and quietly) during winter driving.
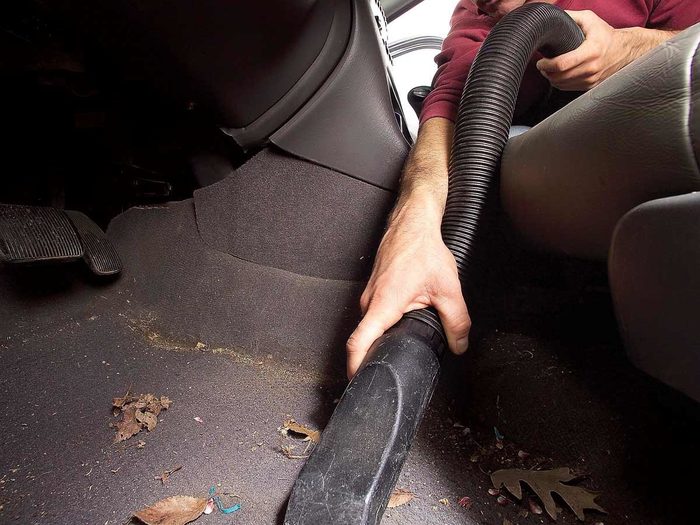
Vacuum Like You Mean It
Slide the seat all the way forward and clean out all the junk underneath. You’ll be surprised by what you find. We found a lost smartphone, enough pens and pencils to equip a small office, and enough coins for several vending machine lunches. Vacuum the seats, remove the mats and vacuum the carpet. Use a brush attachment for the dash and door panels.
Drivers make hilarious confessions about how clean their cars really are.
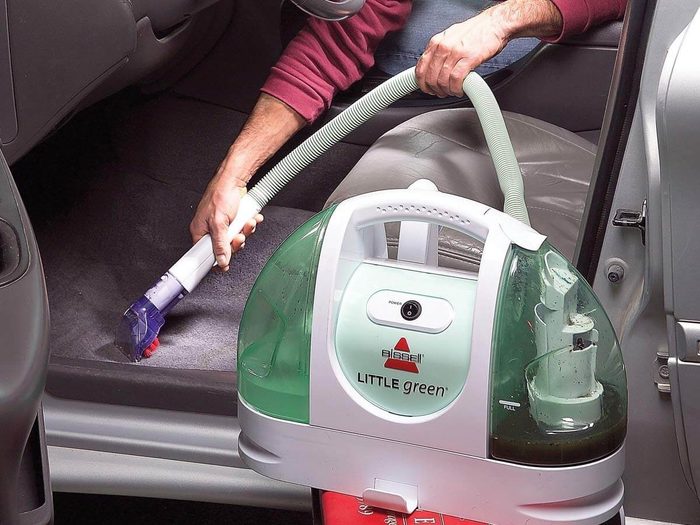
Clean the Carpet
Deep-clean the carpeting and upholstery. Use a carpet cleaning machine to get the dirt that settles deep into the fibers of the carpet. (Clean cloth seats this way as well.) It sprays the carpet with a solution of water and cleaner and then sucks the dirt and grime into a reservoir. A machine like this pays for itself after just a few uses. You can also rent one from a rental centre or use a spray-on cleaner and a scrub brush instead.
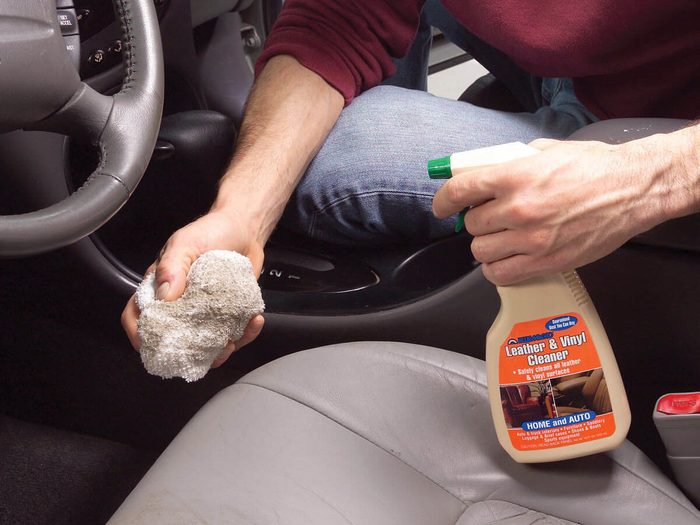
Clean and Condition the Seats
After a few years, you’ll notice that the colour of the leather or vinyl seats no longer matches that of the rest of the interior. It’s not enough just to condition the leather. First spray on leather cleaner and rub vigorously with a clean terry cloth towel. To avoid rubbing the grime back into the seats, keep flipping the cloth to expose a fresh surface. Let the seats dry for an hour and then rub in a leather conditioner like Lexol to keep the leather supple. It’s available at discount stores and auto stores.
Remember the Recesses
Detailing means just that— cleaning all the trim lines and recesses. Wrap a cloth around a worn screwdriver (no sharp edges) and spray it with Simple Green or other all-purpose cleaner. Move it gently along the trim lines to pick up dirt, using fresh sections of cloth as you go. Then clean around the buttons and controls, and follow up with a rejuvenator like Armor All.
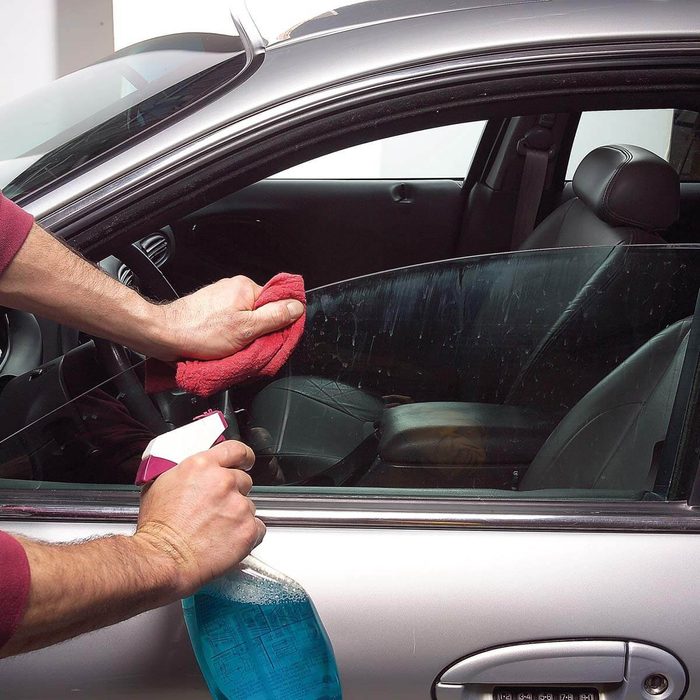
Wash the Windows
Don’t forget the top edges. Ever notice that line of grime on the tops of windows when they’re partially rolled down? Most people overlook this detail when giving their vehicle a quick wash. A few minutes with Windex and a clean rag is all it takes.
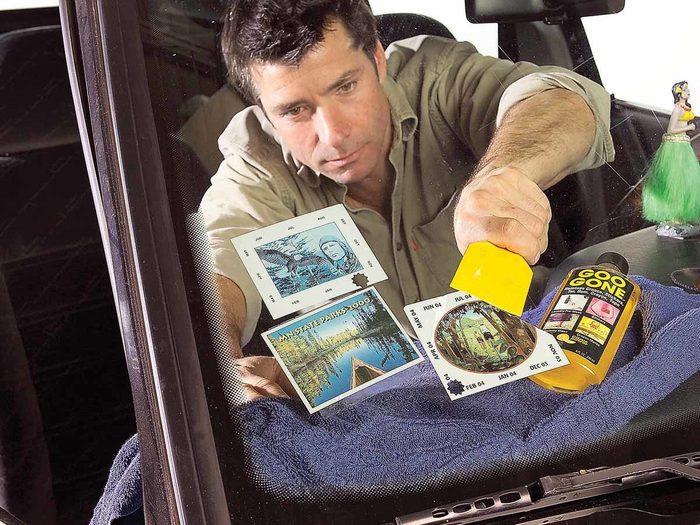
Scrape Off Old Stickers
While all of your national and state park stickers may call to mind great memories, they can be a visual hazard as they accumulate. The high-quality stickers will pull off if you can get under a corner and carefully pull them free at a 90-degree angle. Others will leave a gummy residue and require a bit more attention. Cover your dash with an old towel and dab on Goo Gone. Then scrape and wipe it off.
Here are more ways to remove bugs and bumper stickers on cars.
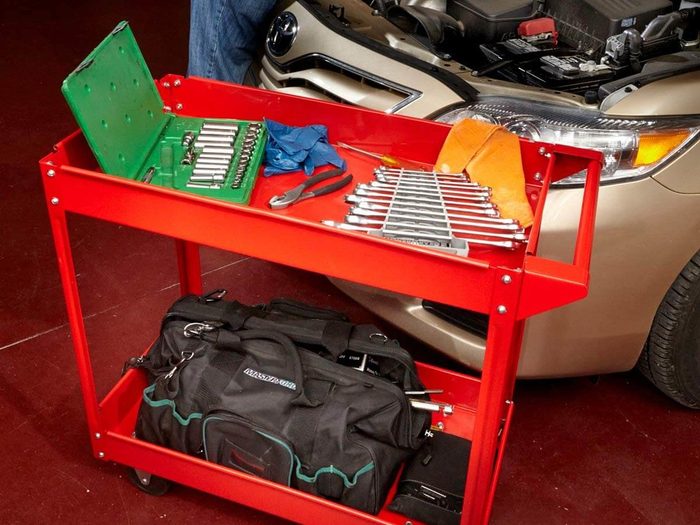
Keep Your Tools Handy with a Rolling Cart
In the old days you laid out the tools you needed on a fender pad. Try that on a late-model vehicle with a sloped fender and you’ll find your tools on the floor. So buy a rolling cart and keep all your tools right at your fingertips.
No car mechanic should be without these 20 essential tools!
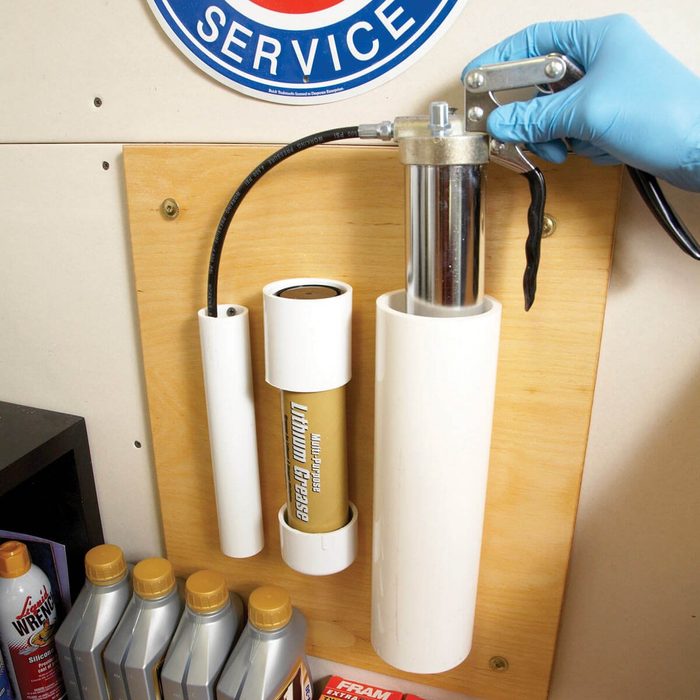
Grease Gun Holster
A grease gun is big and, uh, greasy. But you don’t have to get it on your drawers or cabinets. Cut a few sections of 1-in. and 3-in. PVC pipe and screw them to a plywood backer to make this slick grease gun holder. Then attach a 2-in. coupler and cap to hold a backup tube of grease.
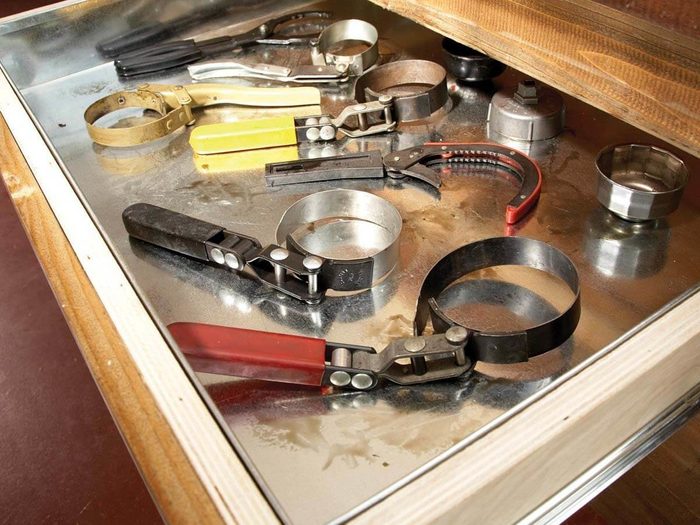
Sheet Metal Drawer Liners
If you use old kitchen cabinets in your workshop, it’s a bad idea to throw oily, greasy tools into those drawers, where the wood soaks up everything. So here’s a tip for you: Instead, take careful measurements of the width, depth and height to any HVAC shop. For about $20 per drawer, you can get a custom liner for each one. The interiors will look like new, and you’ll be able to clean them as needed.

Jack and Jack-Stand Holder
Haven’t you tripped over your jack stands long enough? Build this simple storage rack and get them off the floor. If you have a lightweight floor jack, add mounting hooks under the holder. Screw a 2-in. PVC coupler to the side of the rack and a 2-in. cap on the wall near the floor for the handle.
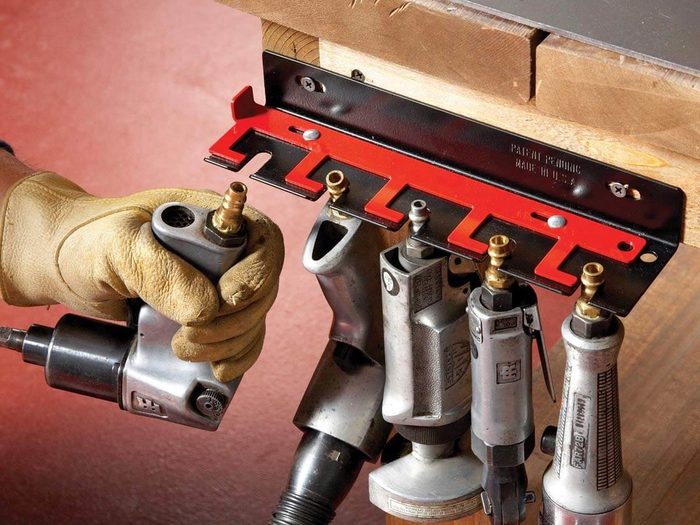
Air Tool Holder
Air tools don’t come with hooks, they don’t nest well in drawers, and on a workbench top they just add to the clutter. So plunk down 20 bucks for this locking air tool holder and your life will be complete. Your tools will be neatly organized on the wall, and you can snap on a padlock to keep them securely in place.
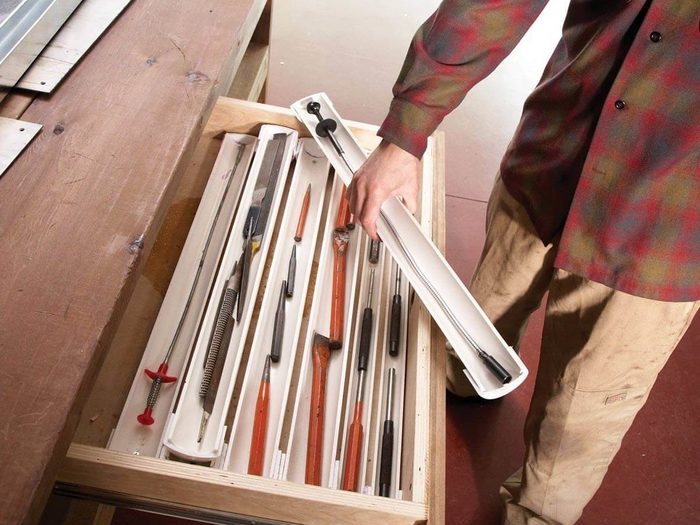
PVC Drawer Organizers
When you’re right in the middle of a project, you don’t need to waste time pawing through drawers looking for tools. So use this handy setup to keep your tools neatly arranged in your workbench drawer. Cut 1- or 2-in. PVC pipe to length. Glue on end caps and slice each pipe in half on a band saw. Screw them to the drawer bottoms and load them up!
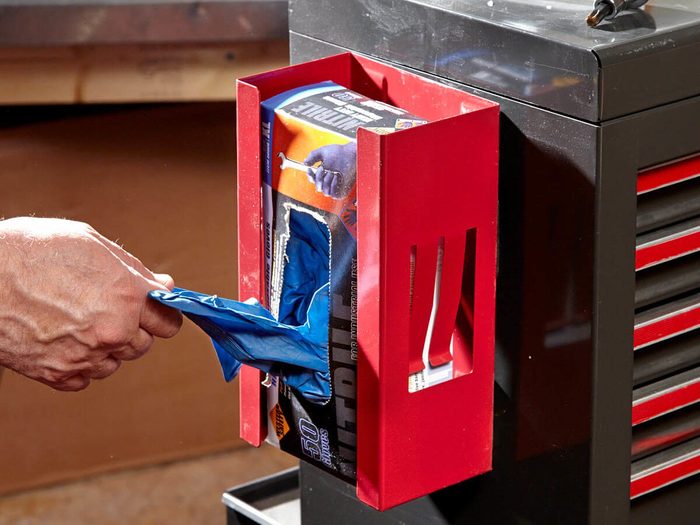
Grab One Glove at a Time
To keep your box of nitrile gloves handy and make it easier to grab just one glove instead of a handful, add this magnetic glove box holder to your shop. It costs about $20 at auto parts stores. You could even put it on your toolbox or rolling cart and yank out new gloves wherever you need them. You can also find many styles of glove dispensers online.
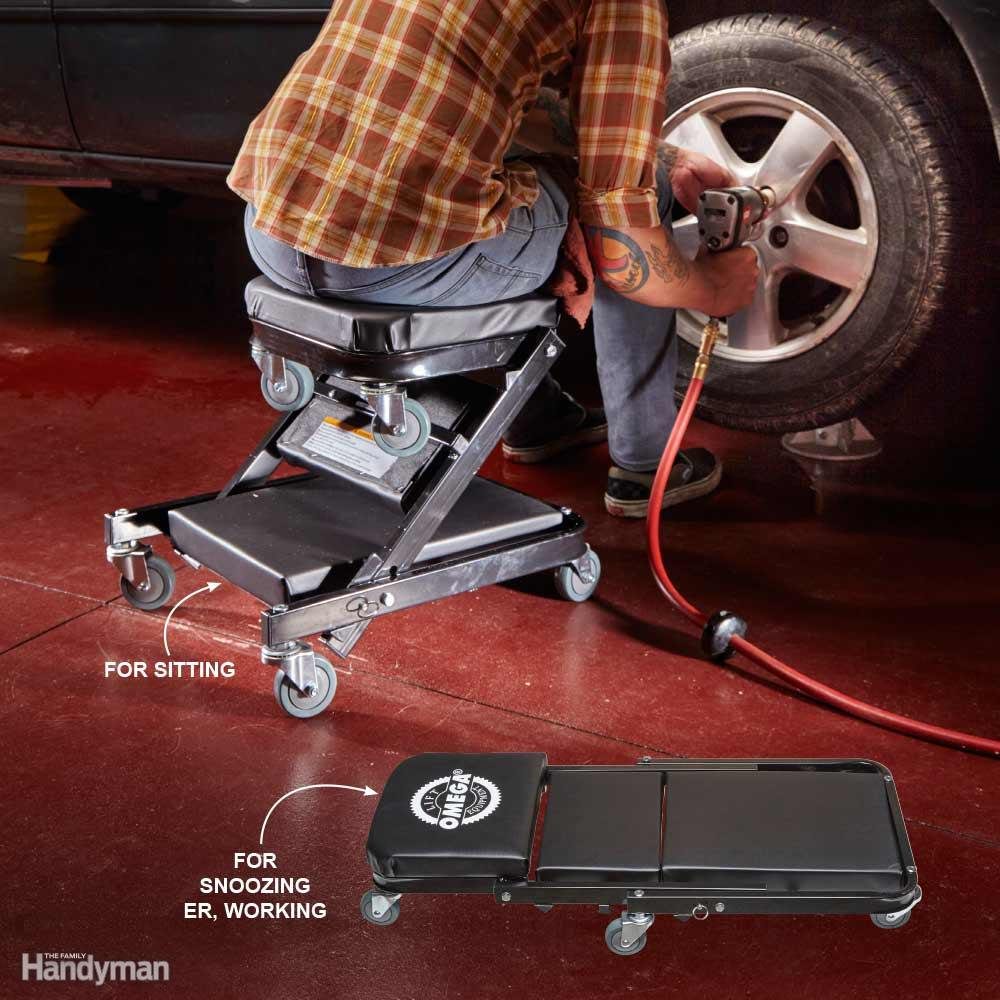
Convertible Creeper
Most creepers are hard, flat, unpadded boards with tiny wheels that get stuck in cracks in your garage floor. Not this one! Here’s a creeper that’s not only comfortable but also convertible. Pull the release pin and lift up on one end and you’ve got a roll-around seat that’s the perfect height for working around wheels. The padding is extra thick and the wheels are extra-large 3-in. soft polyurethane, so the creeper rolls smoothly, even over debris and cracks. It’s a bit higher off the ground than other creepers, so you’ll have to raise the vehicle an extra few inches. But it’s worth it for the comfort. The heavy-duty frame is rated for up to 450 lbs. for heavy-duty mechanics. The Omega 91000 Z Creeper is available online.
This is the safest seat in your car—it’s not where you’d think!
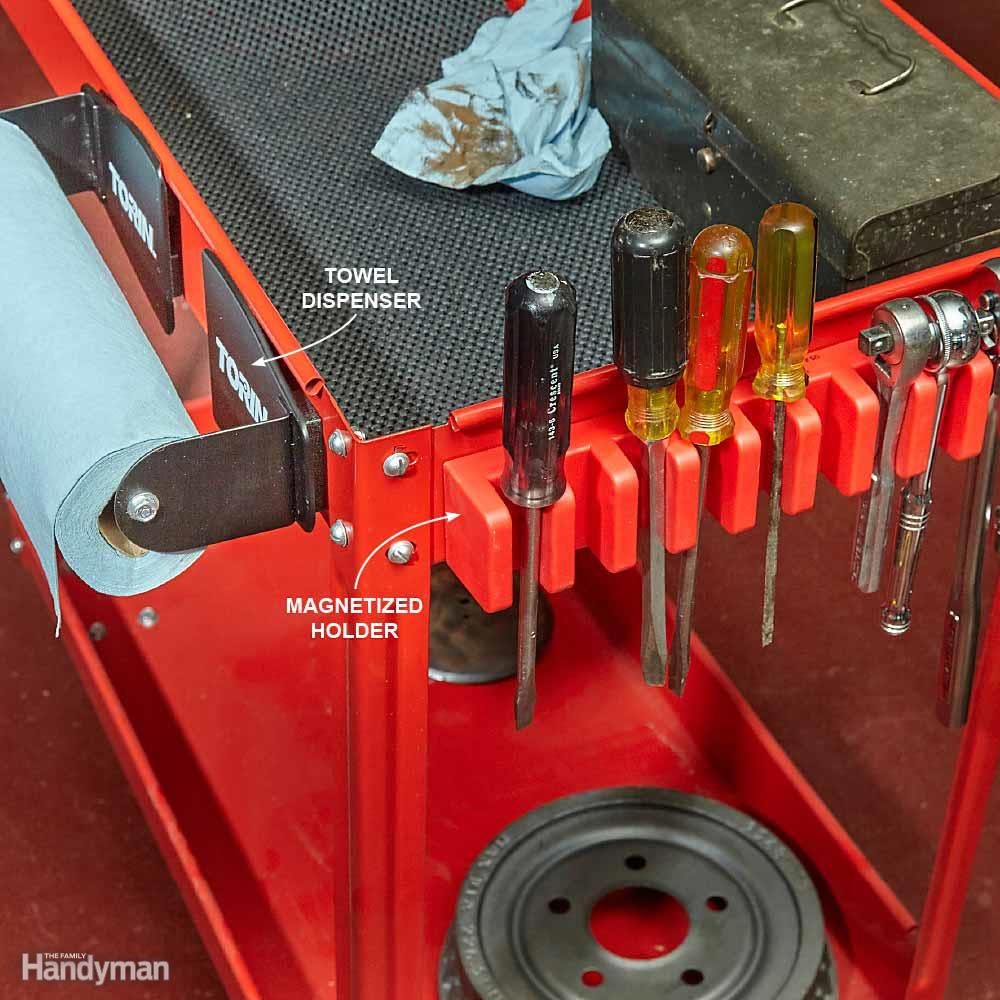
Keep Tools and Towels Handy
Set this magnetic tool organizer (Torin No. MPH10RT) onto a rolling cart and keep up to 10 tools at your fingertips. For easy access, mount the shop towel holder on your toolbox, cart or under the hood.
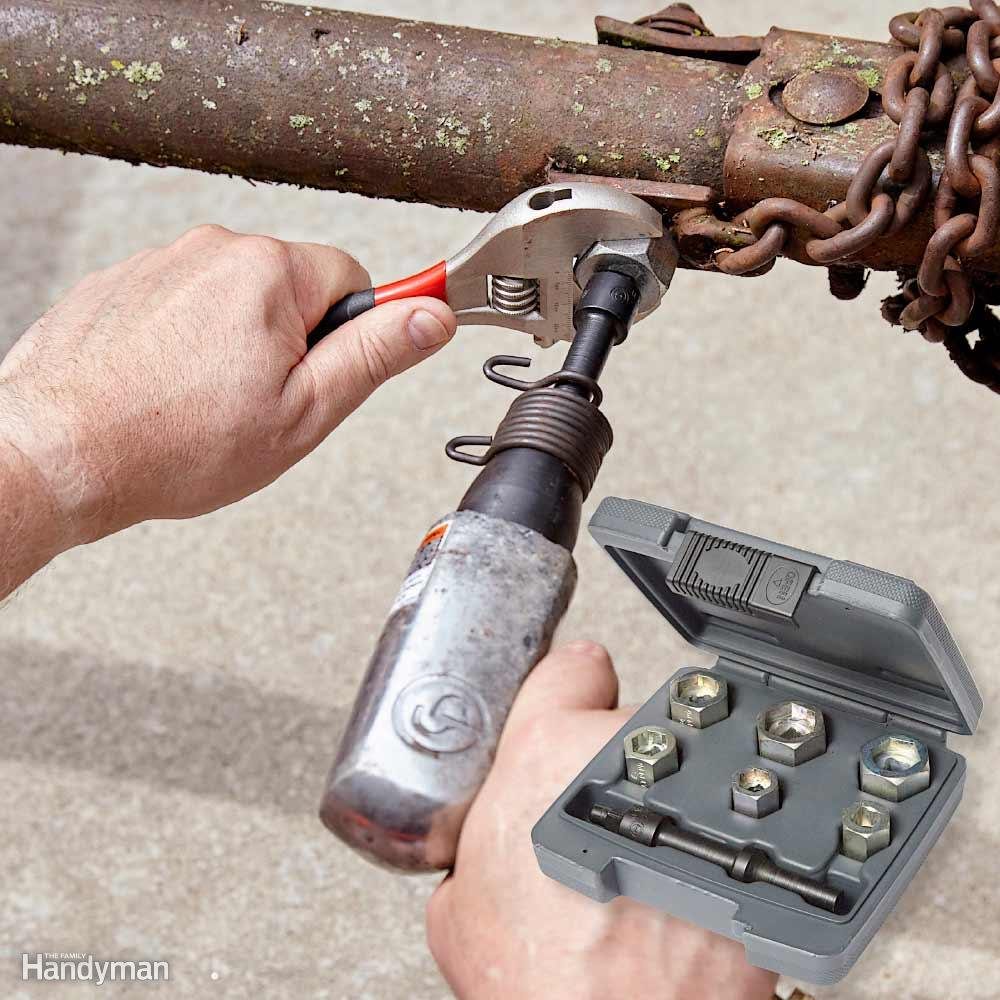
Blast Off Seized Bolts
This tool and a can of rust penetrant are the secret to removing stubborn rusty seized bolts. Load the driver tool into your air hammer and slide on a socket and wrench. When you hit the trigger, the driver applies the impacts to the centre of the bolt head, demolishing the rusty buildup. Turn the wrench and socket during the impacts and you’ll loosen the bolt or nut in no time.
These are the strangest things mechanics have found in cars.
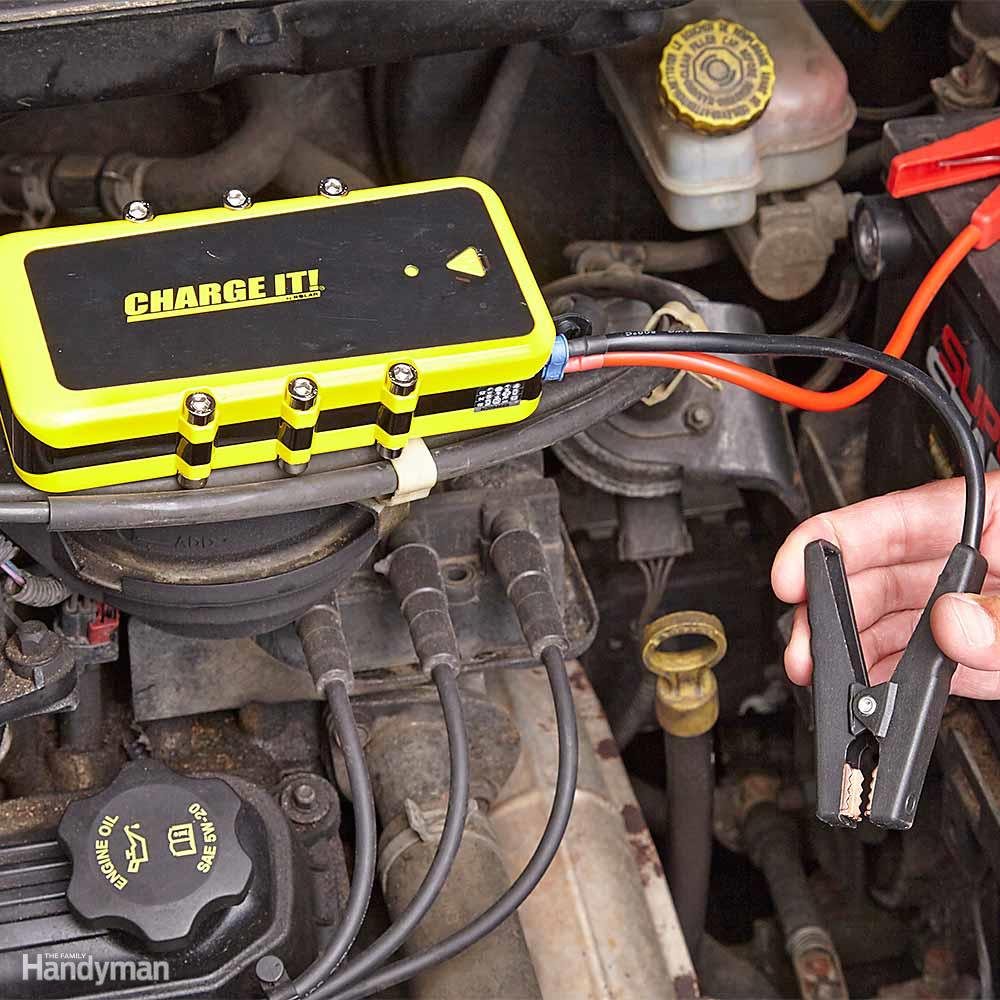
A Jumper Pack/Charger Combo
Recently there have been news stories of defective lithium jumper packs that burst into flames during a jump-start. But this lithium battery jumper pack (CHARGE IT, No. PP15) includes safety features to keep you off the evening news. The pack is small and lightweight (3.3 lbs.) and stays charged much longer than a traditional lead acid-type pack. The battery puts out 270 cranking amps—enough to start most four- and six-cylinder engines. And it comes with charging adapters and a USB port to charge your phone or tablet. Buy the optional 19-volt laptop charging kit and use the pack to charge your computer (PPA17).
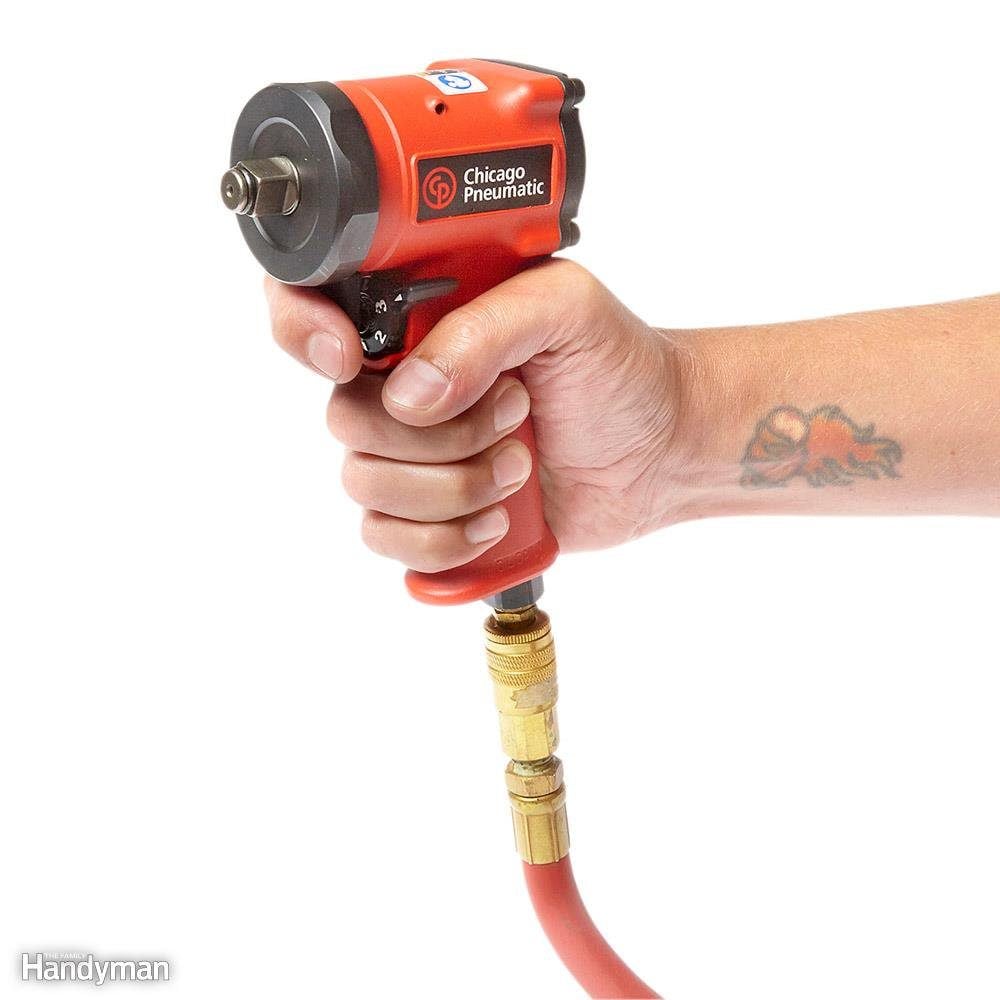
Stubby Impact Wrench
Sometimes you just can’t fit an ordinary air impact wrench into tight spaces. That’s where this ultra-compact stubby impact wrench comes in handy. It’s only 4.4 in. long and weighs only 2.86 lbs., yet it puts out 450 ft.-lbs. of torque.
Keep your car battery working at peak performance with our 10-minute car battery check-up.
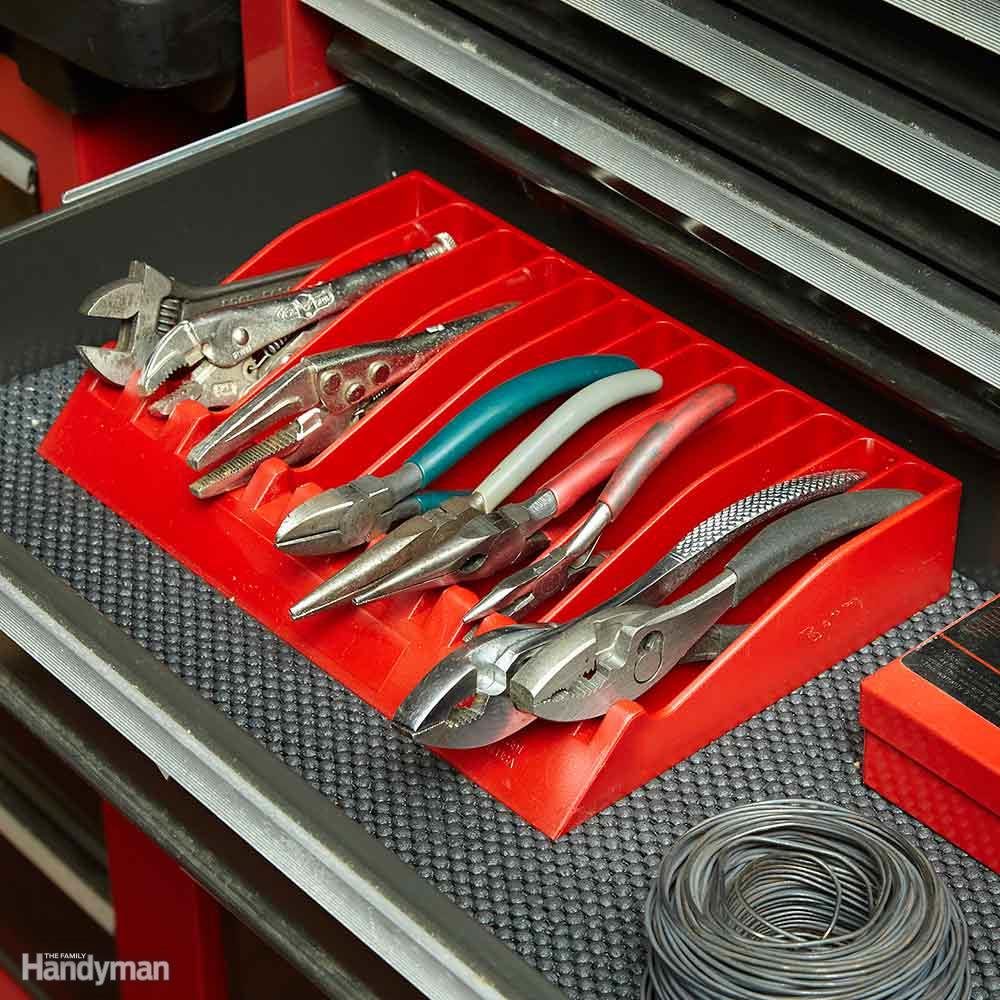
Pliers/Wrench Rack
Drop this nifty rack in a deep tool chest drawer and fit more pliers and wrenches in less space by storing them on their side. The Lisle No. 404090 storage rack holds up to 13 tools and has two different size slots.

Zip Through Metal With an Electric Cutoff Tool
Sometimes it’s just not worth the time and effort to save a rusted fastener or clamp. When I run into those situations, I break out my cutoff tool, slice through the rusted part and install new parts. You can buy an air-powered cutoff tool at any home centre for about $30, but it consumes a lot of air (10 cfm). If you don’t have a huge two-stage compressor, an electric version may be a better option. Cutoff tools aren’t just for cutting rusted parts. They’re great for cutting angle, shelf brackets and threaded rod.
Don’t miss these 13 ways you’re shortening the life of your car.
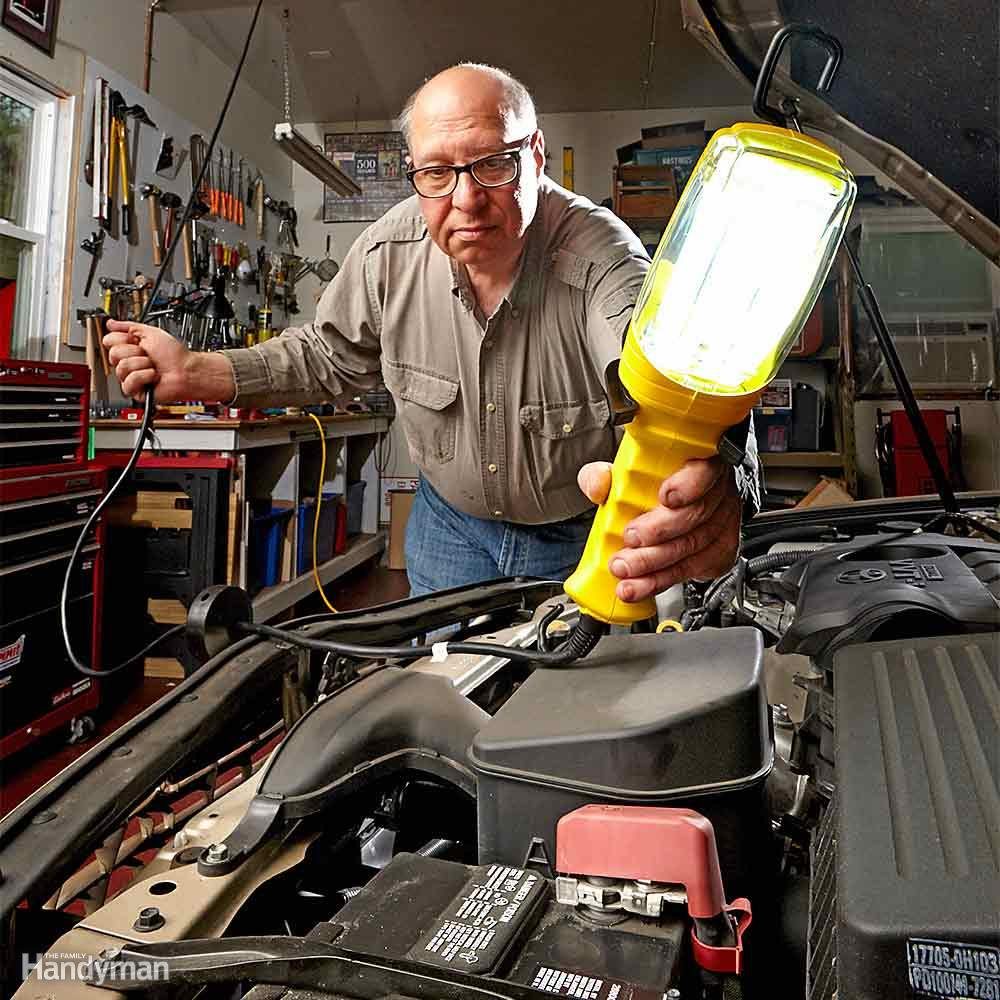
A Retractable Fluorescent Floodlight
Lighting up a jam-packed engine compartment that has deep, hidden components can be a real challenge. One solution is to use two lights: one to flood the entire area and a smaller one to fit in the tight places.
Incandescent trouble lights pose a safety hazard when used around gasoline, and it’s easy to burn yourself on the hot reflector. There are several alternatives. The long-tube fluorescents and LED ‘stick’ lights don’t cut it. They’re either too dim or too long, or they cast too narrow of a beam pattern. Instead, try a short-tube 26-watt fluorescent floodlight (Bayco SL-8908). The floodlight’s twin 13-watt bulbs match a 125-watt incandescent in output, so it really lights up the entire engine. You’ll still need a small light to illuminate the tight spots.
Check out how to recharge a dead car battery quickly—and safely.
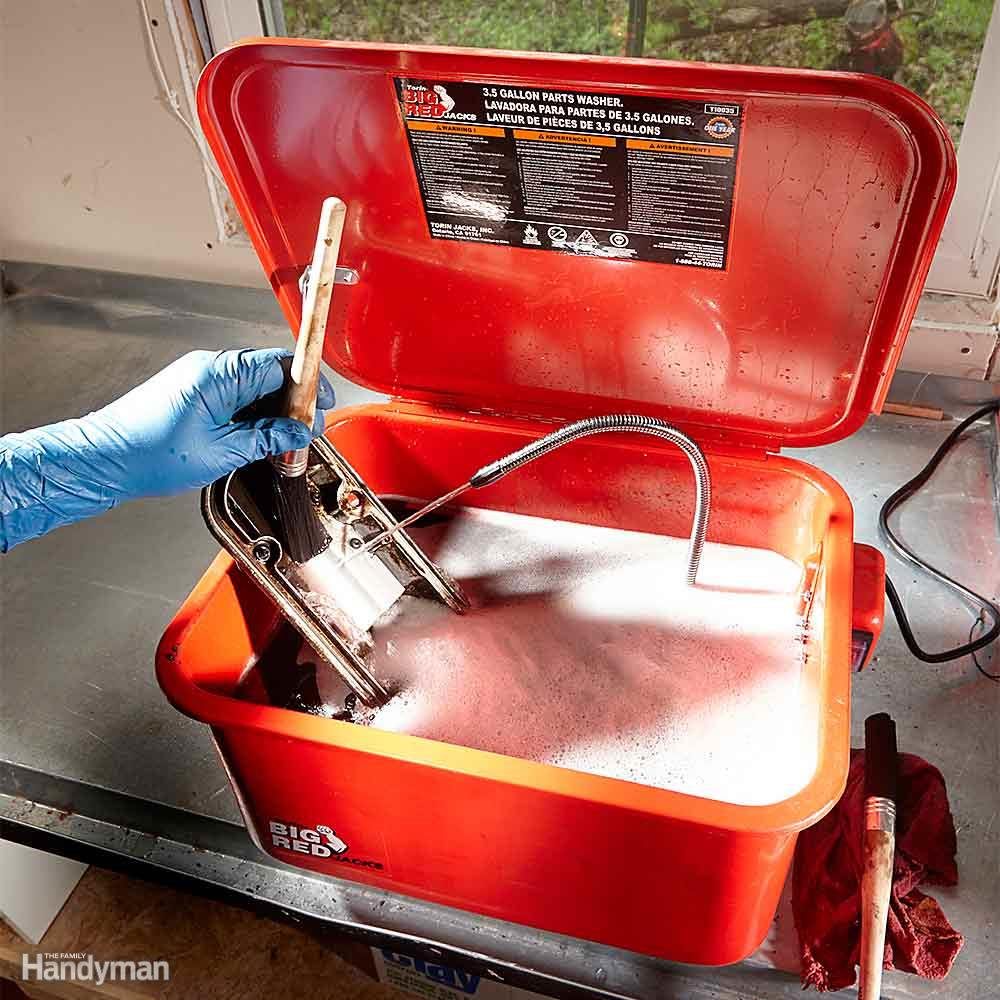
Parts Washers Aren’t Just for Pro Shops
I hate reassembling dirty, greasy, gritty engine and brake components. The dirty bolts cross-thread easily; gasket adhesive doesn’t stick well; it’s no fun to work on dirty stuff; and you can’t see what’s really going on underneath all the grime. That’s why I got a parts washer. This 3-1/2-gallon tabletop unit (the Torin T10035 Part Washer) is available at home centres and Amazon Add a parts washing brush and two gallons of concentrated degreaser and you’ll get out of the store for less than $65. Set it up and add water and you’re ready to clean all those greasy, grimy parts and bolts. And don’t forget to dunk your tools in the cleaner too. Just give them a quick wipe to dry them off before you put them back in your toolbox.
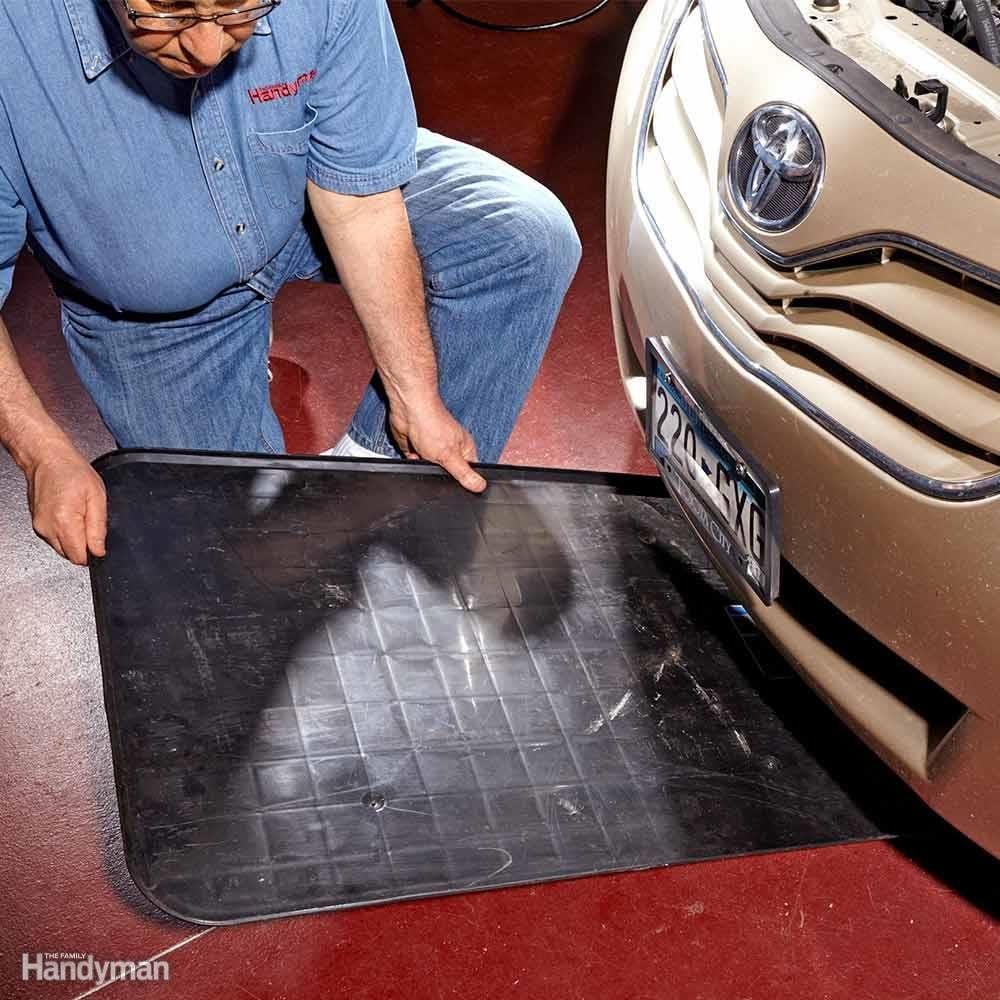
A Drip Pan Saves Time
Car repair is a messy business, and if you don’t use a drip pan or a large piece of cardboard, you’ll wind up with an oily mess on your garage floor. If you’re the kind of cheapskate who saves appliance boxes just for this purpose, more power to you. But the rest of you can easily afford to buy a real drip pan with a lip all around the edge. When you’re done, just pour the oil into your recycling bottle and put the pan back under your car to catch any remaining drips.
Armed with these expert tips, you’ll be able to replace your engine gaskets in no time.
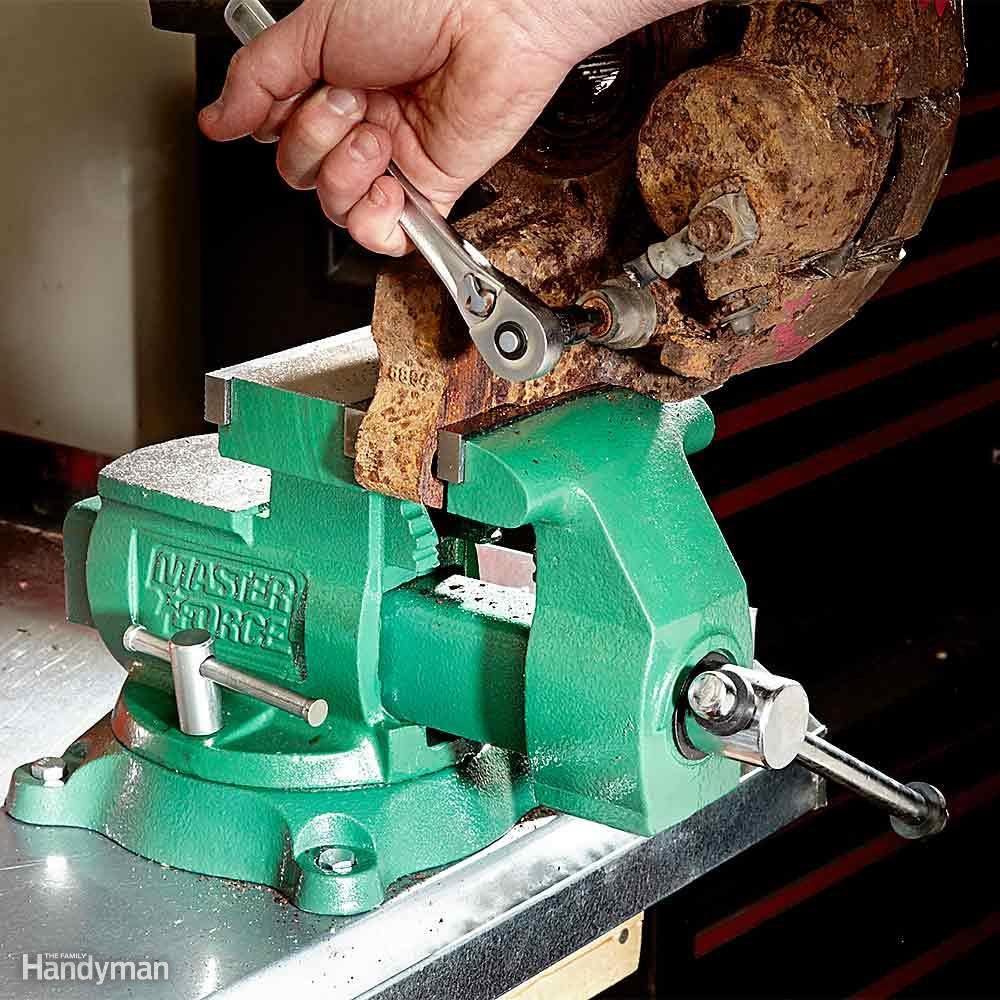
Get a Beefy Bench Vise
A wimpy $30 vise may satisfy your wallet, but you’ll regret buying one the first time you have to crank the bolts off a really big part. So skip the cheapies and invest in a heavy-duty vise. You want a vise with at least 5-1/2-in. jaws, a pipe clamping area, dual swivel locks and a large anvil area. I found this Masterforce model at a home centre for $100. But you can find great deals on good used vises on Kijiji or at neighbourhood garage sales.
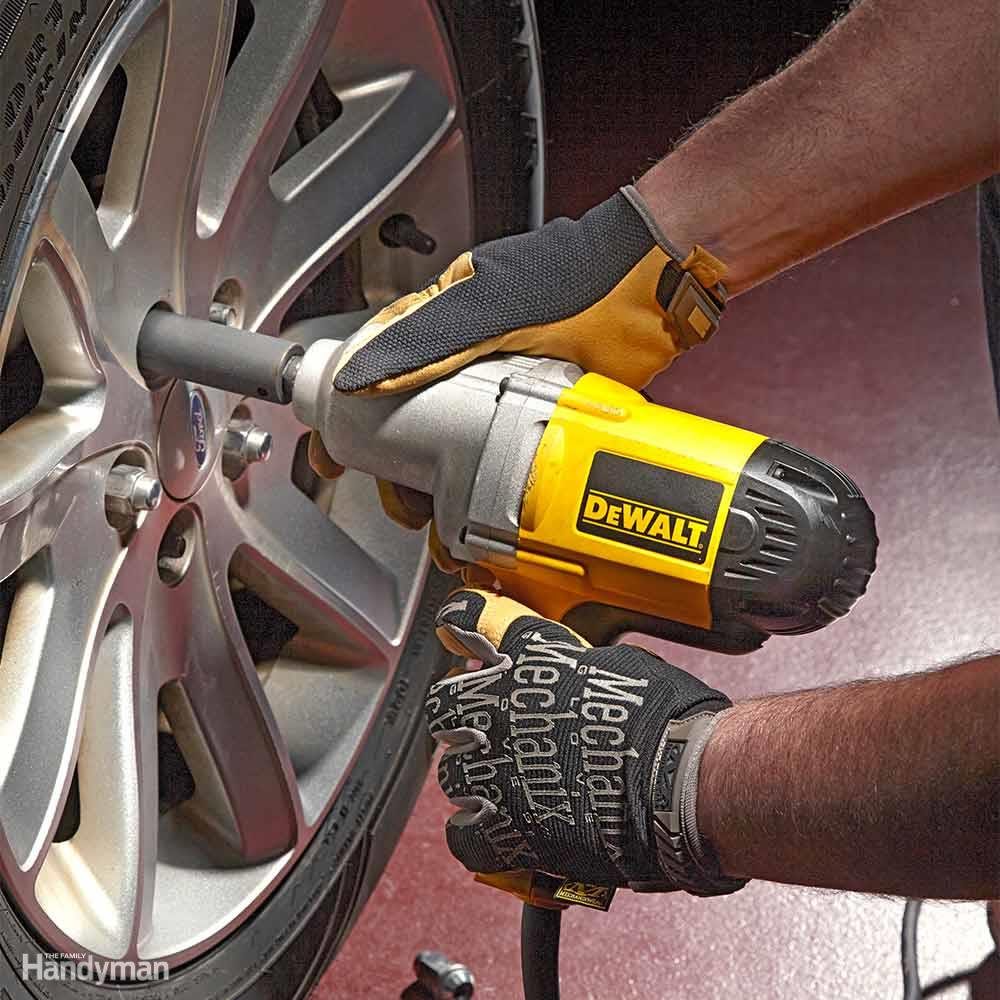
Fast Tire Changes With an Electric Impact Wrench
In less time than it takes your air compressor to pump up to full pressure, you could remove the lug nuts from two wheels using an electric impact wrench. Sure, the electric models don’t pack the same torque as an air-powered wrench, but you don’t need that much torque just to remove lug nuts. If all you’re doing is tire rotation and an occasional heavy-duty repair, an electric impact wrench is just the ticket (one choice is the DEWALT DW292 1/2-Inch 345-ft.-lb. Impact Wrench, available at home centres or Amazon). Just make sure you use a hand-held torque wrench to tighten the lug nuts.
Save Your Back and Knees With a Rolling Seat
A rolling creeper seat doesn’t need much explanation. You sit on it. You store tools and parts under it. And you roll around to reach the tools and parts you forgot. Find creeper seats at any auto parts store, home centre or online tool site.
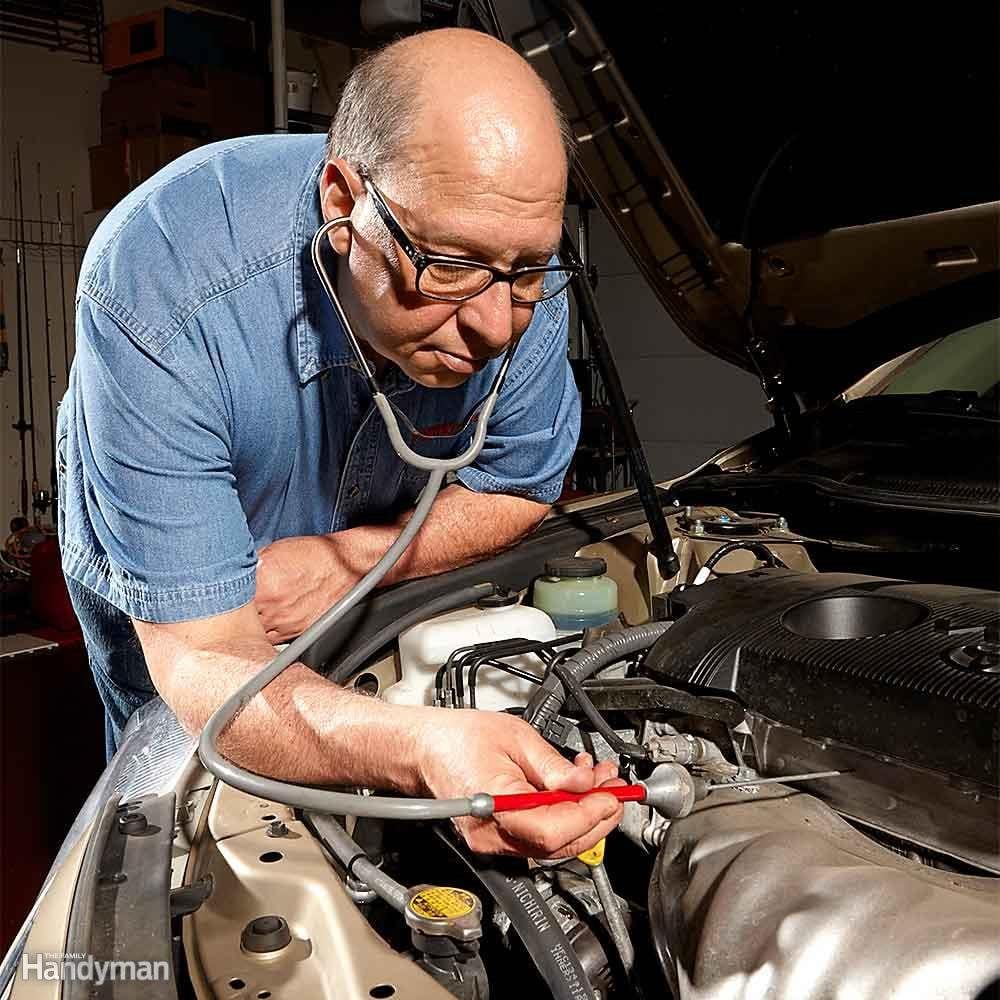
Diagnose With a Stethoscope
Got a knocking, ticking or humming sound and don’t know where it’s coming from? Pinpoint the problem with an automotive stethoscope (one example is the Lisle 52500 Mechanic’s Stethoscope). Just touch the probe to the most likely suspects and the culprit will stand out like a sore thumb. Pick up a stethoscope at any auto parts store.
Here are 12 myths you need to stop believing about your car.
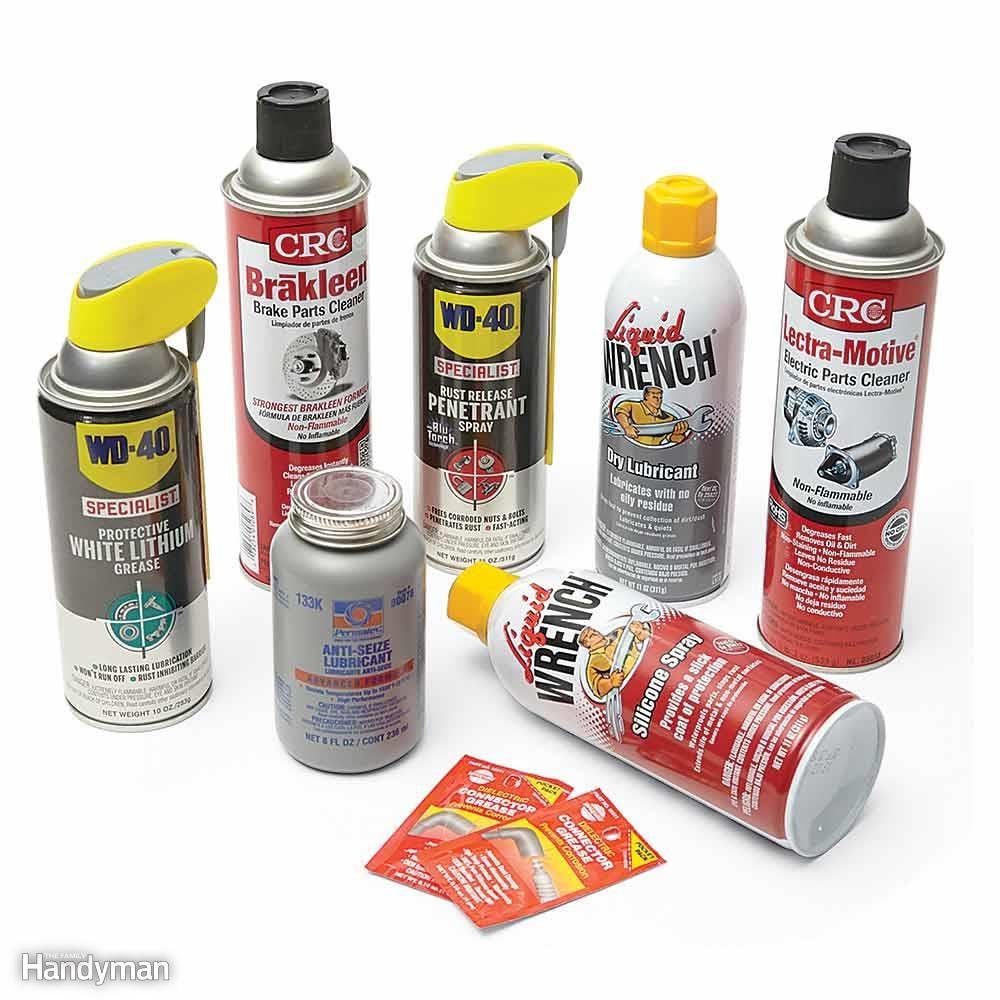
Chemicals to Keep on Hand
If you’re going to do repair work, you simply have to keep some basic lubricants and special chemicals on hand. Here’s what every shop should have.
- Lithium grease for latches and hinges
- Brake cleaner for removing oil and grease from metal parts
- Rust penetrant for removing rusted fasteners
- Dry lubricant for lubricating metal to metal, and metal to plastic or rubber
- Electronic parts cleaner for dissolving corrosion on electrical connectors
- Anti-seize lubricant to prevent nuts and bolts from seizing in place
- Dielectric grease to repel water in electrical connections and prevent corrosion
- Silicone spray to lubricate windows and weather stripping.
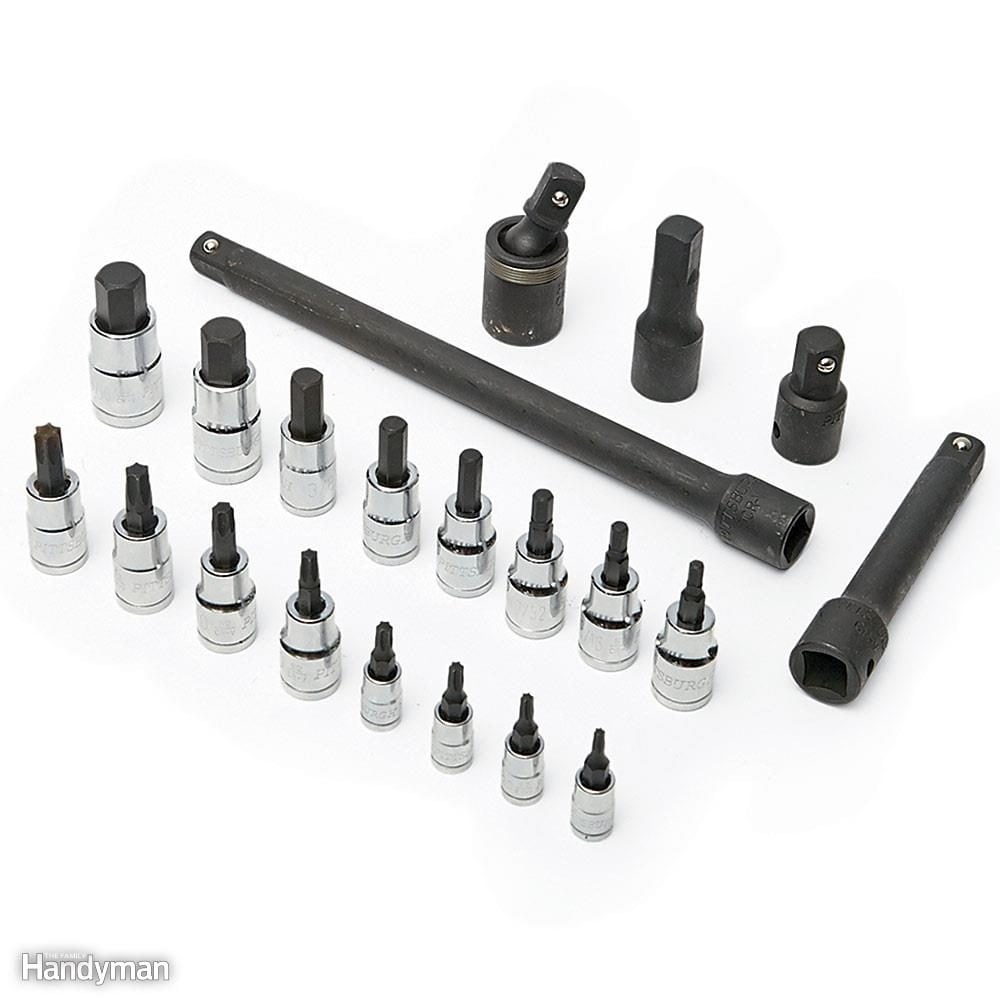
Must-Have Socket Accessories
Most cars, trucks, and lawn and garden implements use metric hex and star fasteners. So why wait until you’re knee-deep in a repair before you discover that you need a special socket? Buy a set of each style now. And if you use an air or electric impact wrench, pick up an impact-rated universal joint and several impact extension bars. Chrome sockets like the ones shown are for use with hand ratchets only, not impact wrenches.
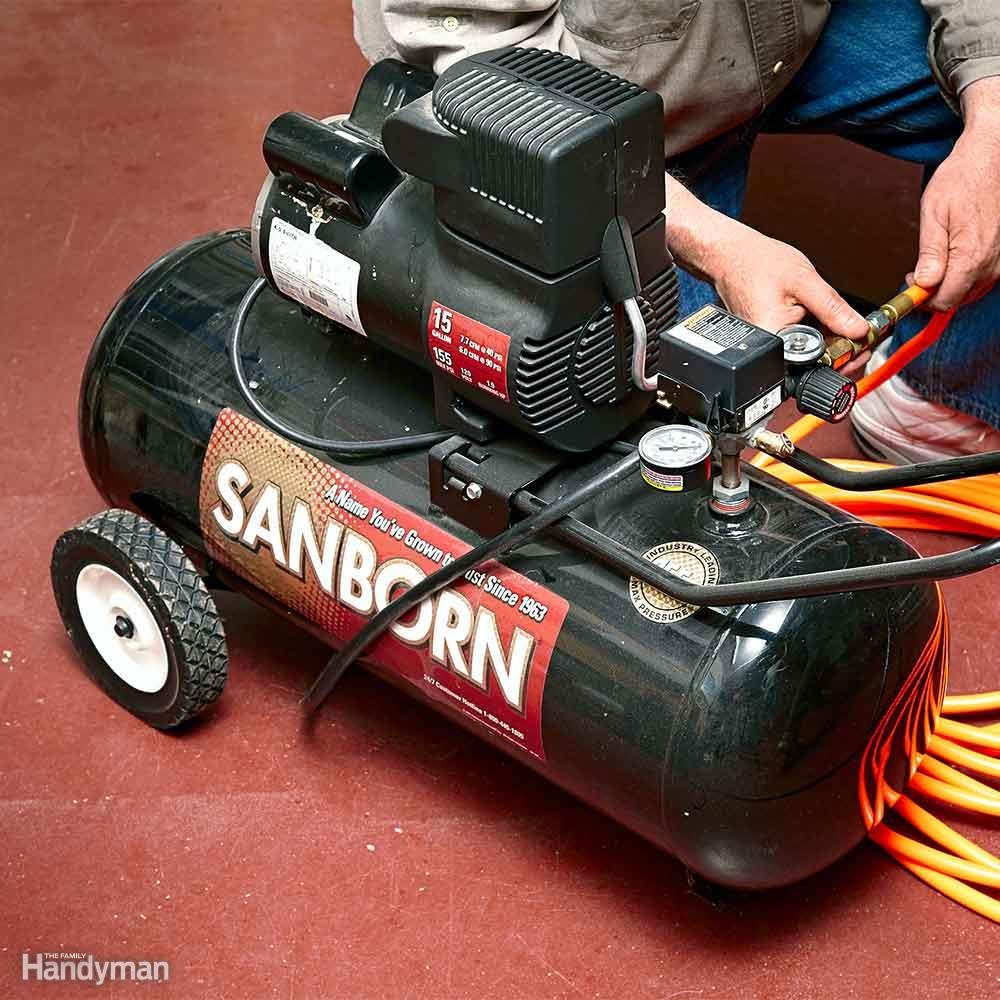
Save Your Knuckles With Air Power
An electric impact wrench is a heckuva lot better than a hand wrench. But seriously, nothing beats raw air power and air tools when you want to make quick work of just about any auto or small-engine repair.
But first you need a real air compressor like the one shown, not some wimpy $99 2-gallon unit designed to run a nail gun. And don’t get suckered by horsepower ratings; they don’t mean anything. Instead, look for a compressor with at least a 15- to 20-gallon tank and a minimum output of 5 cfm at 90 psi. That’ll power just about any air tool you want, except a sandblaster. For that, you need at least 10 cfm, and a rich uncle.
Here are five uses for an air compressor you never thought to try.
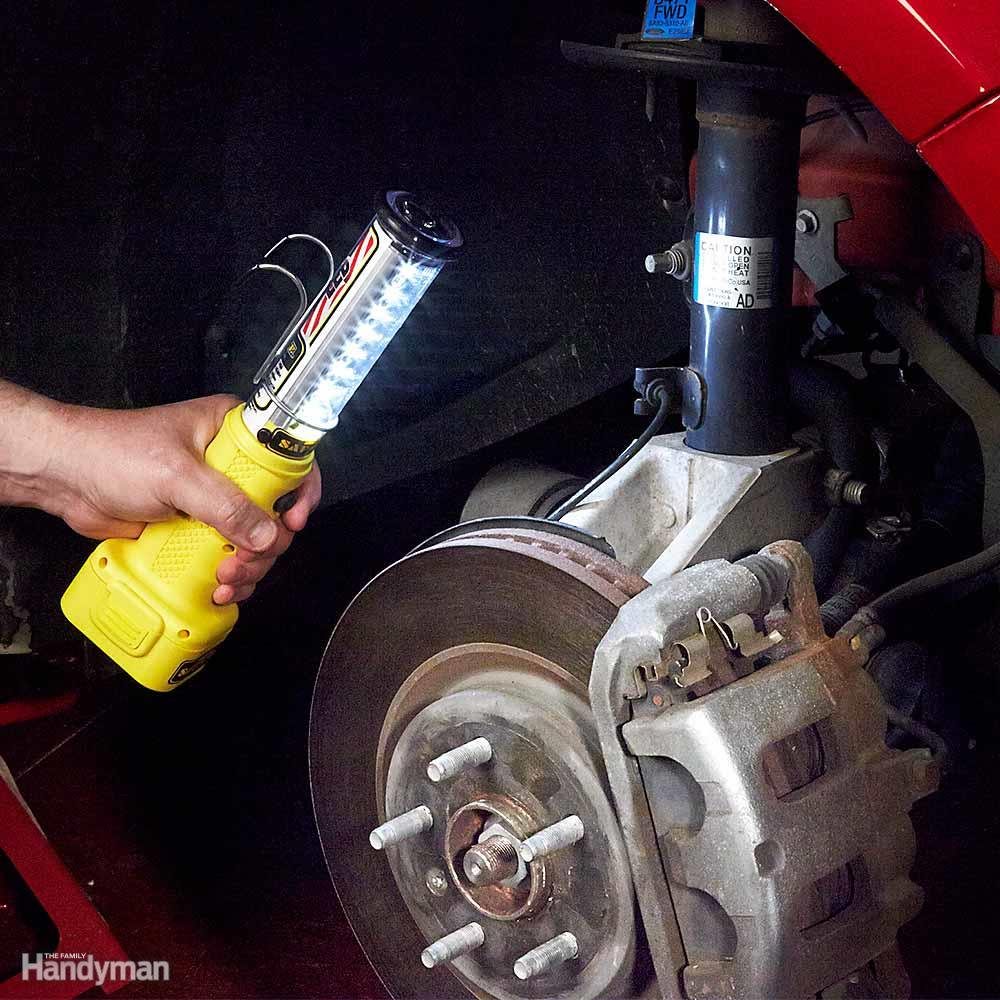
LED Light Fits in Tight Places
When it comes to working in small spaces, fluorescent lights are too big, and flashlights aren’t bright enough (and don’t stay put). But the latest rechargeable LED lights fit the bill perfectly. They’re much shorter and brighter than first-generation 70+ LED stick lights. Plus the battery lasts longer (up to five hours on a charge) and recharges faster. So these LED lights are perfect for DIY auto and small-engine work, as well as home repairs. This Stubby II LED cordless light (available at tool stores or online) allows you to switch between a broad 120-degree beam and a focused, flashlight-size beam.
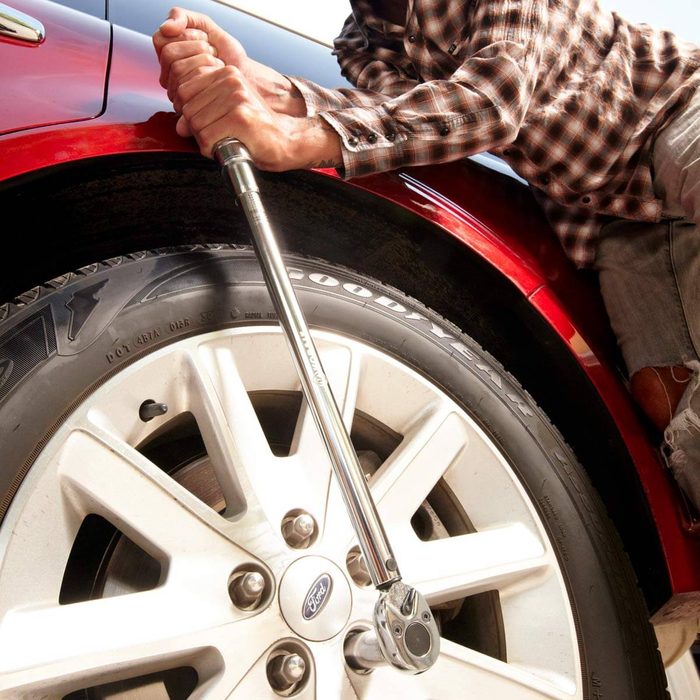
Get a Torque Wrench!
You may not think you need a torque wrench to install spark plugs or work on your lawn and garden equipment. But studies show that most DIYers overtighten just about everything. And overtightening leads to broken bolts, stripped threads and damaged equipment. With a torque wrench and the equipment manufacturer’s torque value in hand, the problem is solved: A “clicker” torque wrench makes an audible click when you’ve reached the set torque, and with a “beam”-style wrench, you just watch the scale and stop at the right number.
Torque Wrench Tips
Tighten fasteners in two steps— first to half torque and then to final torque. n Clean dirty or rusted threads before tightening, but don’t lubricate them unless instructed to by the equipment manufacturer.
Always dial the wrench back to zero (never below zero) when you’re done with it.
Never use your torque wrench as a breaker bar—that’ll damage the torque mechanism.
Handle with care—a single fall can knock the accuracy off by as much as 30 percent. If you do drop it, get it recalibrated before using it again.

Remove a Stubborn Oil Filter
We’ve all done it—overtightened an oil filter so much that it’s a bear to remove. If you think you can remove it by jamming a long screwdriver through the can and twisting, think again. The screwdriver will just rip the can open and you’ll be drenched in oil. When you’re done dealing with that mess, the filter will still be stuck and you’ll be even more frustrated. To remove a stuck filter, use a band-type wrench that you’ve lined with coarse-grit adhesive-backed sandpaper.
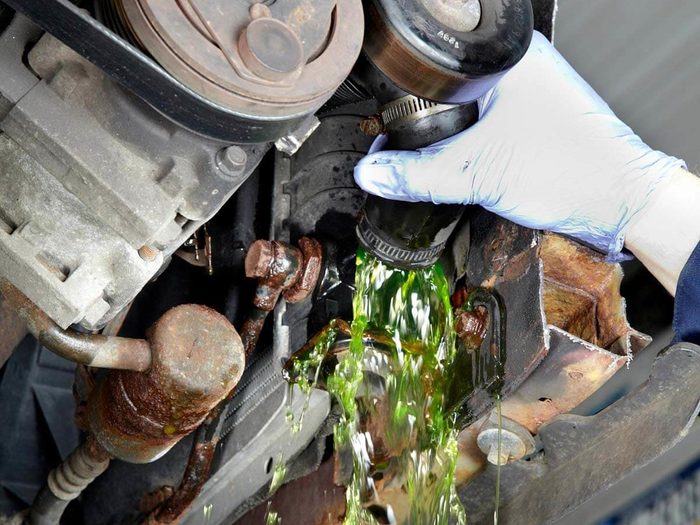
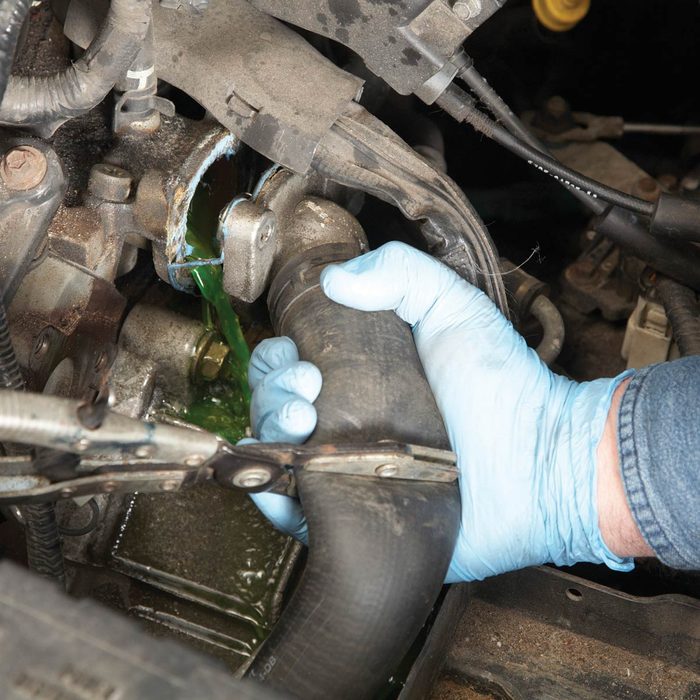
Change Your Engine Coolant
You can change your coolant yourself in about an hour. You’ll need to invest in an air-powered refilling tool to remove air pockets from the cooling system as you fill. You’ll save about $50 on your first coolant change and about $100 on each one after that.
These step-by-step instructions will make replacing a coolant hose even easier for you!
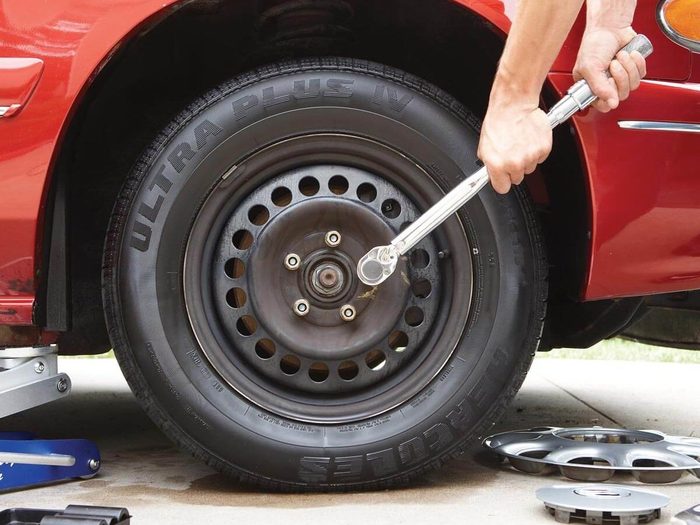
Proper Way to Torque Lug Nuts
Did you know there’s a right way and a wrong way to tighten lug nuts? Most people think tighter is better. Not true. Overtightening lug nuts is the No. 1 cause of warped brake rotors (called “brake rotor lateral run-out”). Warped rotors cause pedal pulsation and can increase your stopping distance. Overtightening can also break wheel studs. The stud itself doesn’t cost much ($3), but the labor to press out the old stud and insert the new one can run $50 to $75.
Spin the lug nuts on by hand. Never coat the stud with grease, oil or anti-seize. Lower the jack only enough to bring the tire into contact with the road. Tighten each nut to half the specified torque. Then lower the vehicle completely and tighten each nut to full torque. Consult your owner’s manual or a shop manual and set your torque wrench to one-half the recommended torque specification. Reset the wrench and tighten each nut to full torque. Move the socket from one nut to the next in a star-shaped sequence.
These are the 15 things you should do within 10 minutes of having a car accident.
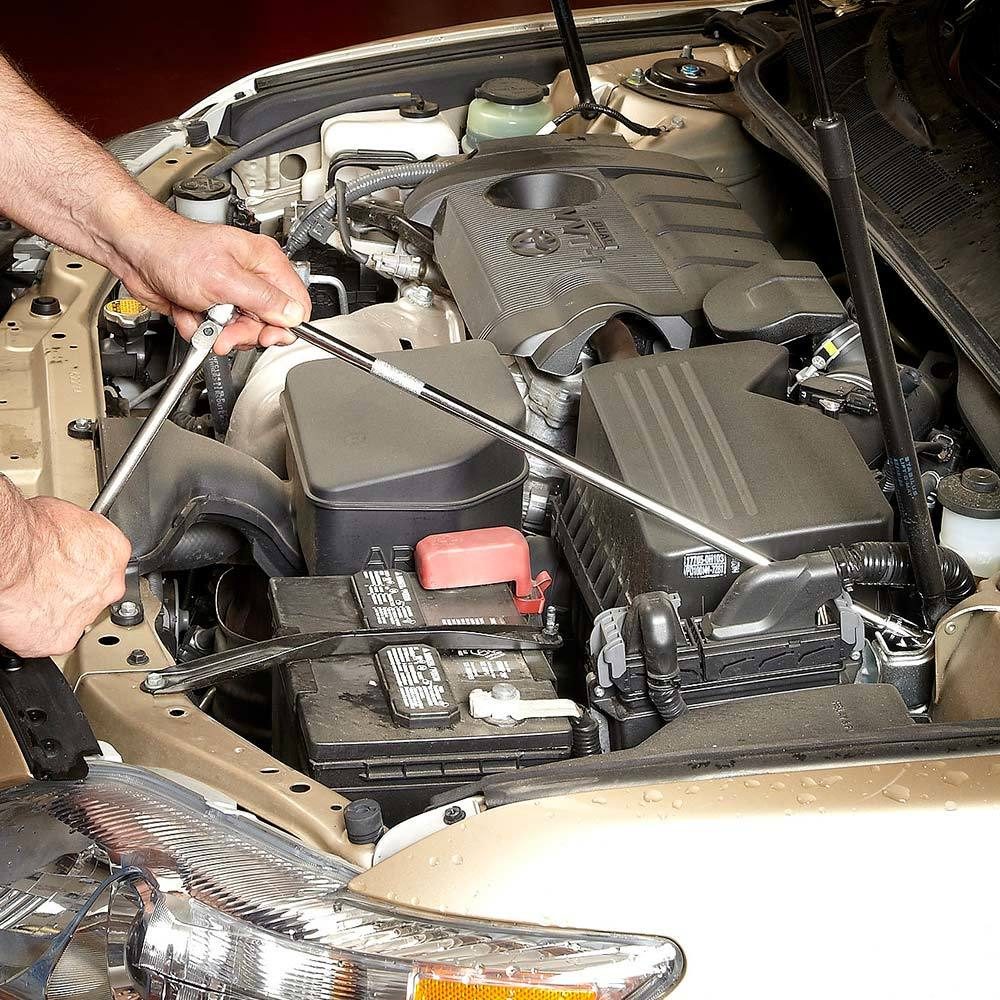
Save your back with a 20-in. extension bar
When you’re leaning over the fender and elbow deep into a tune-up, the tool you want is a 20-in. extension bar. It’ll save your back every time. Just snap your socket onto the end and ratchet away—while standing. The Kobalt 20-in. Extension (No. 337368) is at Lowe’s.
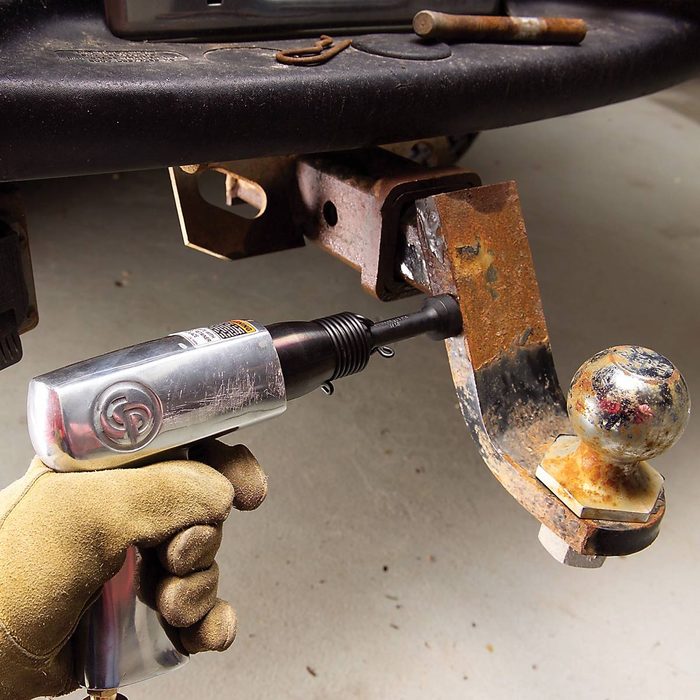
Free Up a Stuck Trailer Hitch
When the ball mount on your trailer hitch is rusted in place, don’t whack at it with a sledgehammer. Here’s what to do instead. Buy a can of penetrating oil ($6) and an air chisel fitted with a “hammer” bit. The air chisel will run about $15 and the extra bit will be about $8.
Spray the opening to the hitch receiver. This newest style of penetrating fluid chills the metal, causing it to contract to help break the rust seal. Then use an air chisel fitted with a hammer bit to knock everything loose. The air hammer will break up the rust, spread the penetrant and free up the ball mount. Once it’s free, just tap out the rusted ball mount with a regular hammer. If you plan to reuse the rusty mount, coat it with a rust converter or waterproof marine grease.
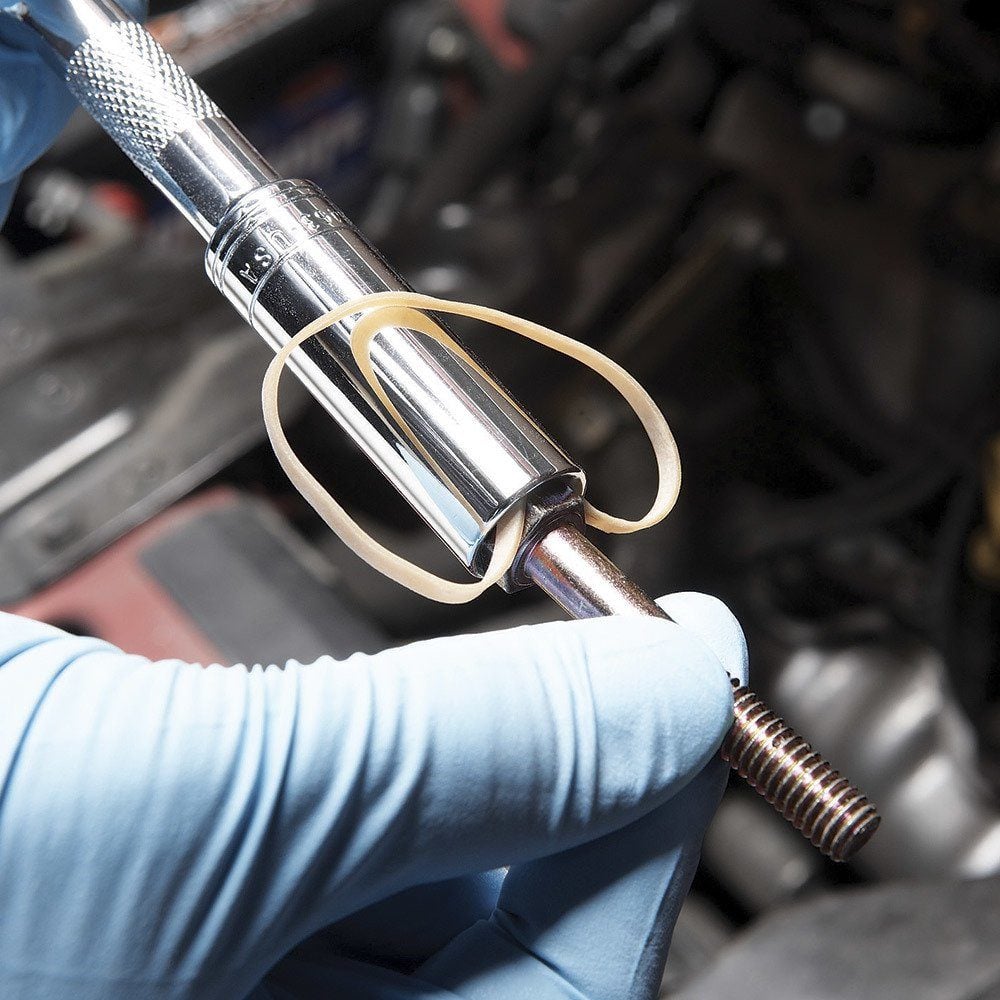
Rubber-Band Bolt Holder
Mechanics often use special magnetic inserts in sockets to prevent the bolt from falling out while they try to thread it into a tight spot. You don’t need to waste money on those gadgets. Simply cut a rubber band into strips and lay a strip across the opening of the socket. Then insert the bolt head. The rubber band will wedge the bolt head in the socket, allowing you to start threading without losing the bolt.
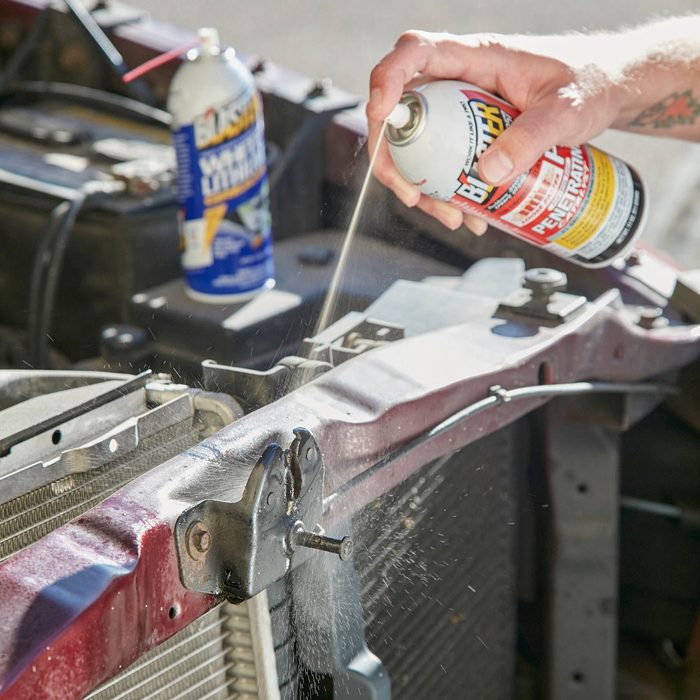
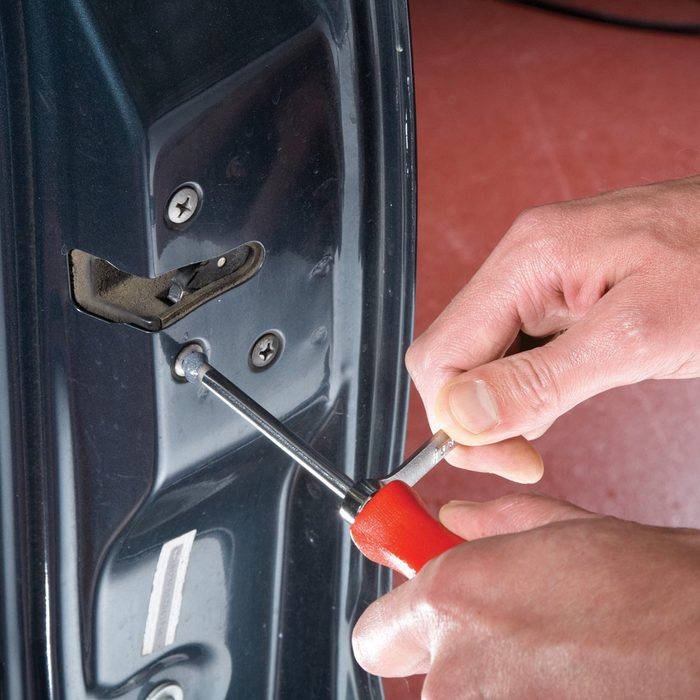
Free Up a Sticking Hood latch
If your hood doesn’t latch and unlatch easily, chances are it’s just rusty and dry. You can fix the problem in about 10 minutes with spray rust penetrant and spray lithium grease. Pop the hood and saturate the entire latch mechanism with rust penetrant. Latch and unlatch the hood several times until the mechanism works smoothly. The rust penetrant won’t last long, so you’ll have to apply a better lube. Open the hood and spray all the moving parts with white lithium grease. Latch and unlatch the hood several more times and you’re good to go. There is a difference between rust penetrant and WD-40, which is still great at scaring away spiders, believe it or not.
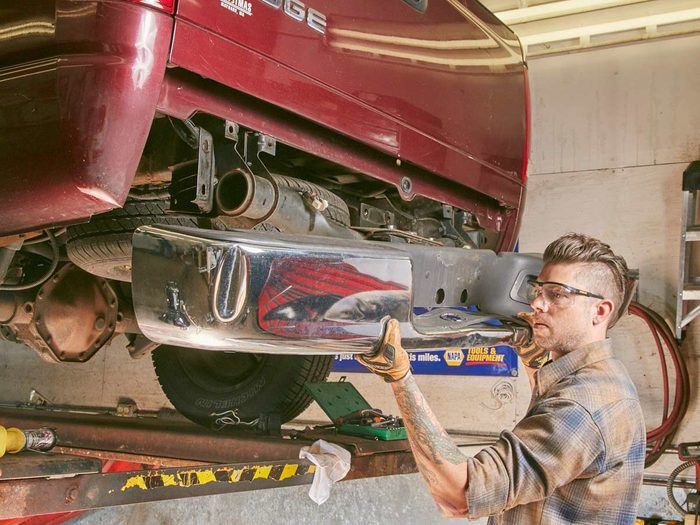
Replace a Pickup Bumper
A rusty or dented bumper can drag down the whole appearance of a pickup that’s in otherwise good shape. Having it replaced by a pro will set you back $1,000, but you can save $500 or more in labour and parts by doing the job yourself. It takes only a few hours.
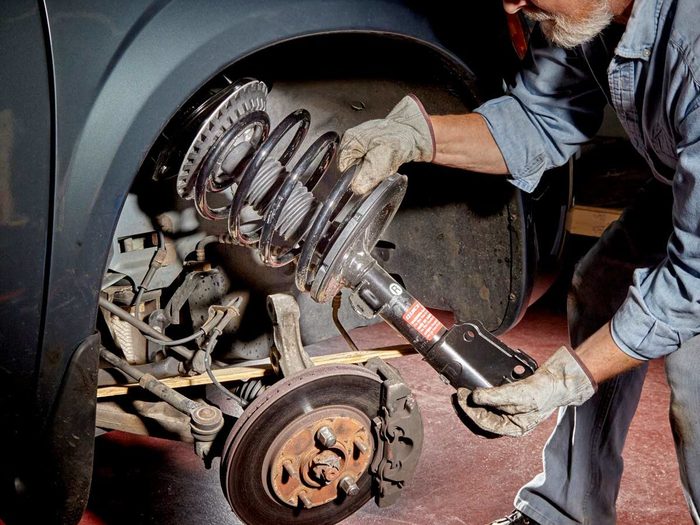
Replace Struts Yourself
If you’ve put 80,000 or more miles on your struts, they’re worn out and must be replaced. We know they’re expensive (about $700 for front struts replaced at a shop). But in the long run, driving on worn struts actually costs you more. You could save $300 doing struts yourself!
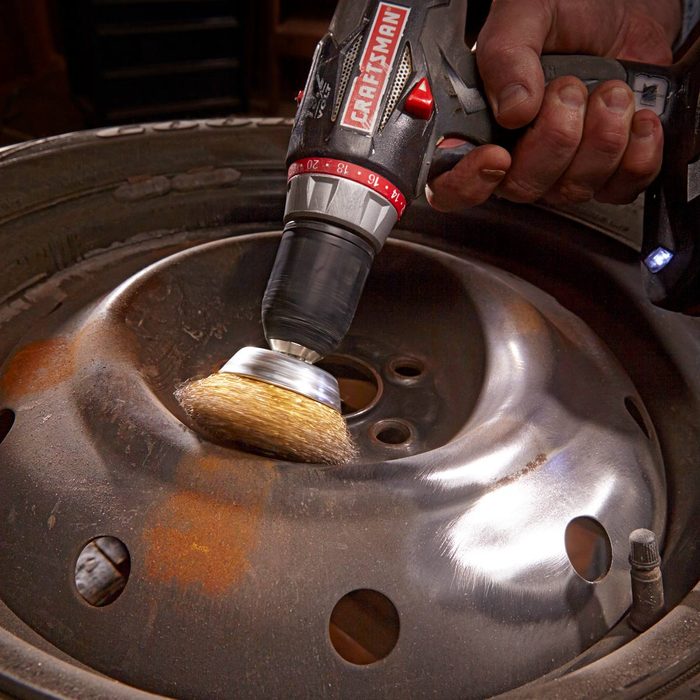
Refinish Wheels and Wheel Covers
Sometimes a middle-aged car can still look fine except for wear and tear on the wheels and wheel covers. Fortunately, you can fix this yourself for very little cash. Removing the rust and painting your wheels take a full day. (Don’t panic—mostly you’re waiting for paint to dry.) Then the wheels must dry for 24 more hours after painting before you remount them. So make other arrangements for transportation for a day. The supplies cost about $50 from any auto parts store. See how to refinish wheels at home.
Don’t Just Polish—Rejuvenate
You can rejuvenate your car’s finish yourself and get it pretty darn close to the factory shine. But it takes more than a simple wax job. The process starts with a good wash, followed by scratch repair, polishing and a protective wax finish. A pro would charge upward of $200 for this. But after a one-time $200 investment for a polisher and supplies, you’ll be able to make your whole fleet look like new. Your first attempt will take a whole day.
Don’t miss these brilliant ways to use car wax around the home.
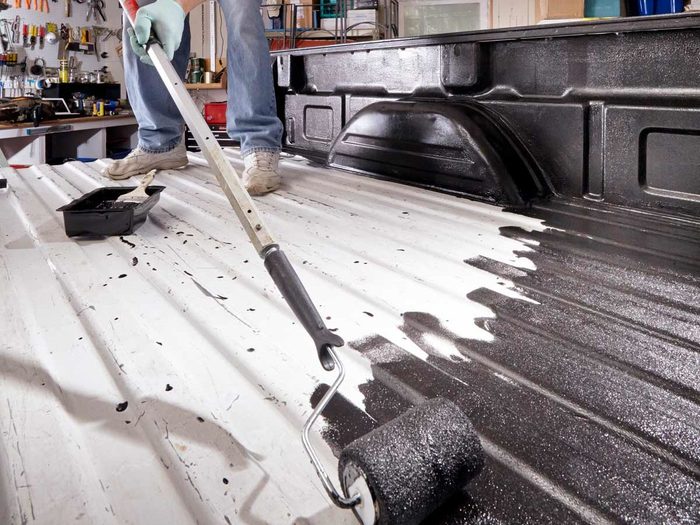
Roll on Your Own Bed Liner
Want to save money on a bed liner? Instead of a plastic liner or a professionally sprayed-on liner, try a DIY roll-on bed liner. You’ll get great-looking results at a fraction of the cost!
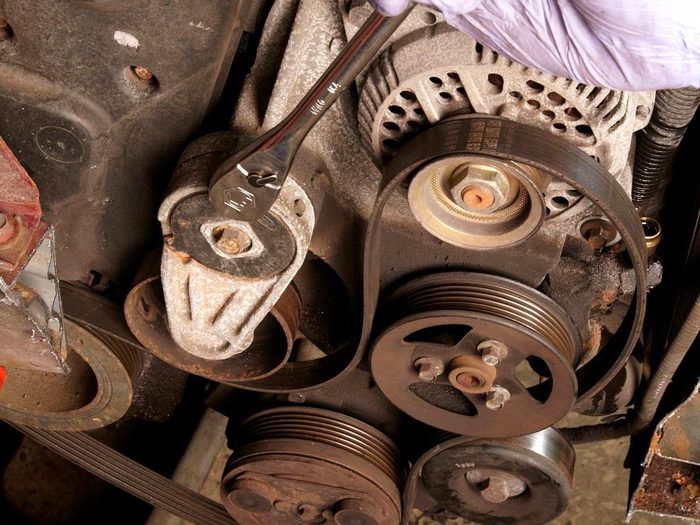
Replace a Serpentine Belt
Automatic belt tensioners, standard in most cars now, make changing a serpentine belt a simple DIY repair.
Check out how to replace a serpentine belt in about 15 minutes.
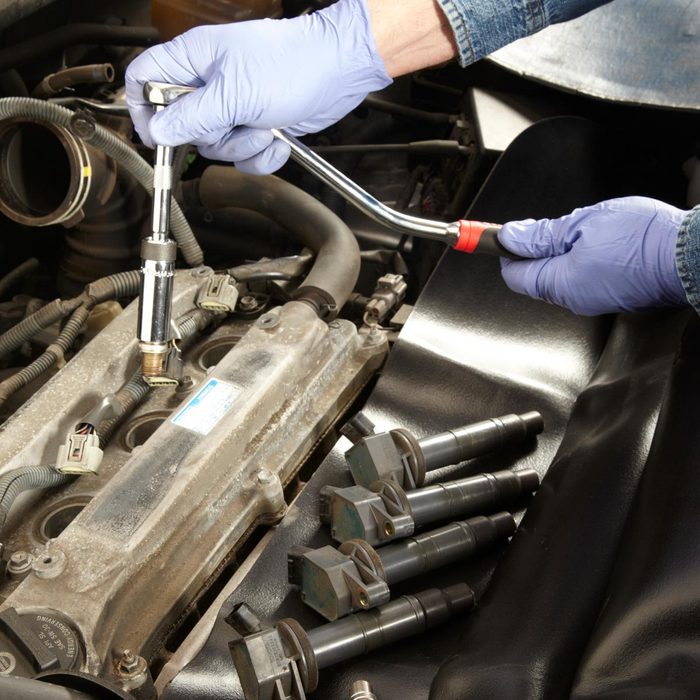
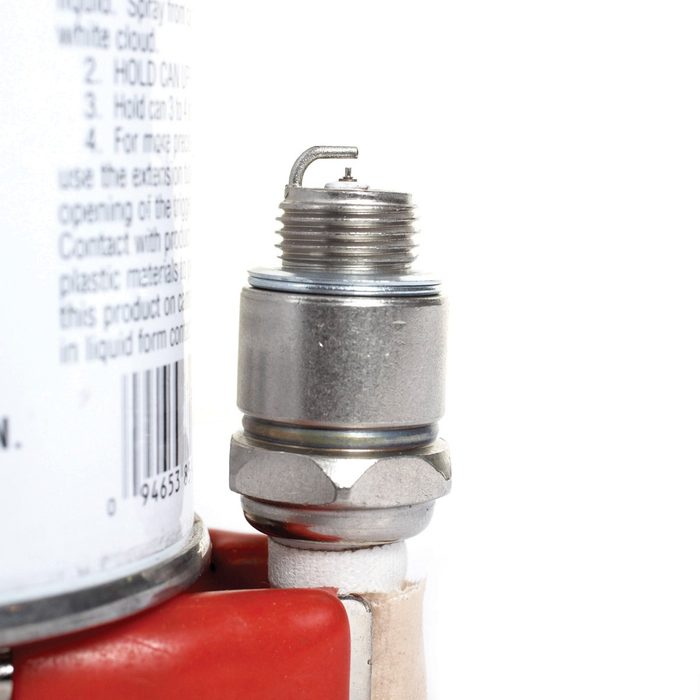
Change Your Spark Plugs
Change your spark plugs yourself to maintain peak performance and high gas mileage. In most cases it’s a simple job as long as you have the right tools. See how to replace spark plugs.
Recharge Your Car’s Air Conditioner
Improve the cooling of your car’s air conditioner with an easy-to-use A/C recharge kit.
These are the craziest things car mechanics have seen on the job.
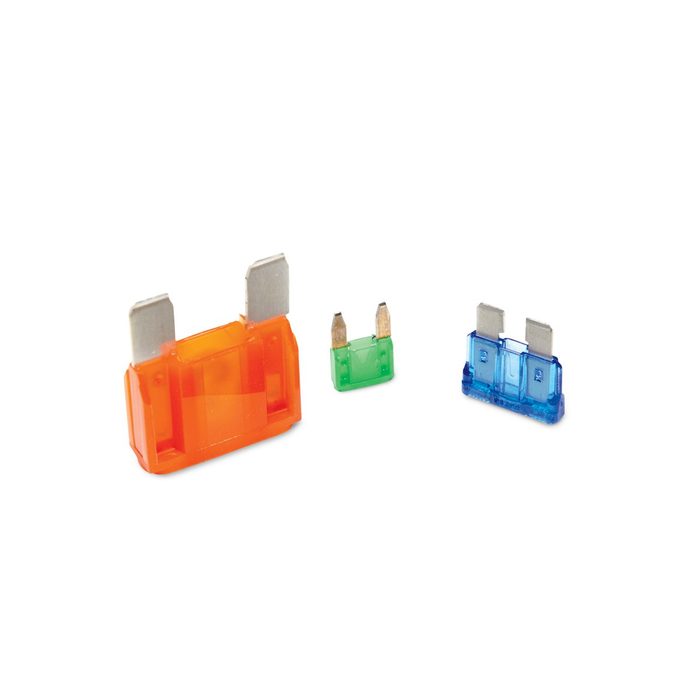
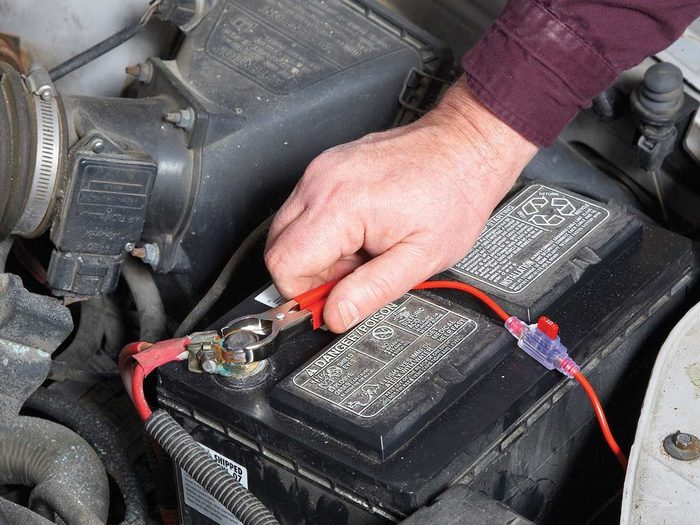
Find and Replace a Blown Fuse
Cars run on electricity as well as gas, and almost all of it runs through fuses. It takes about five minutes, costs about $1, and it’ll save you the hassle of a trip to the repair shop.
Don’t miss these 13 weird car features you didn’t know you might have.

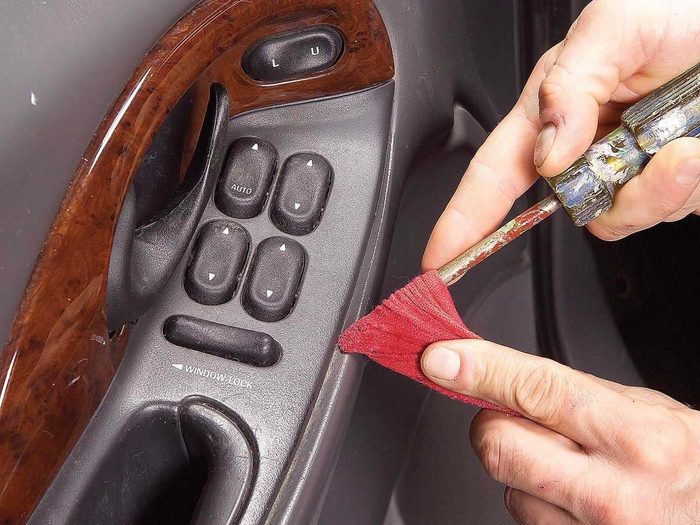
Add Graphite to Door Locks
Graphite powder keeps delicate lock mechanism working. We don’t think much about our door locks until the key breaks off in the cylinder. Keep these delicate mechanisms moving freely with a blast of dry graphite powder. You may need to push the dust protector flap back slightly with a small metal nail file to get at the lock. A quick pump of the tube will dispense enough graphite. Move the lock cylinder with your key several times to work the graphite into the mechanism. Do this to your trunk lock as well.
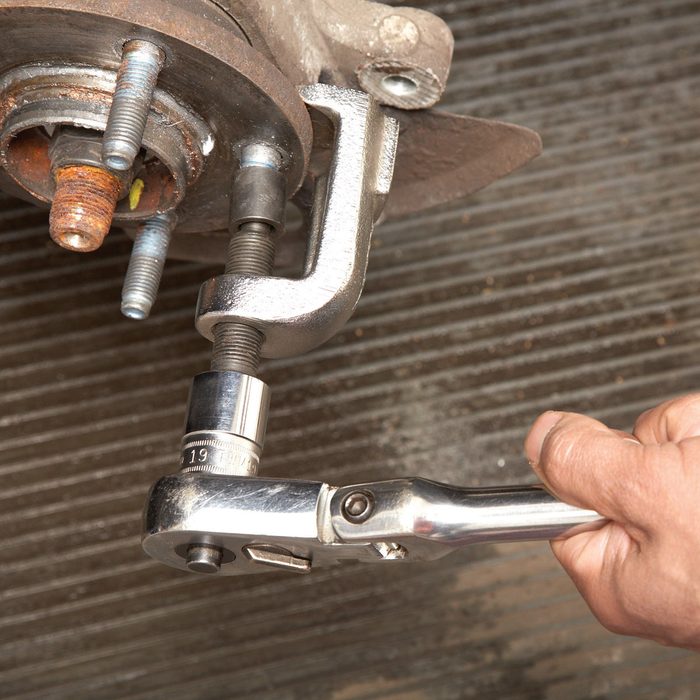
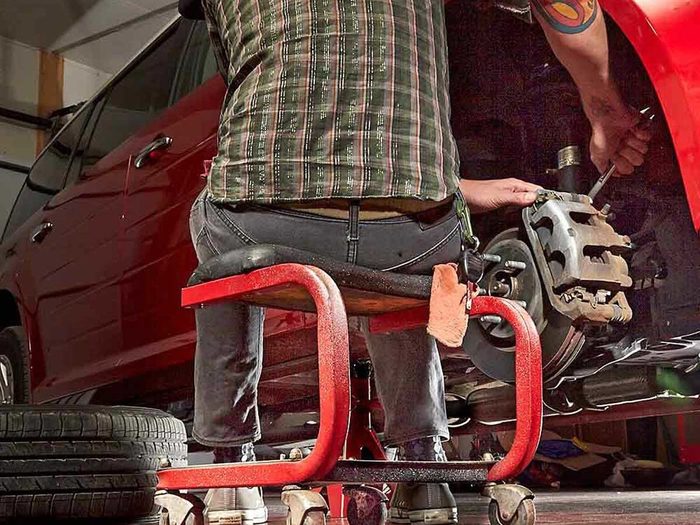
Replace a Broken Wheel Stud
Tightening lug nuts without a torque wrench can be a recipe for disaster. If worse comes to worse and you break the wheel stud, here’s how to replace it.
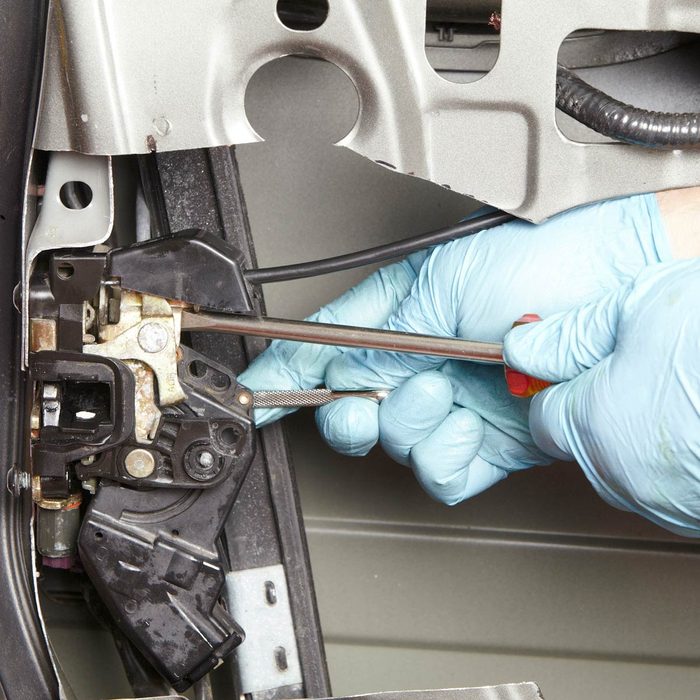
Fix Your Power Door Locks
Repair broken power locks by replacing the actuator, which is a common problem on late-model Fords. You’ll save on the shop fee plus some of the new part cost.
Find out how to fix power door locks—you could save up to $100.

Backup Alarms
Replace your vehicle backup bulbs with alarm bulbs to alert folks nearby for safer backing. It’s quick and easy. Or add a louder freestanding backup alarm under your vehicle.
If you own any of these 10 cars, it’s way more likely to get stolen.
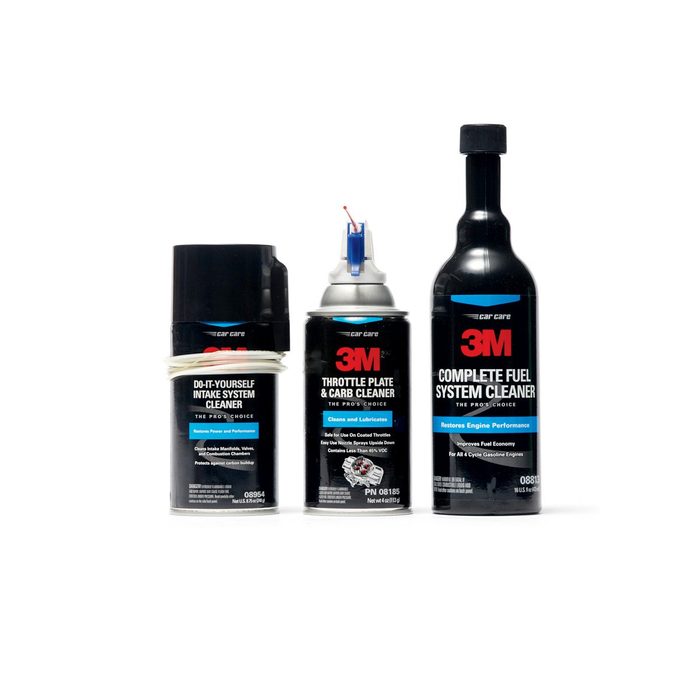
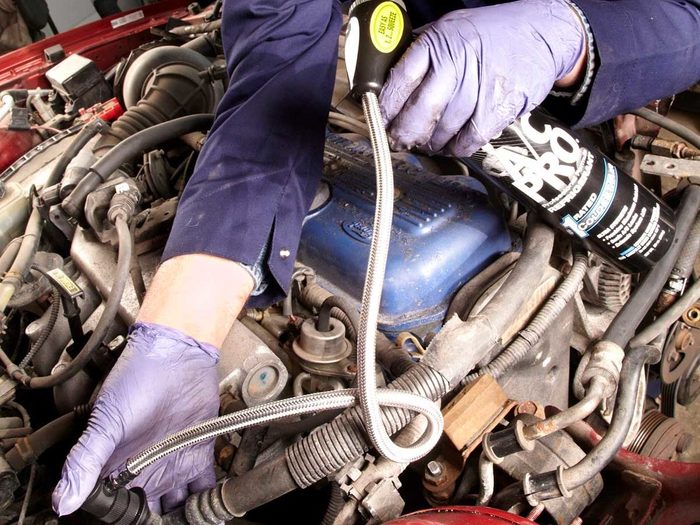
Clean Your Air/Fuel Intake System
Do you get a crummy idle or poor engine response when you put the pedal to the metal? You may have soot and carbon buildup on the valves, intake manifold and throttle body assembly, as well as clogged fuel injectors. Shops charge $80 and up to perform a fuel induction cleaning service. But you can do the same thing in about 30 minutes with the 3M No. 08963 Do-It-Yourself Fuel System Tune-Up Kit; $35 from Amazon. Watch the instructional DVD. Then grab the kit, a screwdriver, goggles and rags and you’re ready to bust crud.
This is the best-selling car of all time!
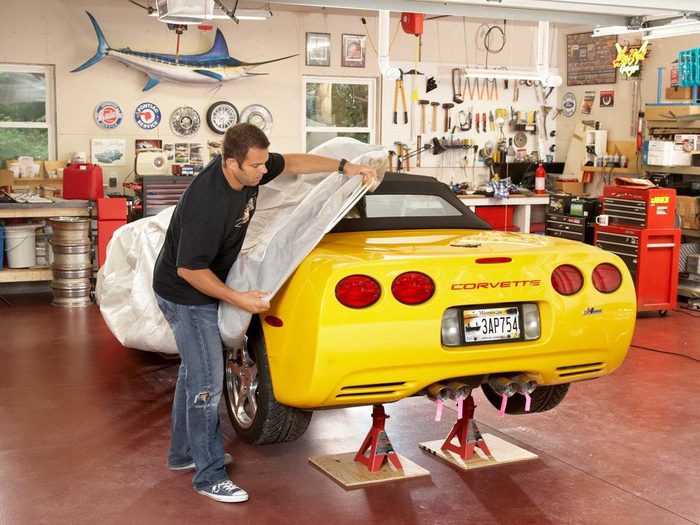
Done for the Season
When you store your sports car or classic car in the garage for the winter, a few simple steps and some proactive care will keep it in tip-top shape for the next outing.

Save Energy by NOT Flying the Flag
Think you’re sending a green or team message by flying a window flag down the road at a high speed? Think again. What you’re really announcing is that you like to waste gas. Normal aerodynamic drag accounts for 30 per cent of your fuel budget. But add those flags and antenna toppers and you use even more fuel. If you’re truly serious about saving fuel, ditch the doodads and drive the vehicle as it came from the factory—naked.
Manufacturers don’t want you to know these five ways self-driving cars can fail.
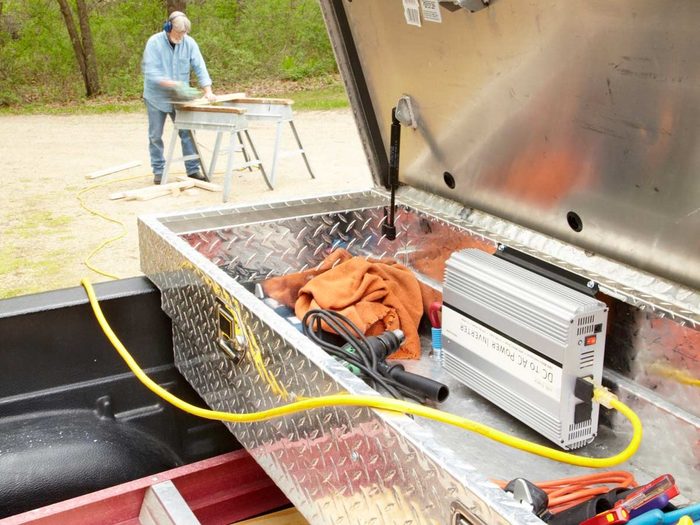
Turn Your Truck into a Generator
Generate power for corded tools anywhere you go without the cost and hassle of a gas-powered generator by wiring a power inverter to your truck battery.
Troubleshoot Windshield Washers
A windshield washer that doesn’t pump enough fluid is annoying and even hazardous.
Find the solution to fixing a troublesome windshield washer.

Mount a Device Holder Without Wrecking Your Dash
Want a great way to mount your electronics without drilling holes? How about a vehicle-specific bracket/adapter mounting system? You can buy a version for just about any car or device from pro-fit-intl.com. The mounting bracket for this 1999 Toyota Camry (Pro. Fit No. 042VSM; $36) fits onto one of the radio fasteners. Other versions mount in different places. Then the device-specific adapter mounts to it.
Replace a Thermostat
Replacing a car’s thermostat (or T-stat) is an easy and inexpensive repair, and in most cases will cure an overheating or no-heat problem, sparing the time and expense needed for expert diagnostics.
Learn all the steps to replace a thermostat!
Remove a Stuck Phillips Screw
Frustrated by a Phillips screw that’s starting to strip out? Salvage the situation with one of these tips before you go through the misery of drilling out the screw.
Small Engines Start Faster with Iridium Spark Plugs
It’s a fact. A spark always jumps from the sharpest edge of the centre electrode. But the edges of copper centre electrodes round off quickly, increasing the number of starter rope pulls. Iridium-enhanced spark plugs, long standard on late-model cars and trucks, are now available for lawn and garden equipment and motorsports applications. Iridium has the highest melting point of all the precious metals (4,229 degrees F), so it holds its sharp edge longer. Iridium plugs cost a few bucks more, but they provide faster starts and last much longer than conventional copper plugs.
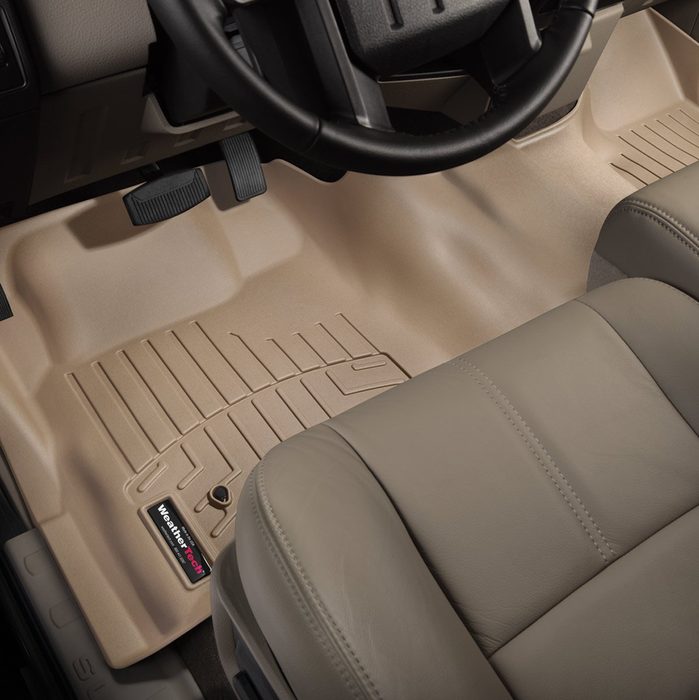
The Last Floor Mat You’ll Ever Buy
Vehicle floor mats are supposed to stay in place and protect your carpet. Do they? Nope! Instead, they slide around, crack and fall apart. So you end up replacing them every few years and still wind up with dirty carpet. That’s why I was so impressed with the FloorLiner DigitalFit floor mats from WeatherTech Canada. The one-piece design protects all your front carpet—door to door. The mat is formed with three layers of material. The bottom layer creates friction between the mat and the carpet (so it won’t move). The rigid middle layer holds the shape, and the top layer is textured so your feet don’t slip. Plus, the built-in water channels drain melted snow away from your feet and off to the sides.
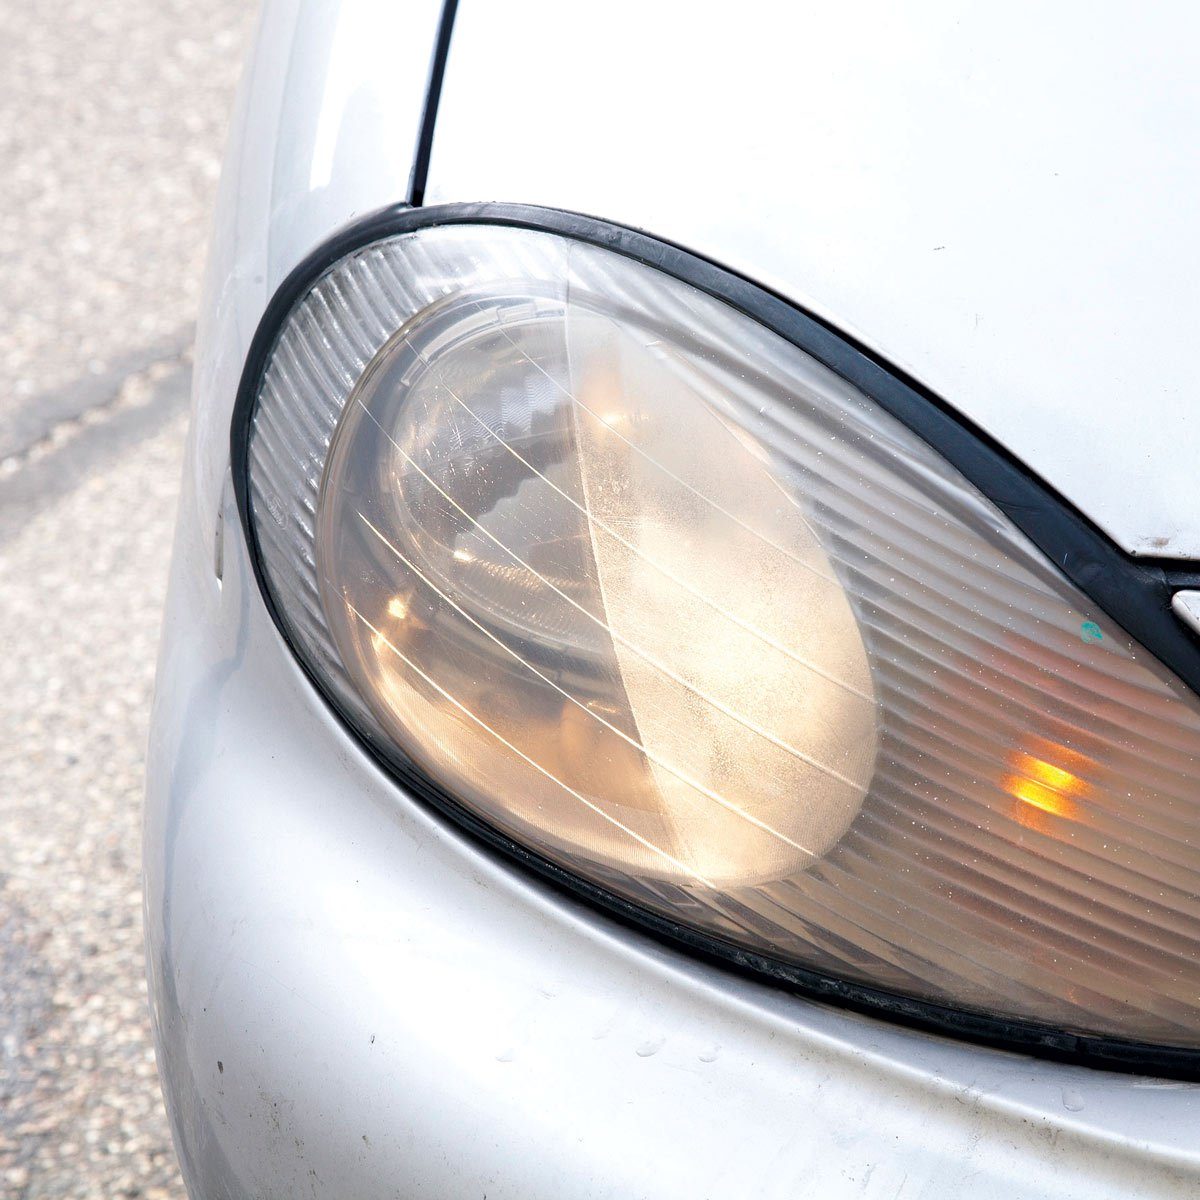
Clear Up Cloudy Headlights
Clear your fogged or yellowed headlight lenses in 45 minutes for less than $15, rather than spending $100s to replace them.
Learn how to clean cloudy headlights with these do-it-yourself tips.
Diagnose a Horn Problem
Use a simple fused jumper to pinpoint the problem with a bad horn. Often the fix is simple and cheap.
Here are six reasons your car horn isn’t working—and how to fix it.
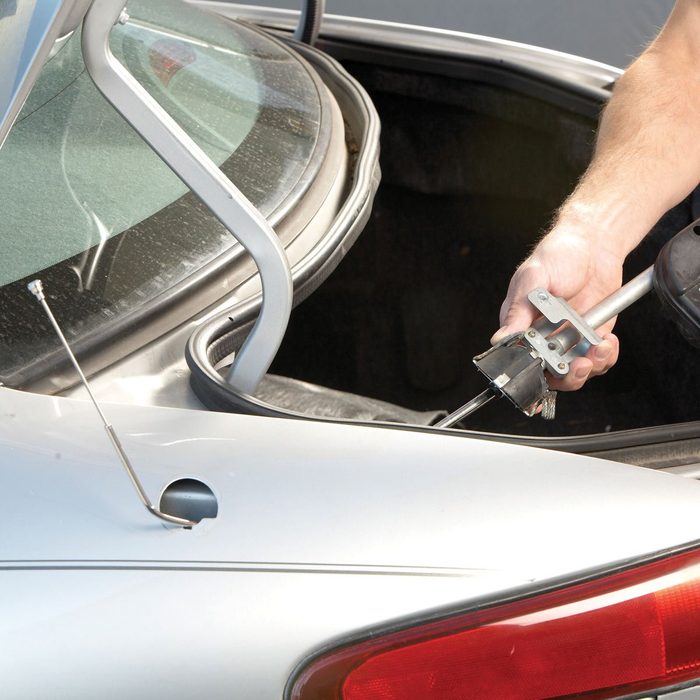
Fix a Stuck Power Antenna
Fix a stuck power antenna by replacing a burned out motor or bad cable/mast. You can do both in about two hours, and you’ll avoid the $50 to $100 dealer service fee. You need only one special tool, an antenna wrench.
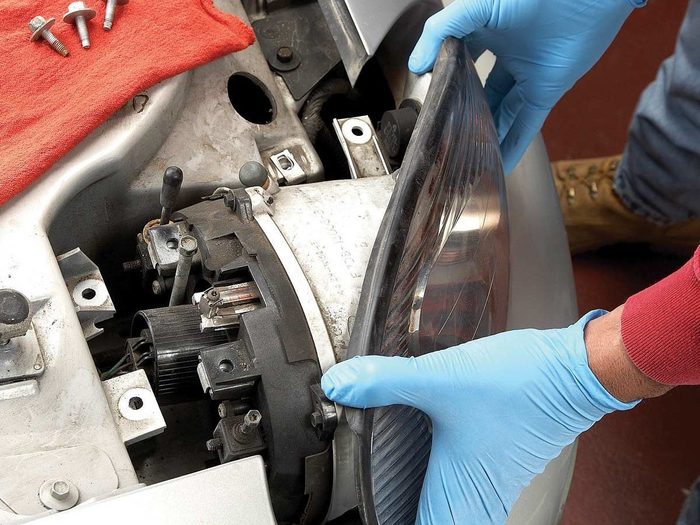
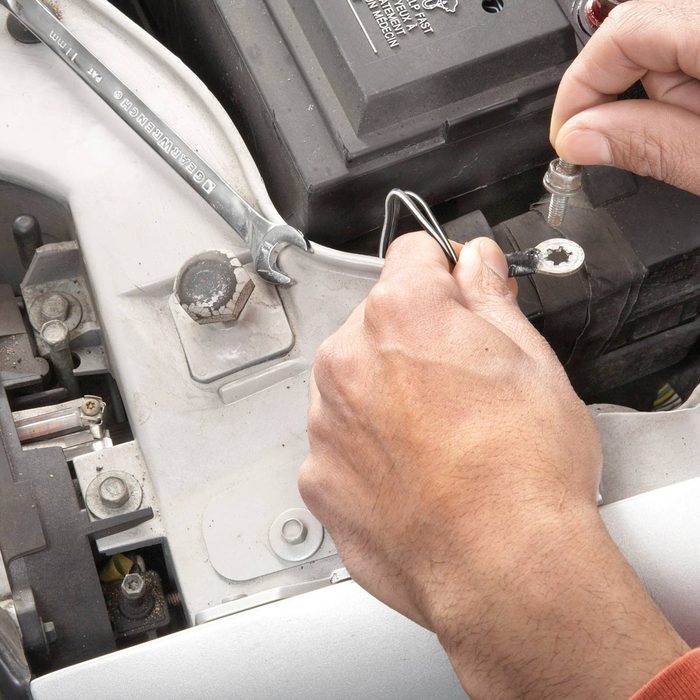
Replace Headlights
The hardest part of the job is choosing a new bulb. You can spend more time shopping for the bulbs than it takes to install them. The choices are mind-boggling. Every bulb manufacturer has its own confusing names for each style, making comparisons difficult. But it boils down to four upgrade categories—brightness level, life span, light colour and energy consumption.
Repair a Dim Headlight
Simply clean the ground connection to restore the brightness of dim headlights. And apply a little dielectric grease. Or replace the bulb if you see a gray/brown film on the inside of the glass.
Don’t miss these headlight upgrades for better style, safety and performance.
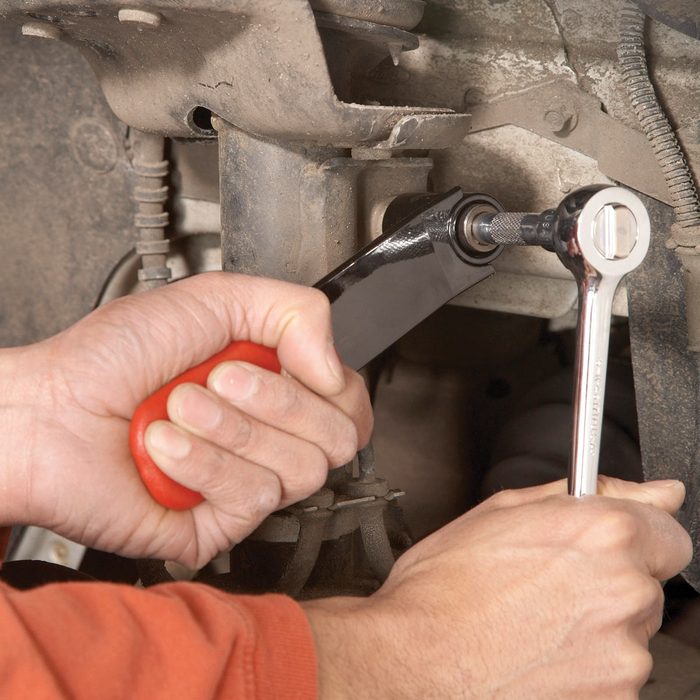
Replace Sway Bar End Links
Fixing a clunk when your car hits a bump is a trial and error process. Start with the stabilizer bushings and then the bar end links, using a special tool.
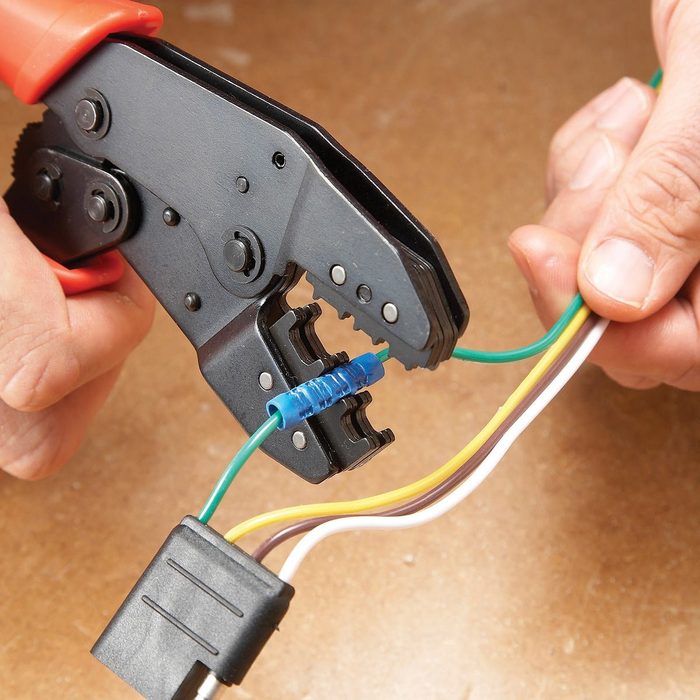
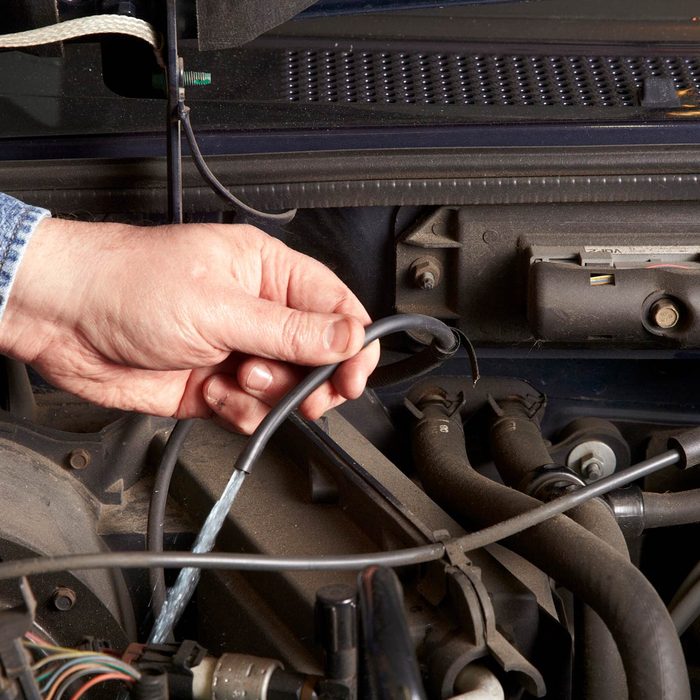
Splice Automotive Wires in Seconds
Use a professional crimper and electrical moisture sealant to make quick, solid connections in auto wiring.
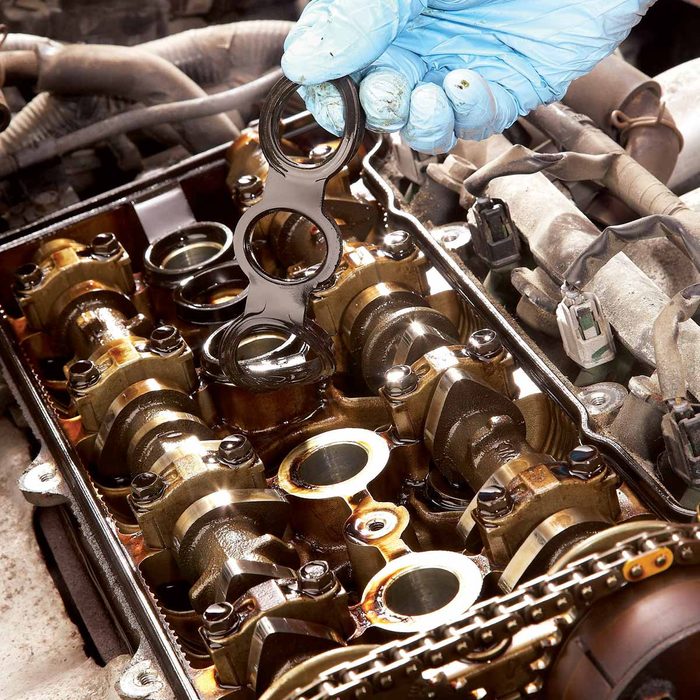
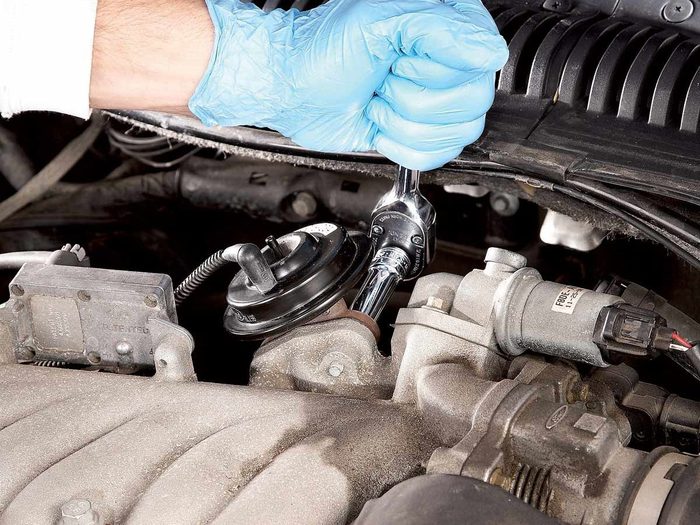
Fix a Leaking Valve Cover Gasket
Replace a leaky gasket cover on a four-cylinder engine easily and in less than an hour for less than $25.
Learn about sea foam and why you should use it for your engine.
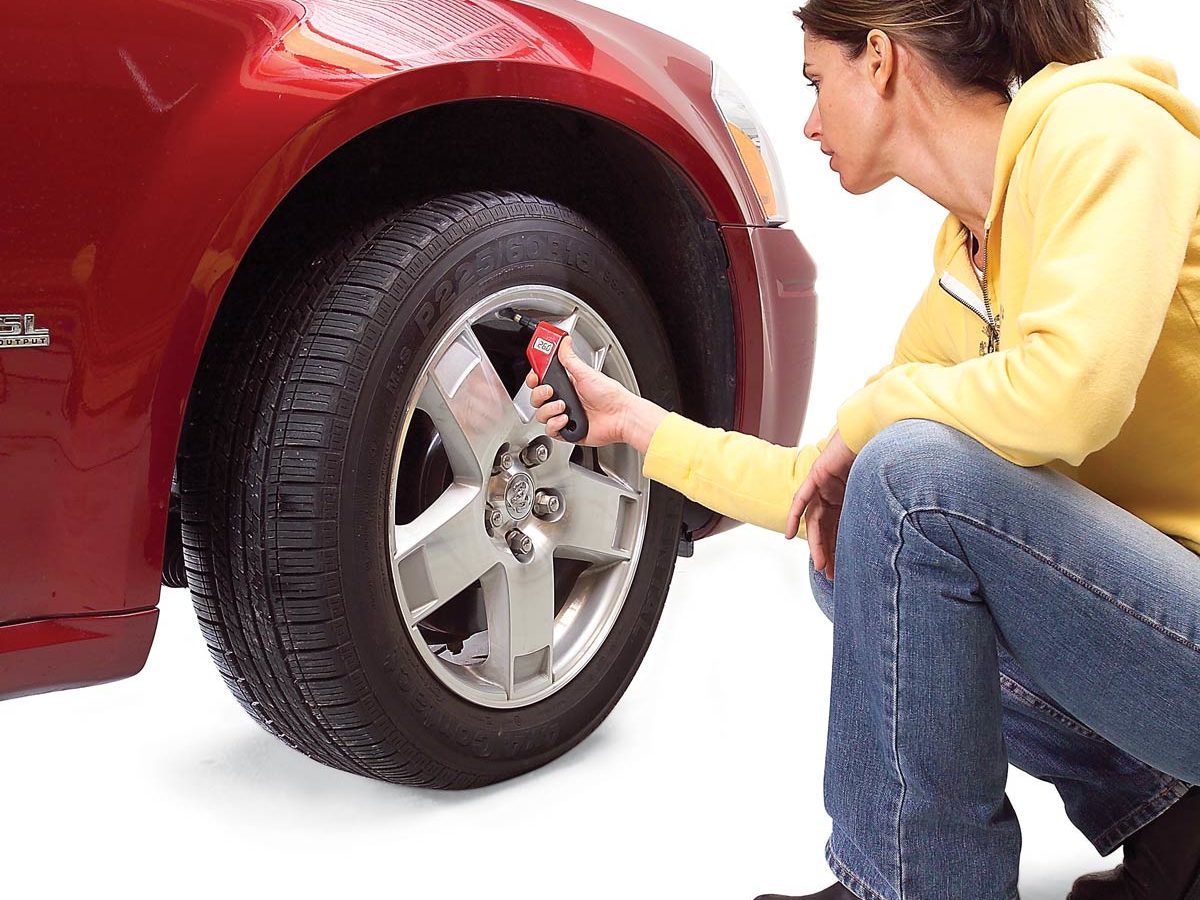
Check Tire Pressure Every Month
All tires lose air, so check your tires monthly. Always use the same tire pressure gauge and check the air pressure first thing in the morning, not after you’ve driven on them or they’ve been sitting in the hot sun. Inflate to the pressures listed on the carmaker’s decal (on the driver’s door or jamb), NOT the maximum pressure listed on the tire. The recommended tire pressure is based on the weight of your particular vehicle, not the tire brand or tread style.
We asked winter driving experts about the winter driving errors that could put you in danger.
Solve Rough Idle by Cleaning EGR Valve
Rough idle? A good dousing with throttle body cleaner may be enough to restore your EGR valve to near-mint condition, transforming a harsh idle into a soothing hum.
Is your car’s oil all black and gunky? Better change it now. Here’s how to choose the right engine oil and oil filter for your vehicle.
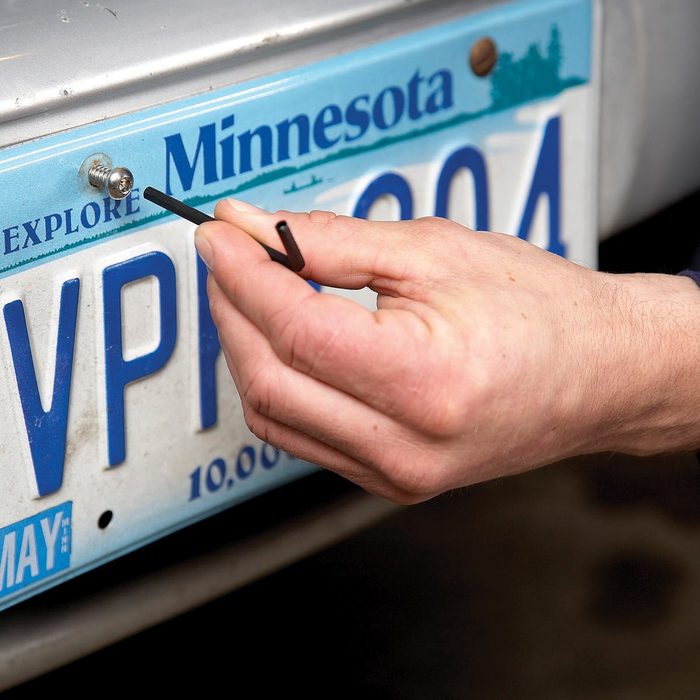
Prevent License Plate Theft
Prevent license plate theft by using special screws that require a special security wrench to remove. They’re inexpensive and take only minutes to install.
Here’s how you can find the engine code and model year in a vehicle identification number (VIN).
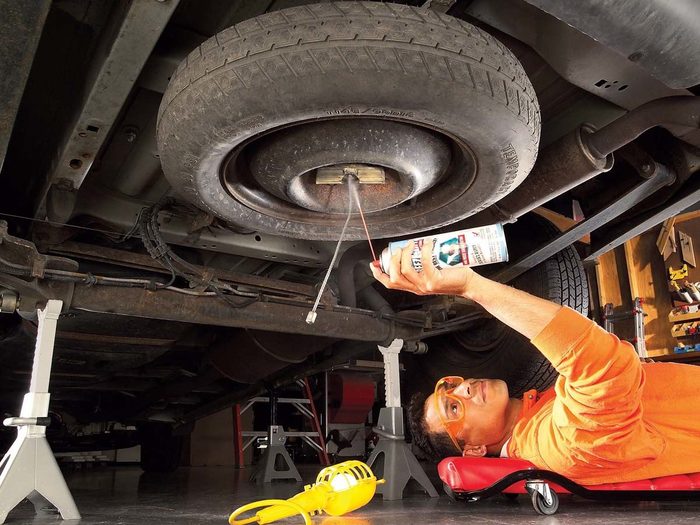
Service Your ‘Tuck-Under’ Spare Tire Lift Now!
Here’s an important car repair and maintenance task you should know. Loosen and lubricate a corroded spare tire lift so you can get to your spare tire when you need it.
Here are some tips that will extend the life of your tires.
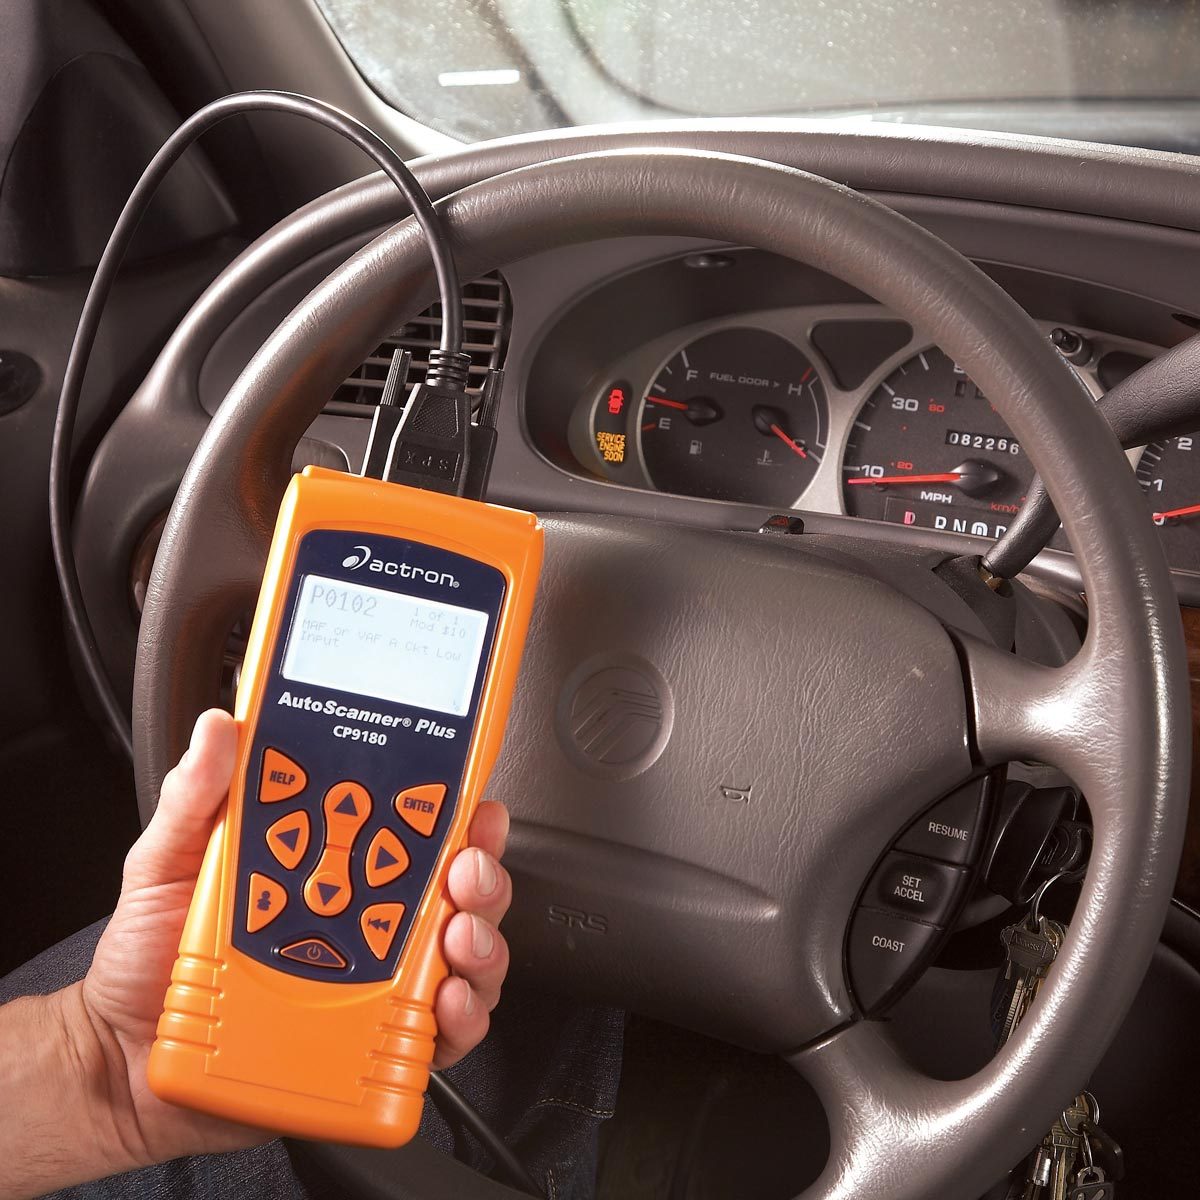
Use a Code Reader
Diagnose car problems without going to a mechanic with an auto code reader. Simply plug it into the car’s computer system, then interpret the trouble code readout.
Next, here are 14 signs your car is about to die.