

How to Refinish Car Wheels
 Updated: Mar. 20, 2019
If you go through the trouble of detailing your aging car, sooner or later the rusty wheels are going to bug you. Here’s how to refinish the wheels so they look new again.
Why refinish car wheels?
Sometimes a middle-aged car can still look fine except for wear and tear on the wheels and wheel covers. Fortunately, you can fix this yourself for very little cash. Removing the rust and painting your wheels take a full day. (Don’t panic-mostly you’re waiting for paint to dry.) Then the wheels must dry for 24 more hours after painting before you remount them. So make other arrangements for transportation for a day. The supplies cost about $50 from any auto parts store. Here’s how to do the job.
Time it will take: One day
Difficulty level: Simple
Cost: $20-$100
Tools required:
Cordless drill
4-in-1 screwdriver
Dust mask
Rags
Safety glasses
Shop vacuum
Materials required:
Wheel paint
Primer
Clear coat spray
Plastic-rated metallic spray paint

Get all refinishing supplies ahead of time
Besides the primer and paint, you’ll need masking tape, plastic sheeting, a drill and a wire wheel. If the wheels are really rusty and the rust has pitted the metal, use “rusty-metal” primer. However, if they’re only lightly rusted, buy self-etching primer instead. It’ll prime any bare metal and bite into the old paint around the rest of the wheel.
Next, buy spray paint formulated for wheels. (Rust-Oleum, Dupli-Color and VHT are three well-known brands carried by most auto parts stores.) Wheel paint has higher pigment content, is more chip- and wear-resistant, handles higher temperatures and repels brake dust better than ordinary household spray paint. Then buy clear coat spray (gloss or satin) to further extend the life of the paint. Two cans each of primer, paint and clear coat is usually enough to paint the outer face of four wheels. Double the amounts if you plan to paint the inside of the wheels too.
If you want to refinish the wheel covers, buy three cans of plastic-rated metallic spray paint.
Remove and wash the wheels and set up a work area
Jack up the car and support it with jack stands. Then remove the wheels and scrub them with heavy-duty spray cleaner, a brush and water. Rinse off all the crud and blow the wheels dry with compressed air or a leaf blower.
Select a well-ventilated area to spray the wheels. Cover the floor with a tarp to catch the overspray. Then set out two sawhorses and lay down three 2x4s. Set the dry wheels face up on the 2x4s.
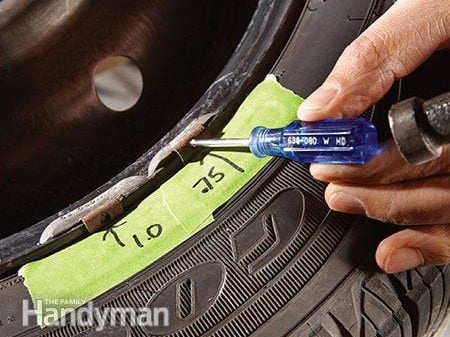
If you paint over the wheel weights, you’ll see the old paint spots the next time the shop rebalances your wheels or you change tires. So take the time to remove them before you start painting. Apply masking tape to the tire and draw an arrow pointing to the centre of the weight. Write the weight markings on the tape so you can get them back in the same place. Then insert a small Phillips screwdriver into the circular opening and tap the screwdriver until the weight pops off.
Wire-brush the entire wheel
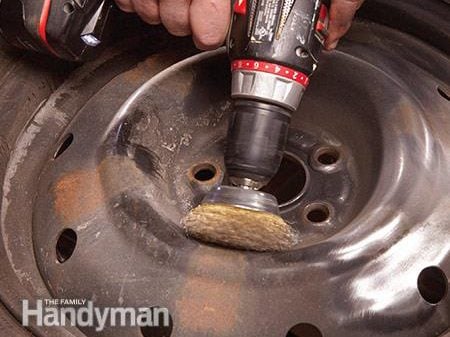
Next, don an N95 paint respirator and protective eyewear and remove the rust with a drill and a wire wheel. Wire-brush the rusted areas down to the bare metal. Then lightly scuff all the painted areas around the entire wheel, including areas near the tire bead and lug nuts. Slow down around the valve stem so you don’t damage it.
Blow off the dust with a leaf blower or an oilless compressor-not compressed air from an oiled compressor. (Oiled compressors often spit out oil droplets, which can cause fish-eyes in the paint. Trust me on this-I’ve done it and ruined paint jobs.) Then wipe down each wheel with a tack cloth.

Prime the wheel surface
Mask all around the wheel using small sections of masking tape (this is really tedious). Next, lay plastic sheeting over the wheels and cut out the centre wheel portion with a scissors. Tape the sheeting onto the first layer of masking tape. Then mask off the valve stem.
Read the can labels to find the recommended wait times between coats. Then apply two coats of primer, letting each dry for the time recommended on the can.

Paint and protect the wheels
Apply three coats of paint and protect it with two coats of clear coat. Let the wheels dry for 24 hours. Then remove the sheeting and tape. Reinstall the wheel weights and remount the wheels.
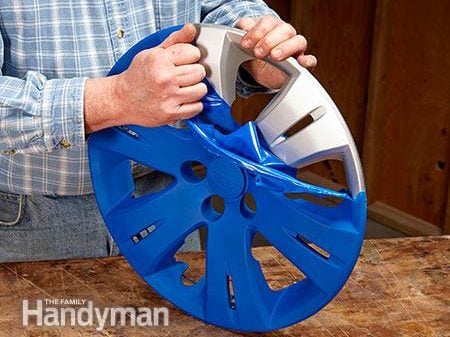
How to refurbish old wheel covers
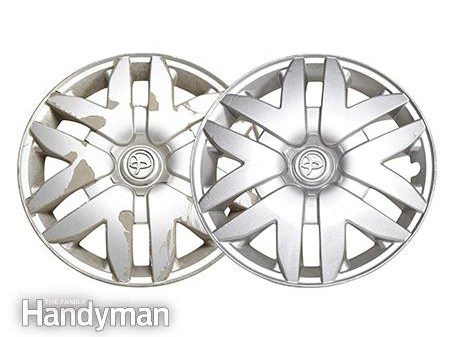
Most plastic wheel covers are painted. After a while, the paint peels and all those curb kisses gouge the plastic. You don’t have to buy new wheel covers. Just refinish the old ones.
Start by scraping the peeled areas. Then feather the peeled edges with 120-grit sandpaper. Sand down high ridges on the gouges until they’re level with the rest of the wheel cover. Then wash the wheel cover with heavy-duty cleaner and a scrub brush. Rinse and dry. Then paint the entire wheel cover with a metallic spray paint rated for plastic.
Add pizzazz with bright-coloured peelable paint
Peelable paint is the latest craze. Car buffs use it to protect their wheel covers and rocker panels over the winter months or to give their rides a shot of colour. Peelable paint is a spray-on rubbery coating that peels off when you’re done with it. If you scratch it, you can simply re-coat it. Use it on any smooth surface indoors or out.
When you use peelable paint outdoors, it should be removed after three months. You can leave it on longer, but it’ll be harder (or impossible) to remove. But indoors, it’s removable for nearly a year.
Peelable paint is available at auto parts stores, home centres and craft stores. Rust-Oleum, Dupli-Color and Plasti Dip are three well-known brands of peelable paint.