

100 Home Improvement Hacks You’ll Wish You Knew Sooner
 Updated: Jul. 25, 2024
Sometimes those head-scratching home improvement moments turn into "Aha!" ideas.
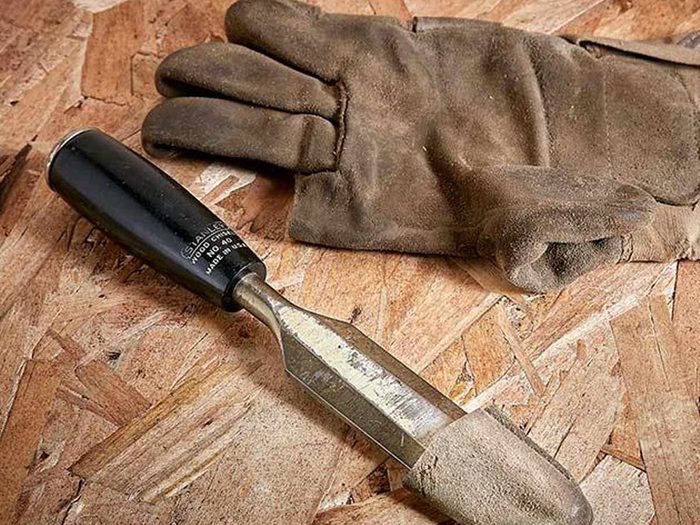
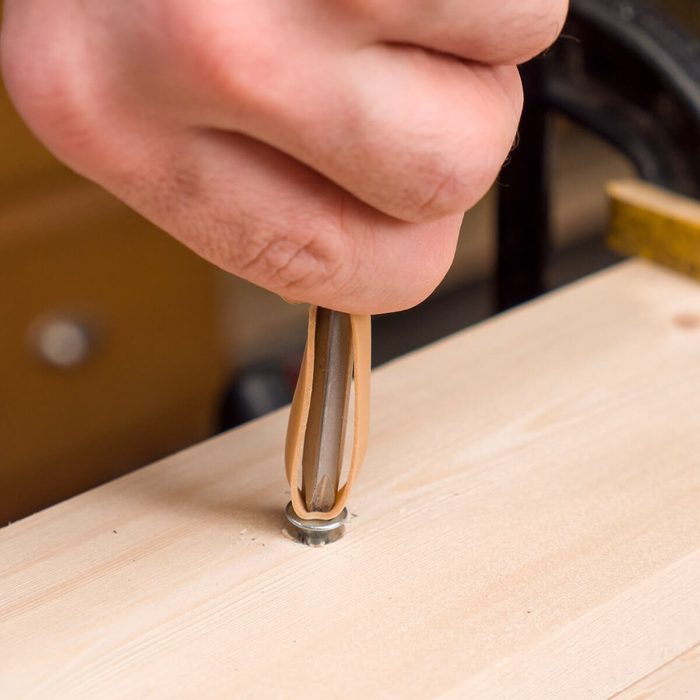
New uses for old glove fingers
Don’t throw out your old work gloves. Cut the fingers off and you’ll find lots of uses for them! Use them to protect the tips of chisels when you need to carry them. They’re also good for softening the grip of pliers and many other applications.
Make a squeegee from a rake
Need a squeegee in a hurry? Take a piece of pipe insulation or a pool noodle and use a couple of cable ties to fasten it to the back of a garden rake. Works like a charm, and you don’t even have to take it off to use the rake.
Check out more yard tool hacks that’ll make your life so much easier.
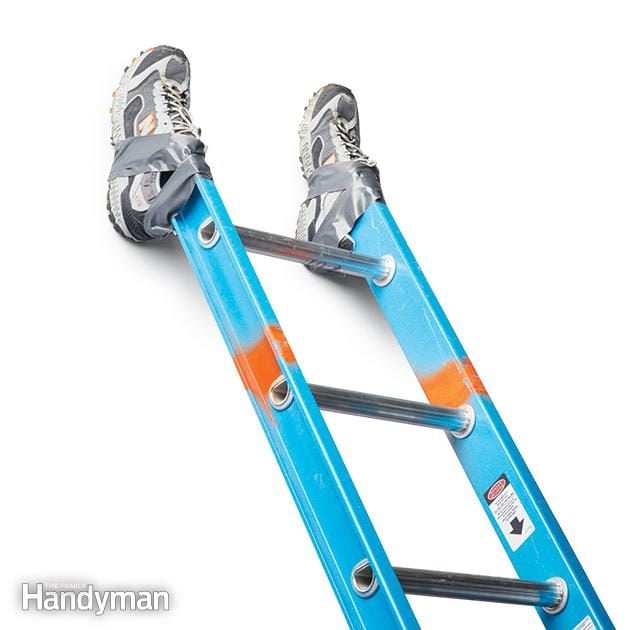
Old sneakers as ladder bumpers
You could buy special rubber bumpers for the tops of your ladders to protect your siding or walls, but why? A pair of old sneakers (who doesn’t have some lying around!) and a little duct tape will do the job just fine.
Check out 16 budget-friendly ways to boost your home’s curb appeal.
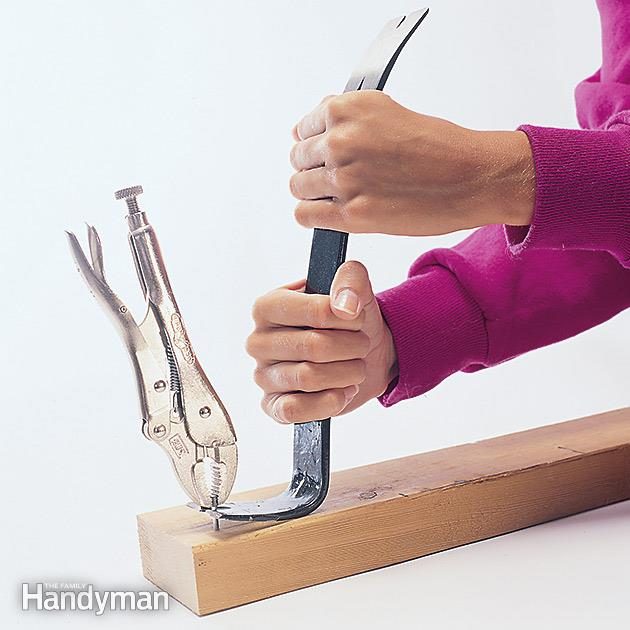
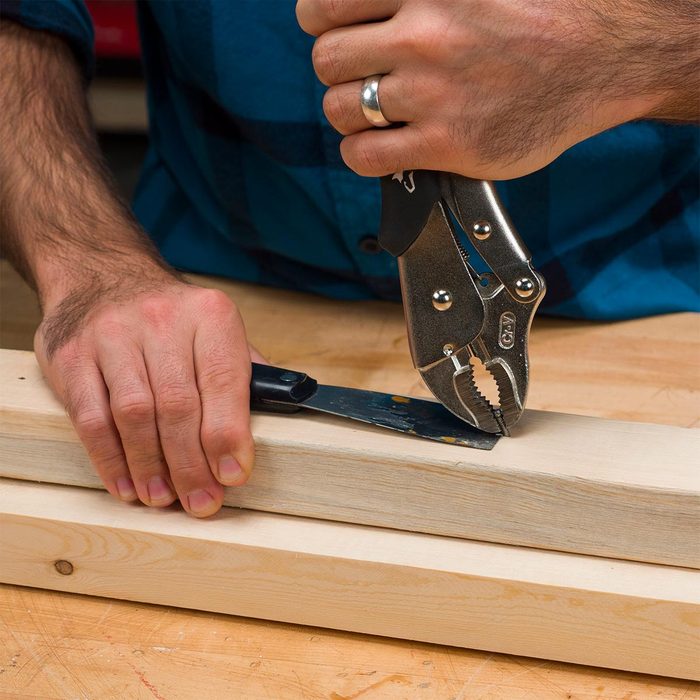
Double up on stubborn nails
Nails can be a pain to remove, especially trim nails with small heads and any nail when the head breaks off. The trick is to use two tools together: locking pliers to grab the nail shank, and a pry bar to do the pulling.
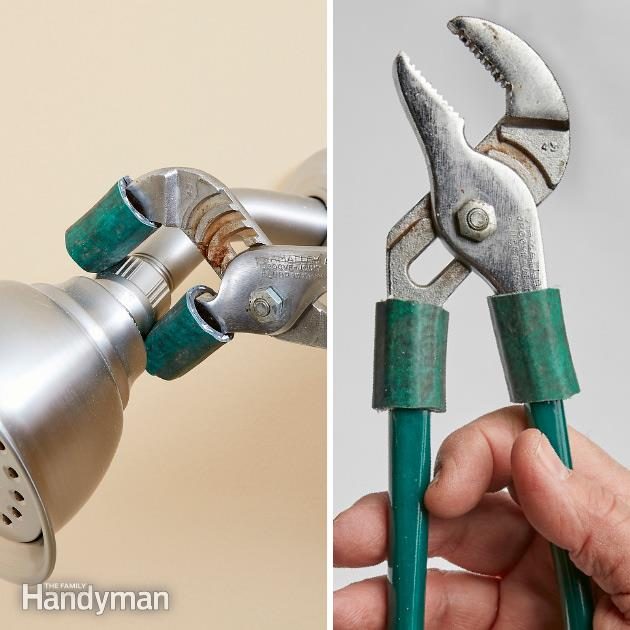
Gentle-grip pliers
Here’s an oldie with a twist. Use pieces of garden hose or other tubing to soften the jaws of slip-joint or other pliers so you can grip plated surfaces without damage. The twist? Size them so you can slide them up the handles to keep them handy.
Find out six things professional plumbers never do in their own homes.
Use a rubber band to grip stripped screws
We’ve all stripped a couple of screws in our day. And it normally isn’t a big setback until you need to unscrew it, that is. So the next time you’re in this situation, try a rubber band for a screw grip.
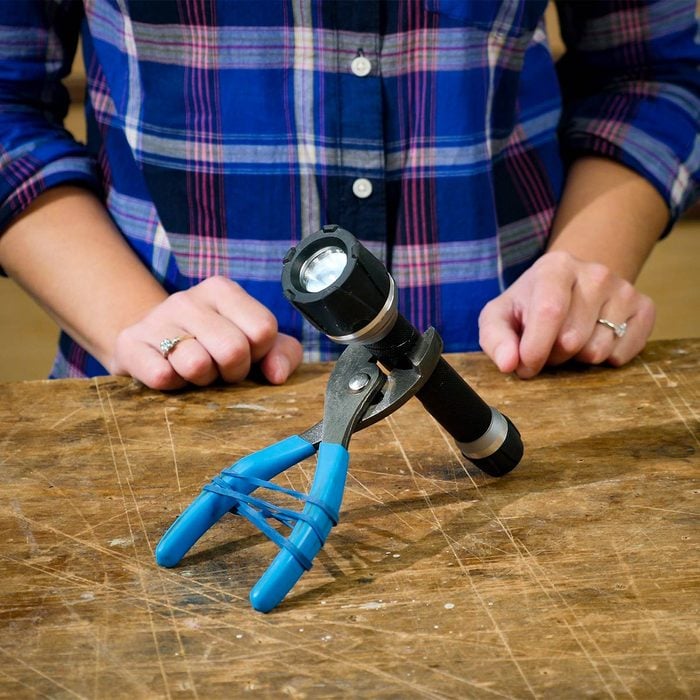
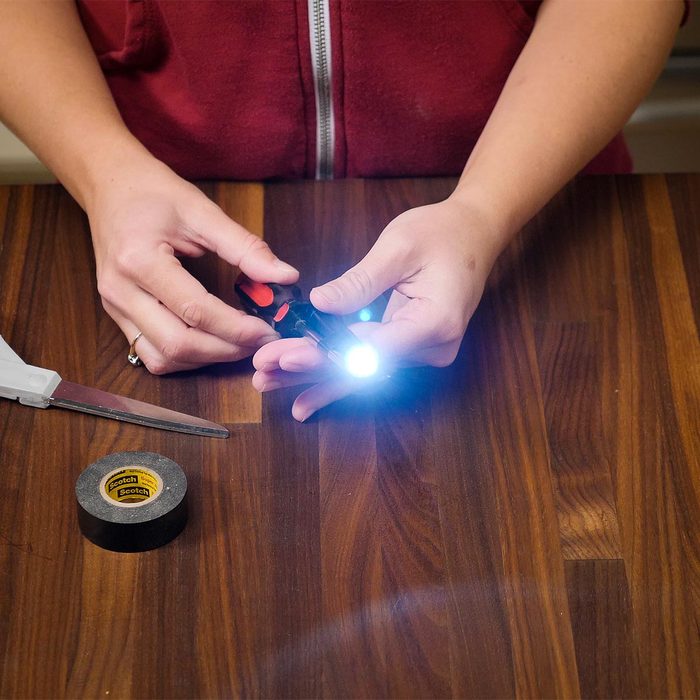
Hands-free light hack
Make a hands-free light in a snap with a flashlight, a pair of pliers and a rubber band. Place the flashlight in the jaws of the pliers; then wrap a rubber band around the handles of the pliers. That’s it! Point the light wherever you need it.
Find out which home renovations you’re likely to regret later.
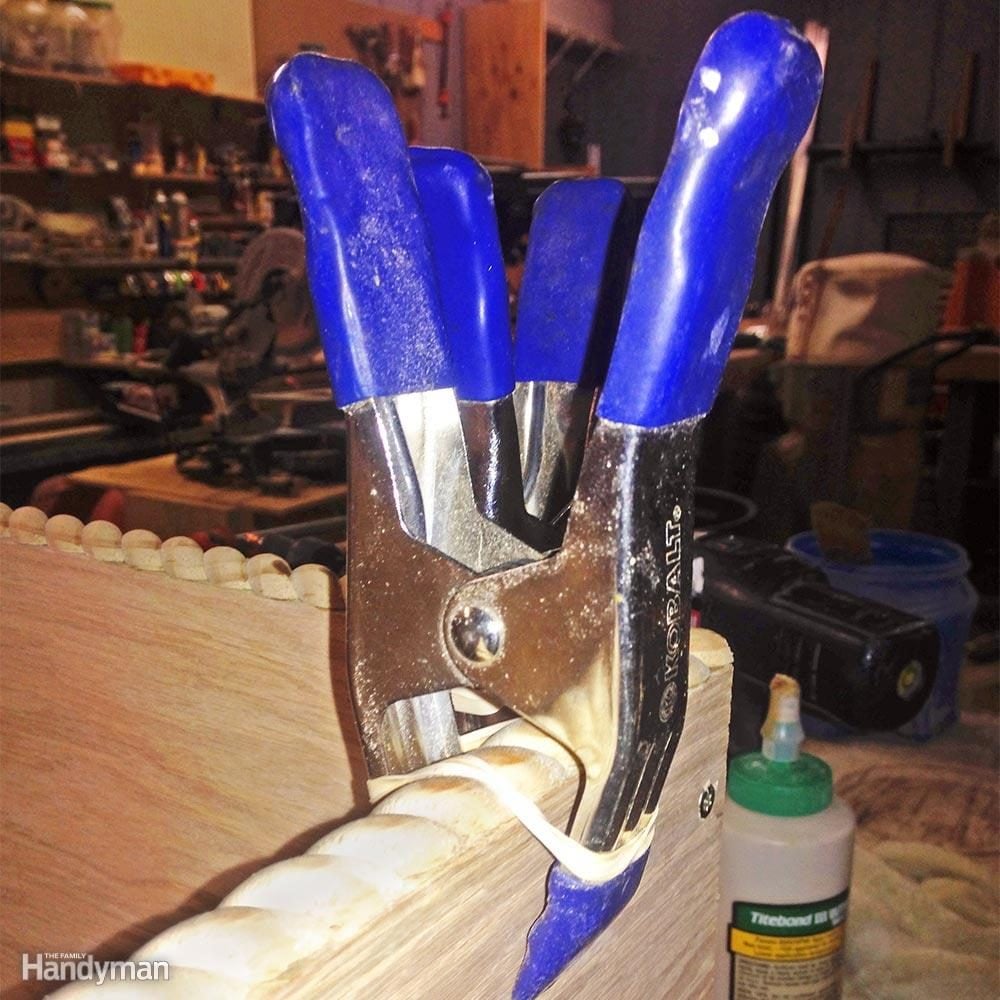
Rubber band clamps
You can buy special woodworking clamps to hold hardwood edging in place until the glue sets, but they’re expensive and you won’t use them often. Instead of buying specialty clamps, you can modify some of your spring clamps instead. Grab a few rubber bands and presto—instant edge clamps.
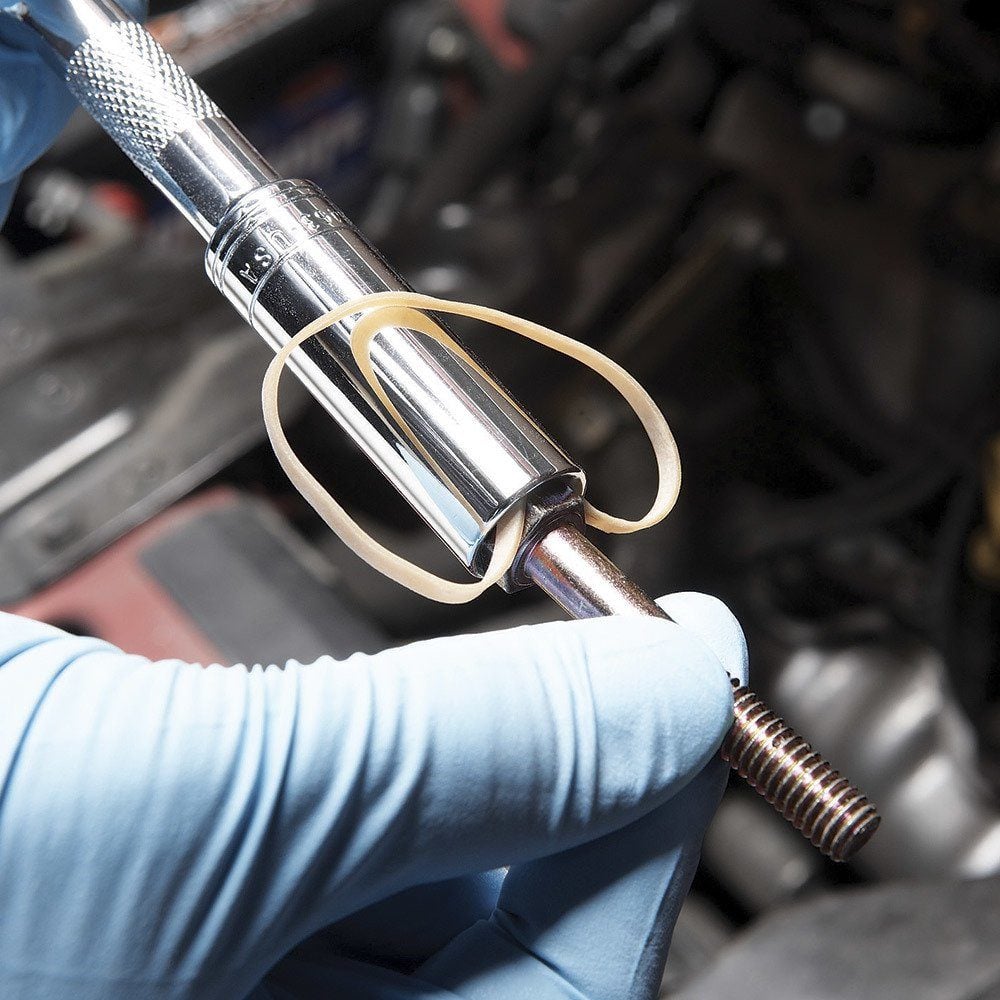
Rubber band bolt holder
Mechanics often use special magnetic inserts in sockets to prevent the bolt from falling out while they try to thread it into a tight spot. You don’t need to waste money on those gadgets. Simply cut a rubber band into strips and lay a strip across the opening of the socket. Then insert the bolt head. The rubber band will wedge the bolt head in the socket, allowing you to start threading without losing the bolt.
Bringing in the pros? Check out these helpful hints from Canadian contractors.
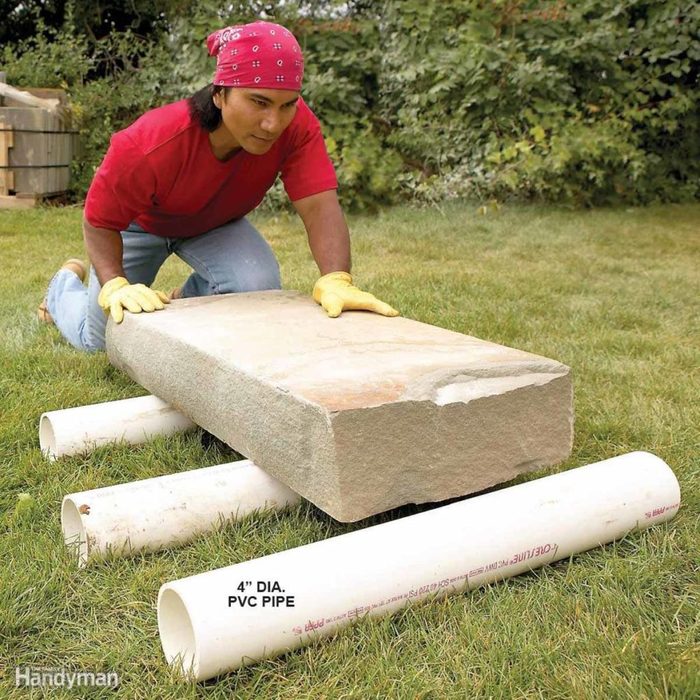
Roll it!
You’d be amazed at how easy it is to move heavy, awkward objects with three pieces of PVC pipe. Move playhouses, yard sheds, empty hot tubs and rocks weighing well over a ton with this trick. Use 4-in.-diametre ‘Schedule 40’ PVC, which is available from home centres. Here’s how to do it:
- Lift the front edge of the stone with a pry bar and slip two pipes underneath. Place one near the front and one about midway so the stone rests on the pipes.
- Position the third pipe a foot or two in front of the stone.
- Roll the stone forward onto the third pipe until the rear pipe comes free. Then move the rear pipe to the front and repeat.
This technique works best on relatively flat ground. On mild slopes, you’ll need a helper to shift pipes while you stabilize the load. Don’t use this method on steeper slopes.
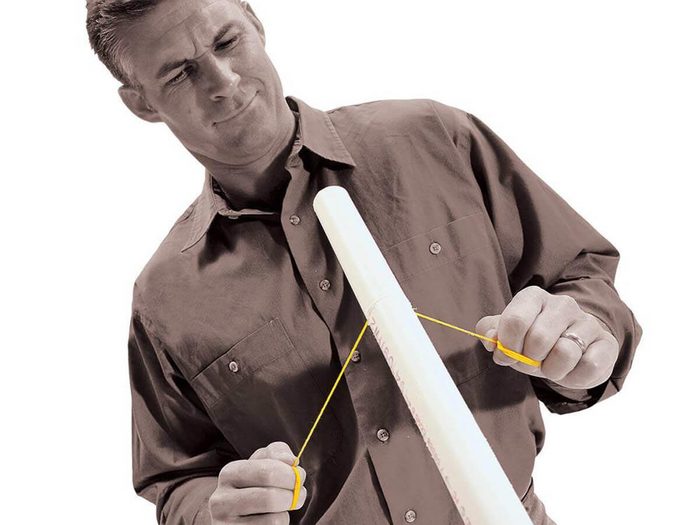
String pipe cutter
Amaze your friends and mystify your neighbours by cutting PVC pipe with a string. It’s a great trick to know if you have to cut pipe that’s buried in a wall or some other tight spot. We used a mason’s line to saw through 2″ PVC pipe in less than a minute.
Check out these quick home repairs you can do in 10 minutes (or less).
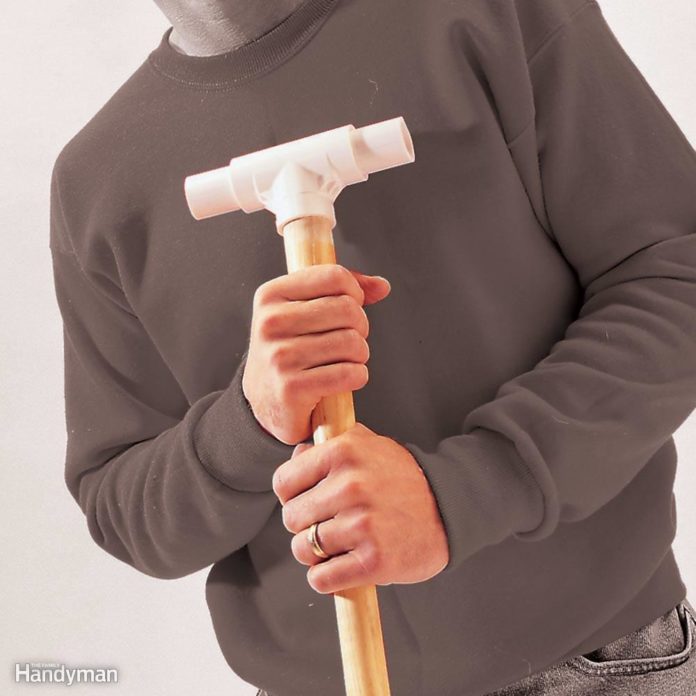
Get a grip
Get a better grip on your straight-handled shovel by epoxying a 1-in. PVC tee to the end.
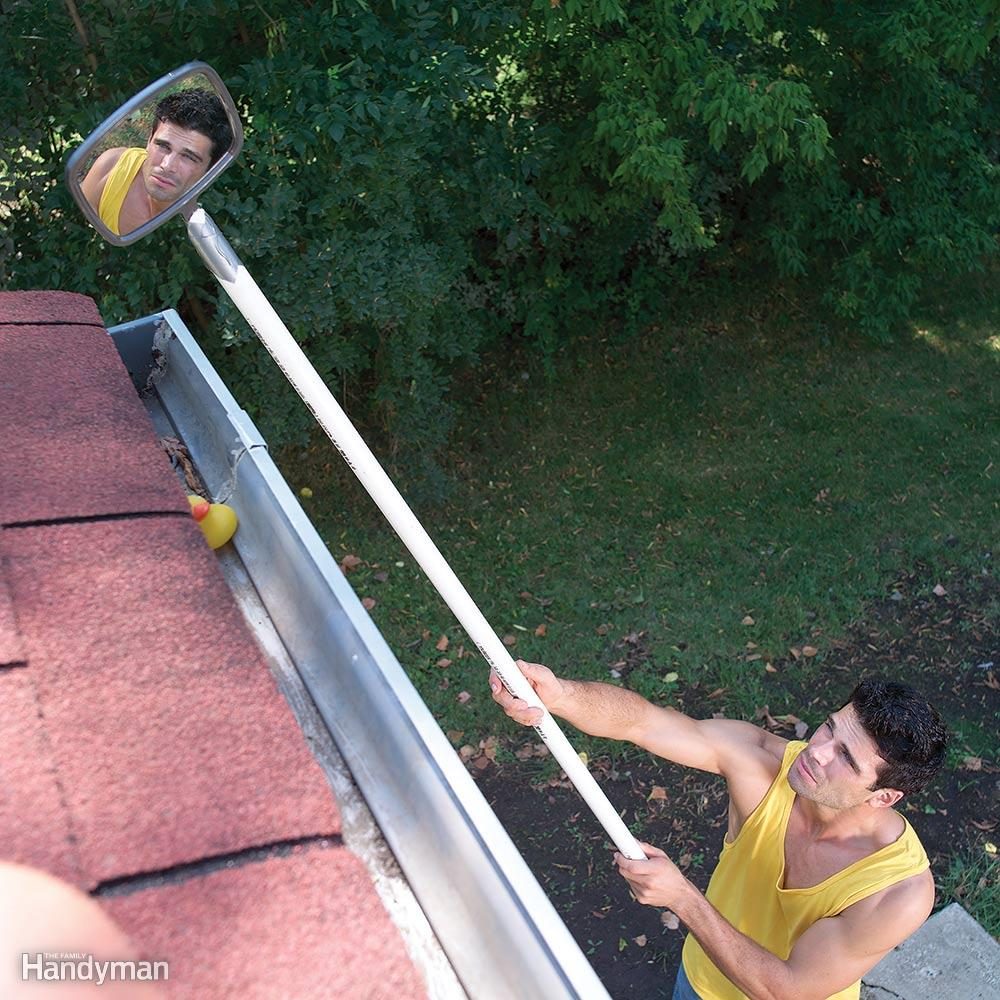
I-Spy rain gutter
Here’s a quick and easy way to eyeball rain gutters for possible clogs—before the next downpour causes an overflow. Cut a 60-degree angle on the end of a piece of PVC pipe and tape a hand mirror to the angled end. Hoist the mirror above the gutter to spot leaves and mini jams.
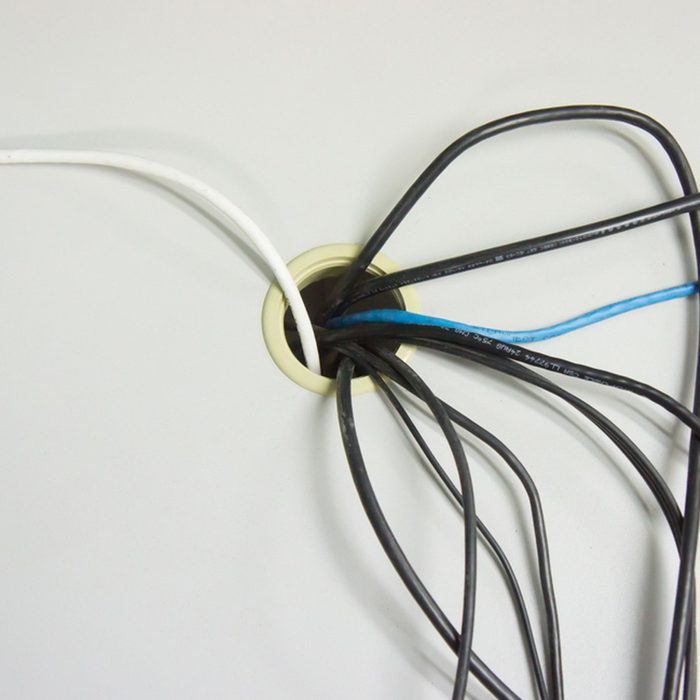
Hide cords
Help keep your home office space organized by using PVC pipe to hide cords. Just wrangle all those computer, mouse, monitor and phone cords and hide them in some PVC pipe. You can even use some colourful tape to match your office décor.
You’ll find more decluttering solutions in this roundup of 40 fantastic home organizing hacks.
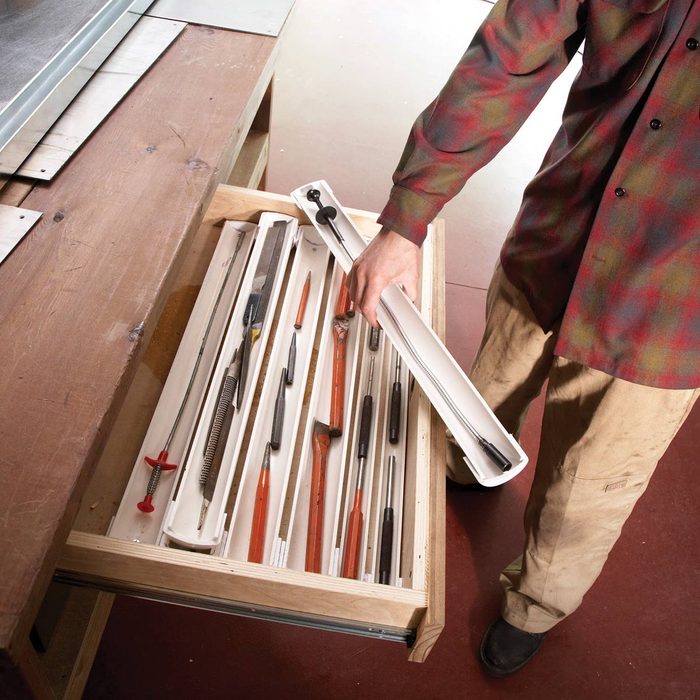
Drawer organizers on the cheap
Slit some up PVC pipe down the middle and you’ve got stackable drawer organizers to keep all your small tools handy.
Find more inspiration in these before-and-after shots of home organization makeovers.
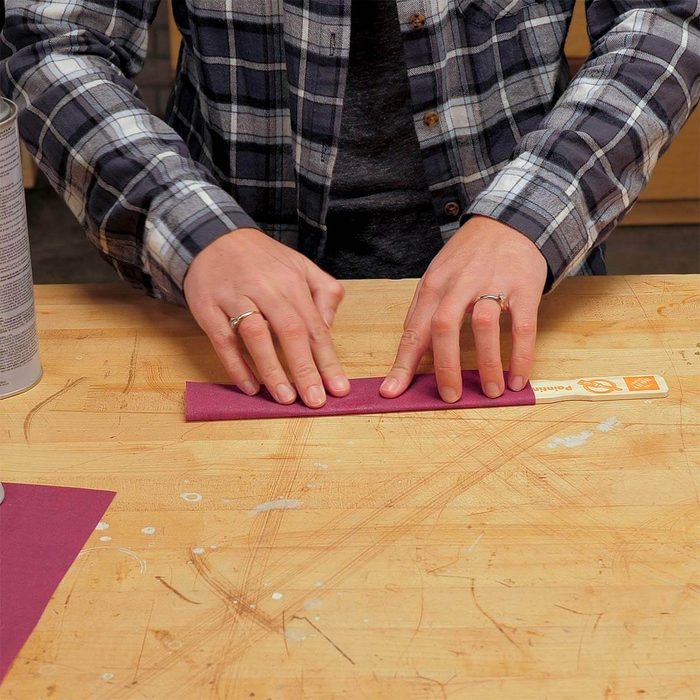
Quick woodworking file
This woodworking file comes in handy for sanding in tight spaces. Cut a piece of sandpaper to fit around a paint stir stick. Then use spray adhesive or an all-purpose glue to adhere it to the stick. Write the sandpaper grit on the handle of the stir stick, if you plan to store it for later use.
Here’s expert advice on how to choose the right paint brush for the job.
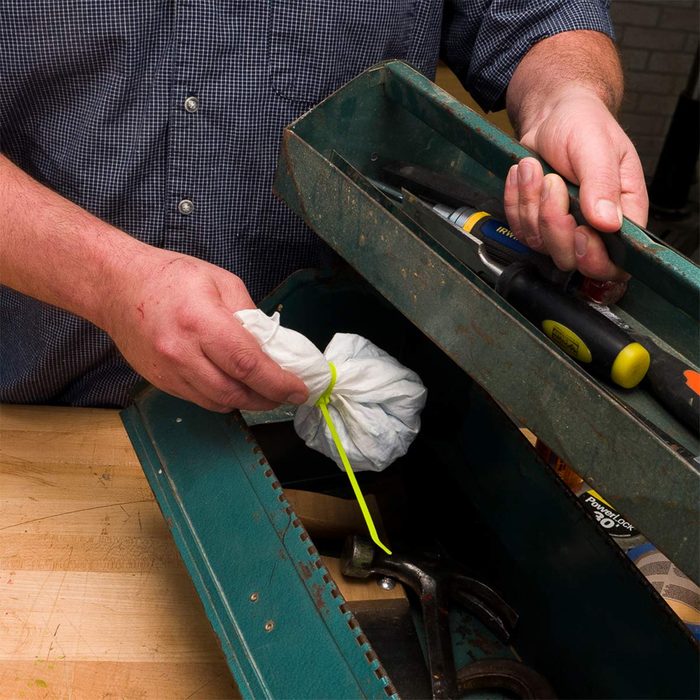
Kitty litter pouch for tool protection
Make a rust-preventing pouch for your toolbox with a scoop of silica crystal kitty litter, a piece of breathable fabric, and a zip tie. Toss it in your toolbox to keep out excess moisture and protect your prized possessions.
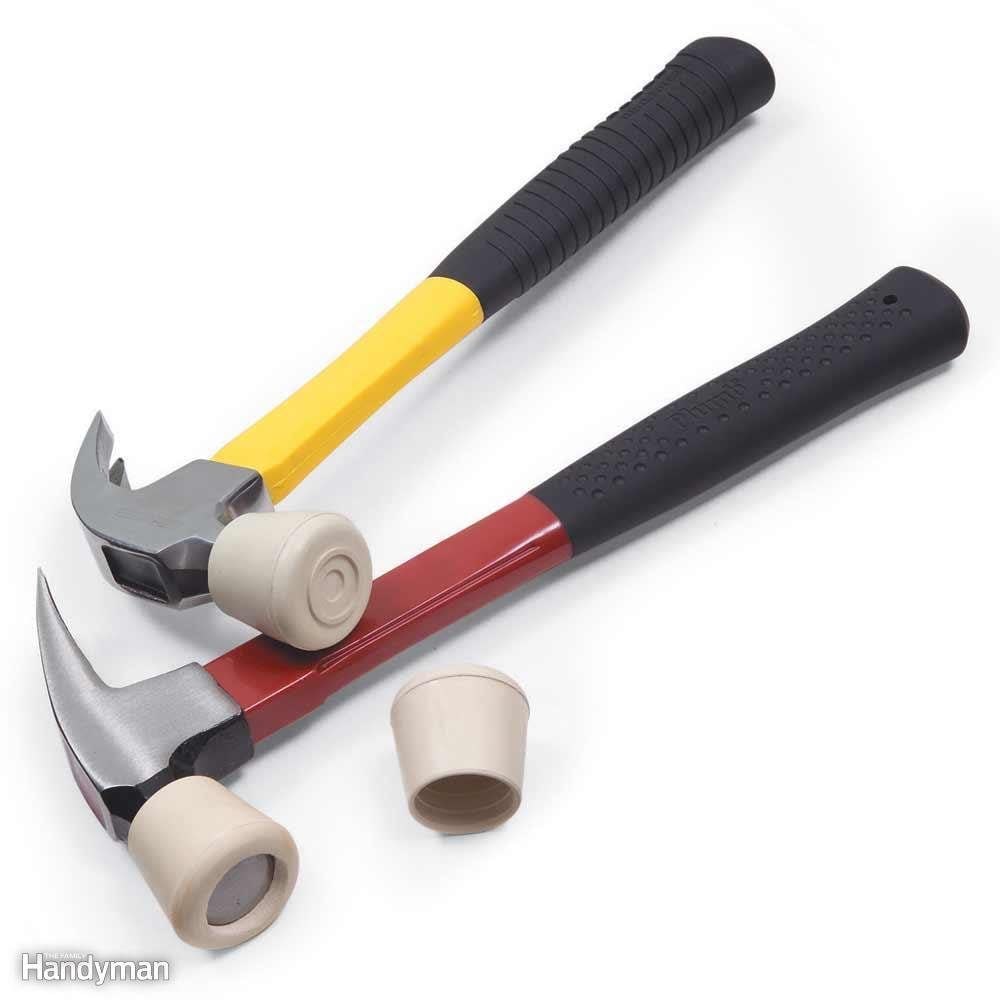
Hammer cushion
A rubber chair leg cap instantly converts a hammer into a rubber mallet. And if you want to drive a nail without denting the surrounding wood, cut a hole in the rubber cap. Pound until the rubber strikes wood, then finish driving the nail with a nail set. A 1-1/8-in. rubber cap fits tightly over most hammers and costs about $1 at home centres and hardware stores.
Learn to spot the signs you’re about to hire a bad contractor.
Lighted screwdriver hack
No need for fancy hand tools with built-in LED lights—opt for this lighted screwdriver hack instead. When working in a dark space such as inside a cabinet, make your own lighted screwdriver by taping a keychain-size flashlight to the shaft. It’ll shine the light right where you need it.

Bobby pin nail holder
There’s no need to risk hammering a finger when working with tiny nails or in tight quarters. A common bobby pin makes a great nail holder—and keeps your fingers at a safe distance! Once the nail is started, remove the bobby pin and continue hammering away.
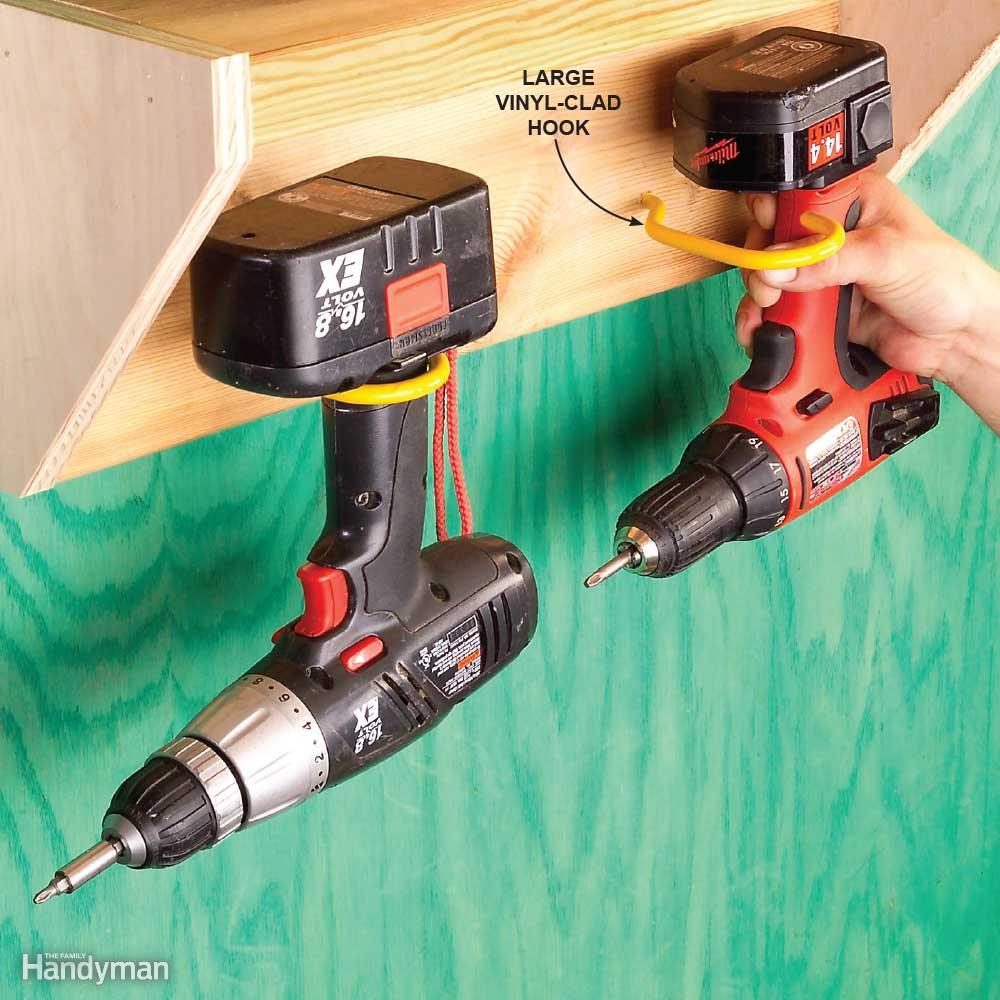
Drill hangout
Those big hooks that are often used to hang bikes also make slick drill hangers. Get them at any home centre for a couple of bucks apiece.
Vise-Grips to pull nails
Vise-Grip pliers make great nail pullers. The tool locks onto the nail, creating a secure hold, and the curve of the head provides excellent leverage. Use a putty knife under the pliers if you plan to salvage the material after removing the nails.
Don’t miss these inspired uses for masking tape all around the house.

Wine cork caulk saver
Synthetic wine corks are great for sealing partially used tubes of caulk. Drill a 5/16-in. hole into the cork about 1 in. deep. The cork fits perfectly and makes an airtight seal. —Susan Claussen

Six-pack shop organizer
Six-pack cartons are useful for storing and transporting items like spray paint, lubricants and caulk. —Gerald Fitzgibbon
Here are 30 things you can organize in 30 minutes—or less!
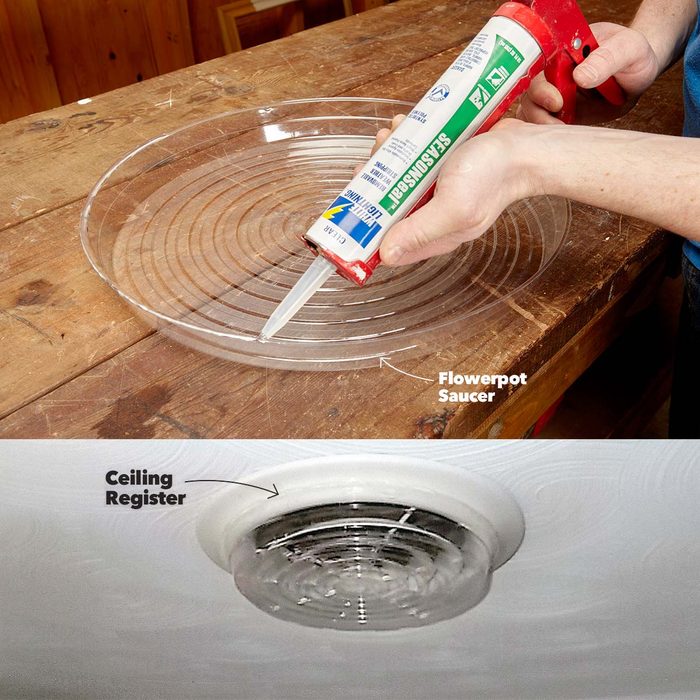
Draft dodger
My house has round ceiling registers for the air-conditioning system. In the winter, we’d get cold air falling from the registers. Rather than put up with the drafts, I sealed the registers with those clear plastic saucers that you put under flowerpots. I temporarily glued them in place with a rubbery sealant that you apply with a caulk gun and peel off in the spring. —James Herrrenknecht
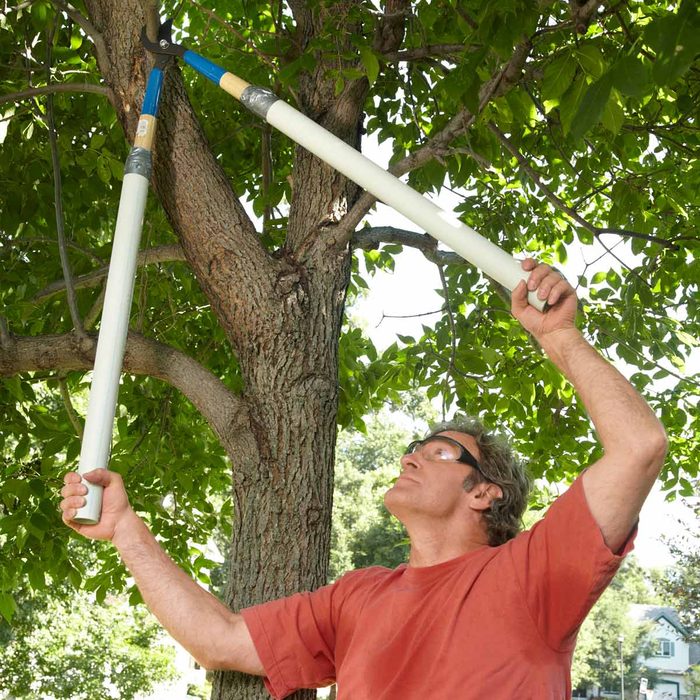
Long reach shears
Slip PVC pipes over the handles of your pruning shears and tape them in place to extend your reach and clip high branches without a ladder.
Here are more gardening shortcuts that will save you time, money and effort.
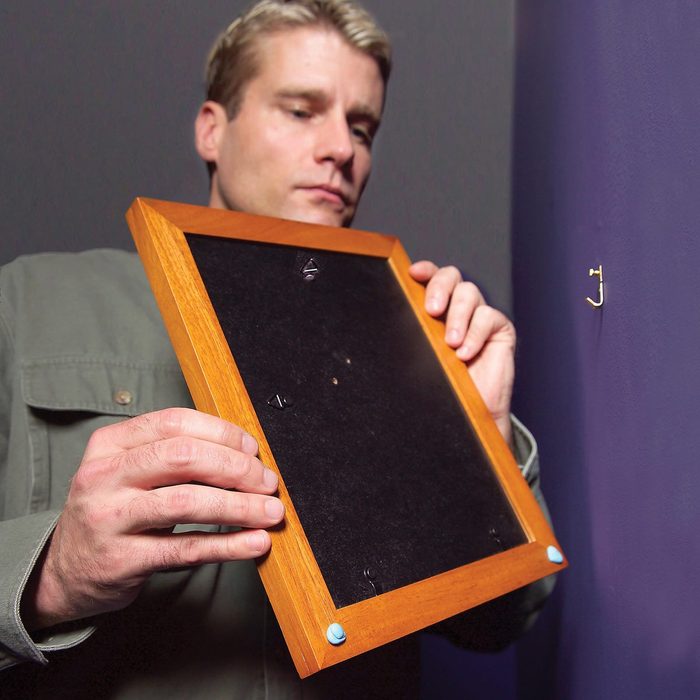
Keep pictures level
A pinch of mounting putty (that sticky stuff used to hang posters) prevents picture tilt without harming walls.
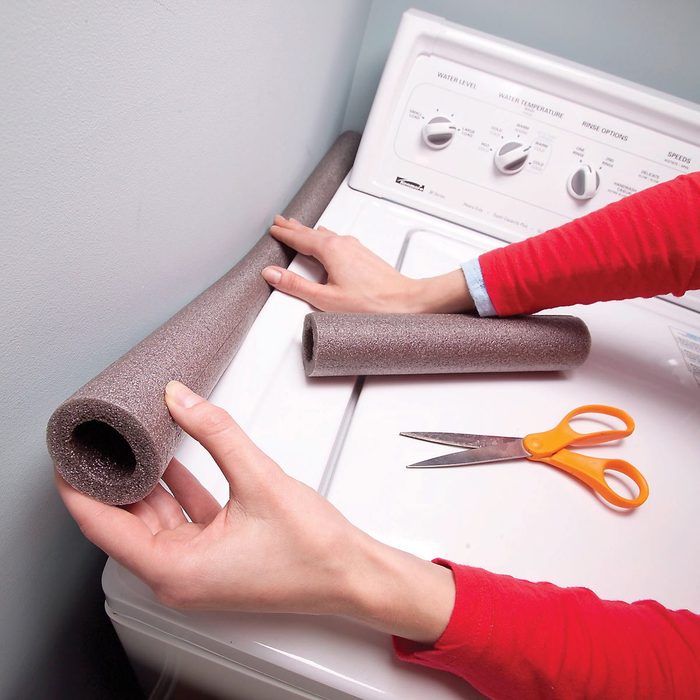
Stop losing socks
Stuff a strip of foam pipe insulation into the space between your washer and dryer or along the wall. That way, socks can’t slip into the abyss.
Find out the surprising ways you’re shortening the life of your washer and dryer.
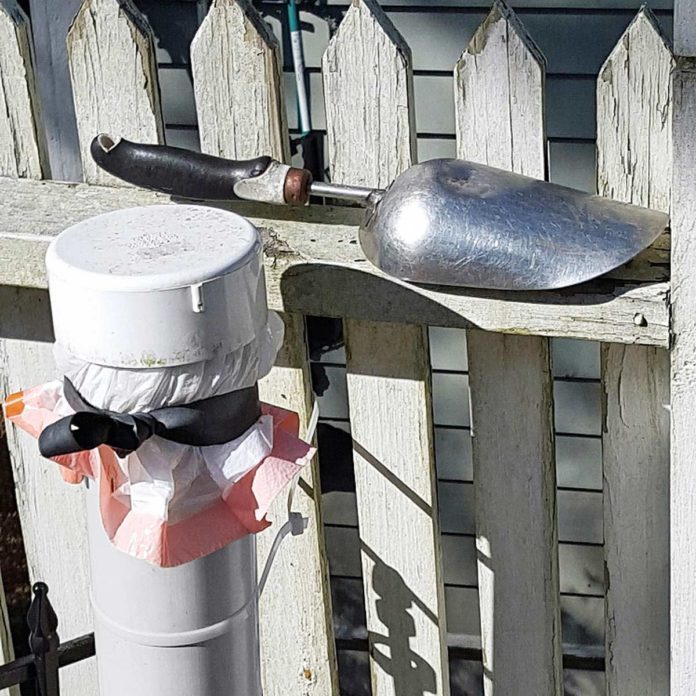
Poop pipe
My dogs and I have an arrangement. They poop; I pick it up. But rather than make daily trips to the trash can, I built this poop pipe. It’s just a large piece of 4-in. PVC drainpipe sunk into the ground a foot or so, with a trash bag lining it and a cap sitting loosely on top. A rubber band holds the bag in place, and the cap helps keep odours at bay. When the bag gets full, I just take it to the trash bin and put a new one in the drainpipe. —Kelley Griswold
Find out 10 more pet odour removal tricks that actually work.
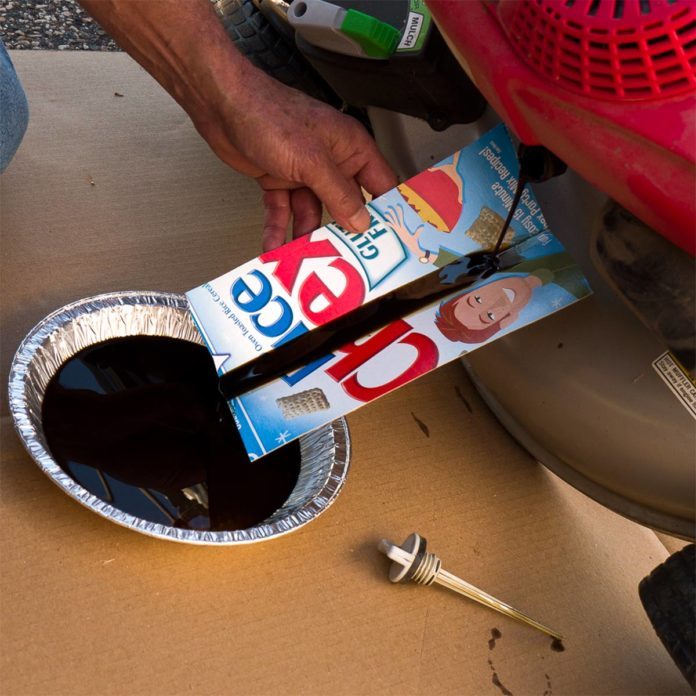
Oil change trough
Make changing the oil in your lawn mower, snowthrower, and outdoor machines less messy with this handy hint: Cut off a piece of an empty cereal box and fold it into a trough. Then tip the machine and use the trough to guide the oil into the waste pan. The glossy coating on the cereal box keeps the oil from soaking through.
Find out 100 car maintenance jobs you can do on your own.
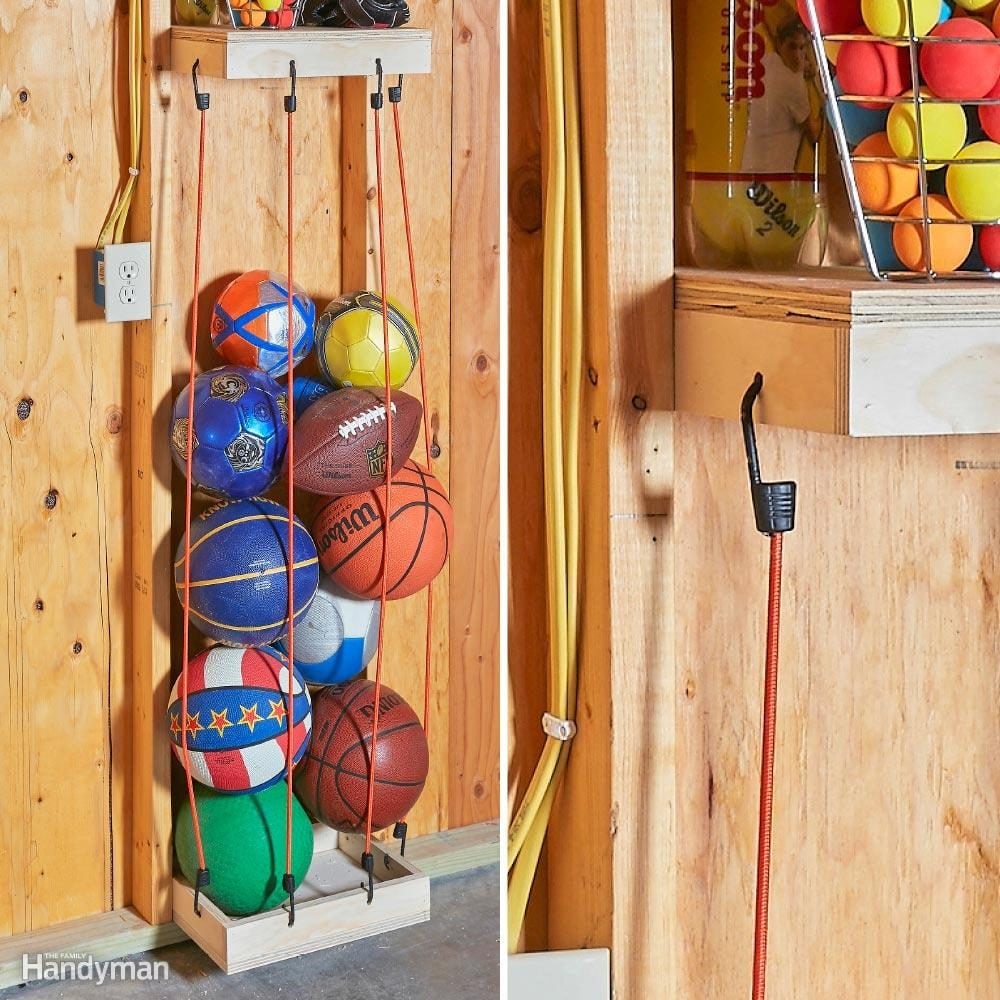
Build a ball tower
Some kids are into balls—any kind of balls. So they accumulate. It’s hard to find a storage system to keep them all handy, including the ones on the bottom of the pile. Here’s an ingenious system using bungee cords. They’re firm enough to keep the pile organized, but stretchy enough that you can squeeze the bottom ball out.
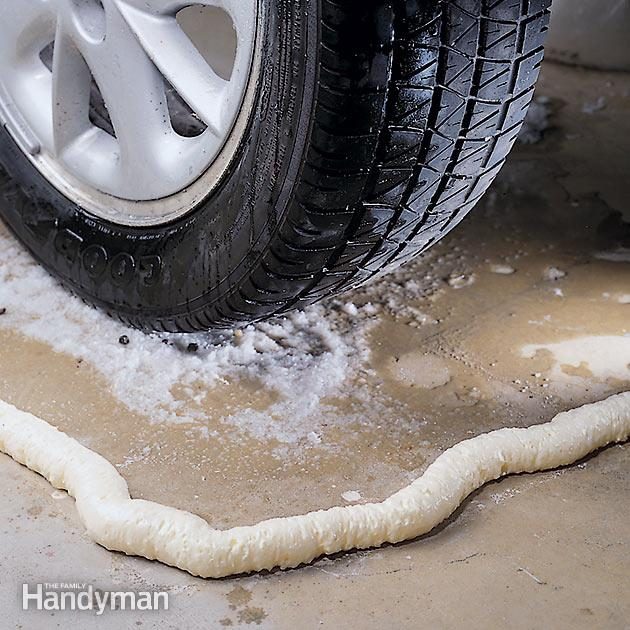
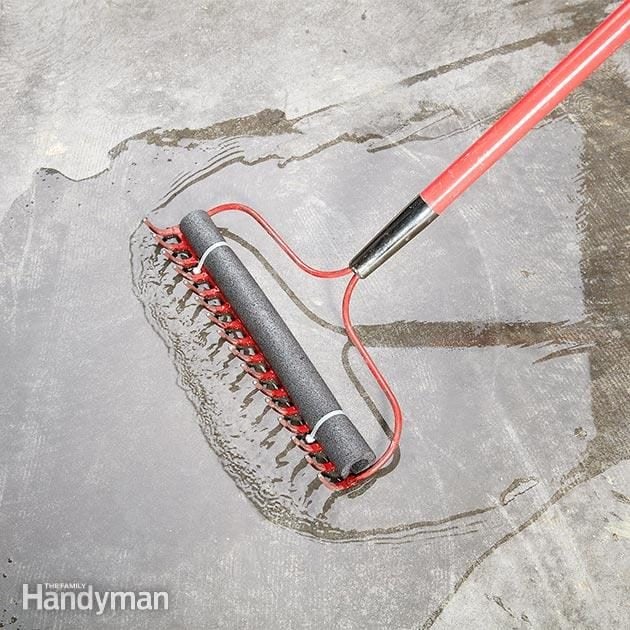
Garage floor dam
Garage floors are puddle prone: springtime floods, melting ice from tires, you name it. You can keep that water away from your tools and toys with a dam made of expanding foam. It sticks, it’s waterproof, and you can walk or drive over it without damaging it. And come summer, it’ll scrape right off.
Find out more cheap ways to make everything you own last longer.
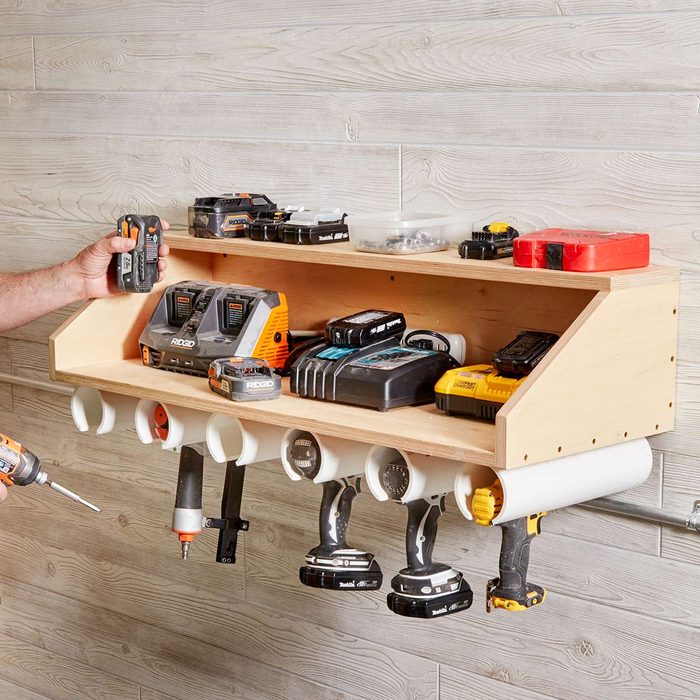
Drill dock
Keep your drill(s) and accessories organized and close at hand to make your DIY projects run smoothly. By investing just two hours, you can build this wall-mounted drill dock to house everything you need. There’s a top shelf for accessories, a wider lower shelf for larger items such as battery packs, and the clever use of three-inch PVC piping makes hanging holsters for different drill attachments.
The instructions for this drill dock include advice on how to customize the dock to fit your drill and you can even add a power strip to the bottom shelf to keep everything charged and ready to go. In addition to basic tools, you’ll need a circular saw, a jigsaw and a clamp to complete this project successfully.
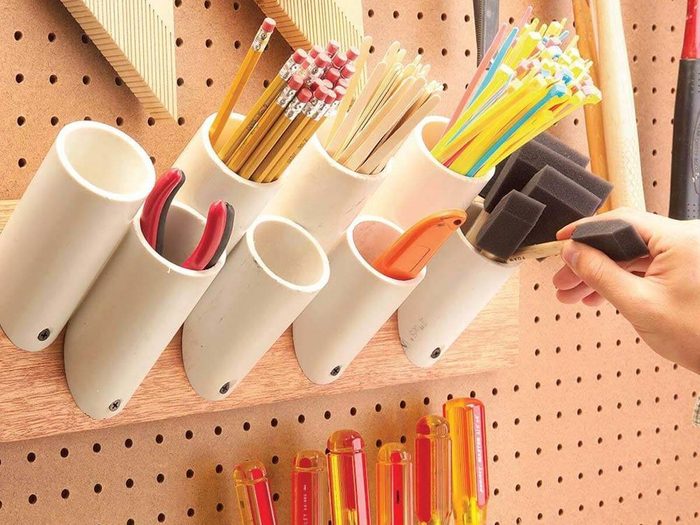
Storage pockets for skinny things
Saw off short pieces of 1-1/2-, two- or three-in. PVC plumbing pipe with 45-degree angles on one end. Screw them to a board to hold paint brushes, pencils, stir sticks and just about any other narrow paraphernalia in your shop. Mount them by drilling a 1/4-in. hole in the angled end, and then drive a 1-5/8-in. drywall screw through the hole into the board.
Don’t miss these genius tricks to squeeze more storage out of small spaces.

PVC sanding files
Stick sandpaper to cutoff pieces of PVC water pipe with spray-on adhesive and you’ll be able to sand concave curves to perfection. PVC pipe is labelled by inside diameter; here’s an index for the outside diameter of useful pipe sizes.
- 1/2-in. i.d. = 7/8-in. o.d.
- 3/4-in. i.d. = 1-in. o.d.
- 1-in. i.d. = 1-1/4-in. o.d.
- 1-1/4-in. i.d. = 1-5/8-in. o.d.
- 1-1/2-in. i.d. = 1-7/8-in. o.d.
To apply sandpaper to the pipe, spray both the paper and the pipe with a generous layer of adhesive. Let both surfaces dry several minutes before joining them. Use two grits on each pipe—80-grit for sculpting a precise radius, and 100- or 120-grit for finish sanding. When the sandpaper’s worn out, just pull it off, spray fresh adhesive on a new strip and go back to having fun.
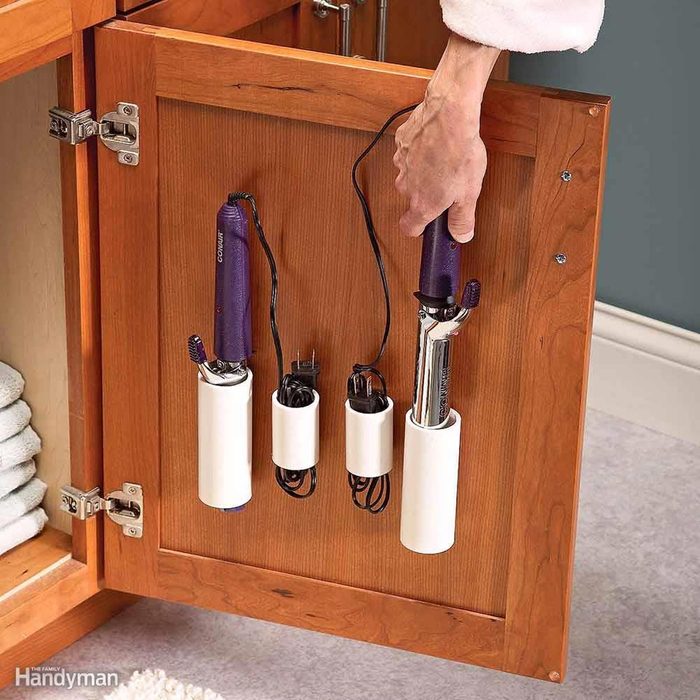
PVC curling iron holsters
Hate the messy look of curling irons lying on the vanity or the toilet tank? Here’s a tip for you. Use hook-and-loop tape to attach five-in. lengths of 2″ PVC pipe to the vanity door to hold the curling irons. Do the same thing with three-in. pieces of 1-1/2-in.-diameter pipe to hold the cords. Just measure your curling irons to see how long your “holsters” need to be. Let your curling irons cool before you stow them away.
Find out 20 home organizing mistakes you’re probably making (and how to fix them).
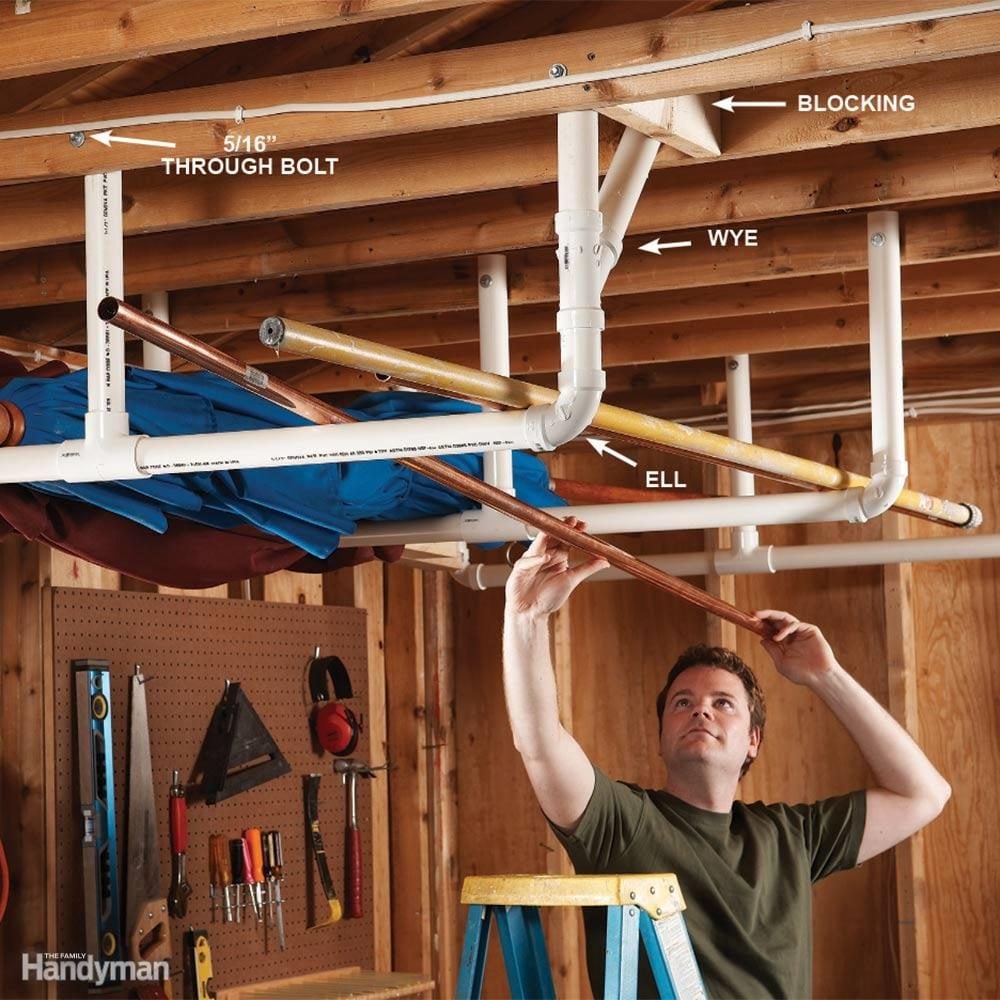
Overhead storage in the garage
Stow bulky items overhead by cementing together a simple rack from 2″ PVC pipes and fittings. Bolt the straight pipe to the ceiling joists to support heavy loads, and screw the angled pieces from the ‘wye’ connectors into the cross brace to stabilize the whole rack. The PVC’s smooth surface makes for easy loading and unloading.

Caulk tube nest
Before I made this caulk nest for my shop, the tubes rolled all over the shelves like slippery logs. To build one, cut 10-in.-long pieces of 2-in. PVC pipe and glue them side to side with PVC cement. To get straight glue lines, use the print along the side of the pipe as a guide. As you glue, hold the pieces together for 60 seconds with hand pressure or a clamp until the glue sets. Be sure to apply the glue only in a well-ventilated area. Glue on one tube at a time to fit the available space. That’s it— your caulk tubes are now organized.
This easy car maintenance hack will ensure you never miss another oil change!
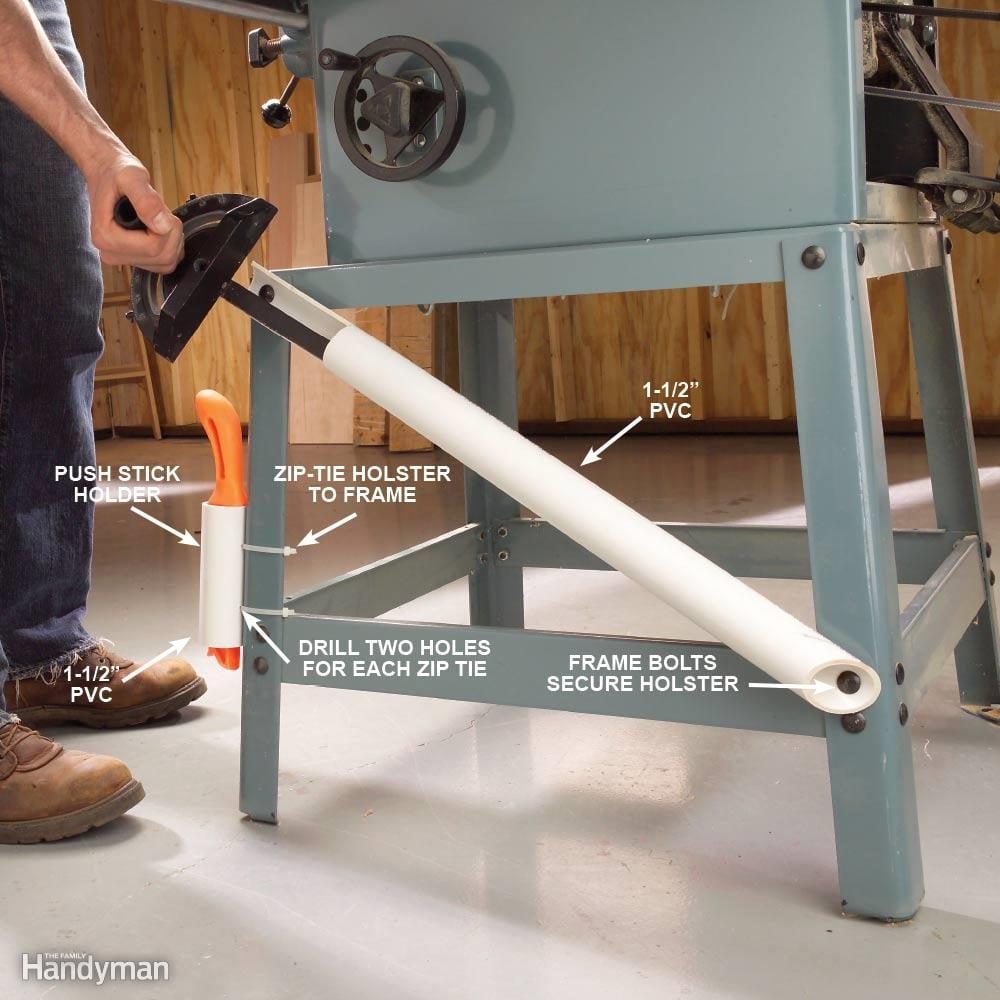
Quick-draw table saw accessories
Keep your table saw’s miter gauge and push stick within easy reach with a couple of sections of 1-1/2-in. PVC pipe bolted or zip-tied to a convenient spot on the frame under the table. Attach the miter gauge holster using the existing frame bolts, or drill holes in the legs for machine screws. For the push stick holster, we drilled a couple of sets of matching holes about an inch apart on the pipe and tautly zip-tied it to the leg.
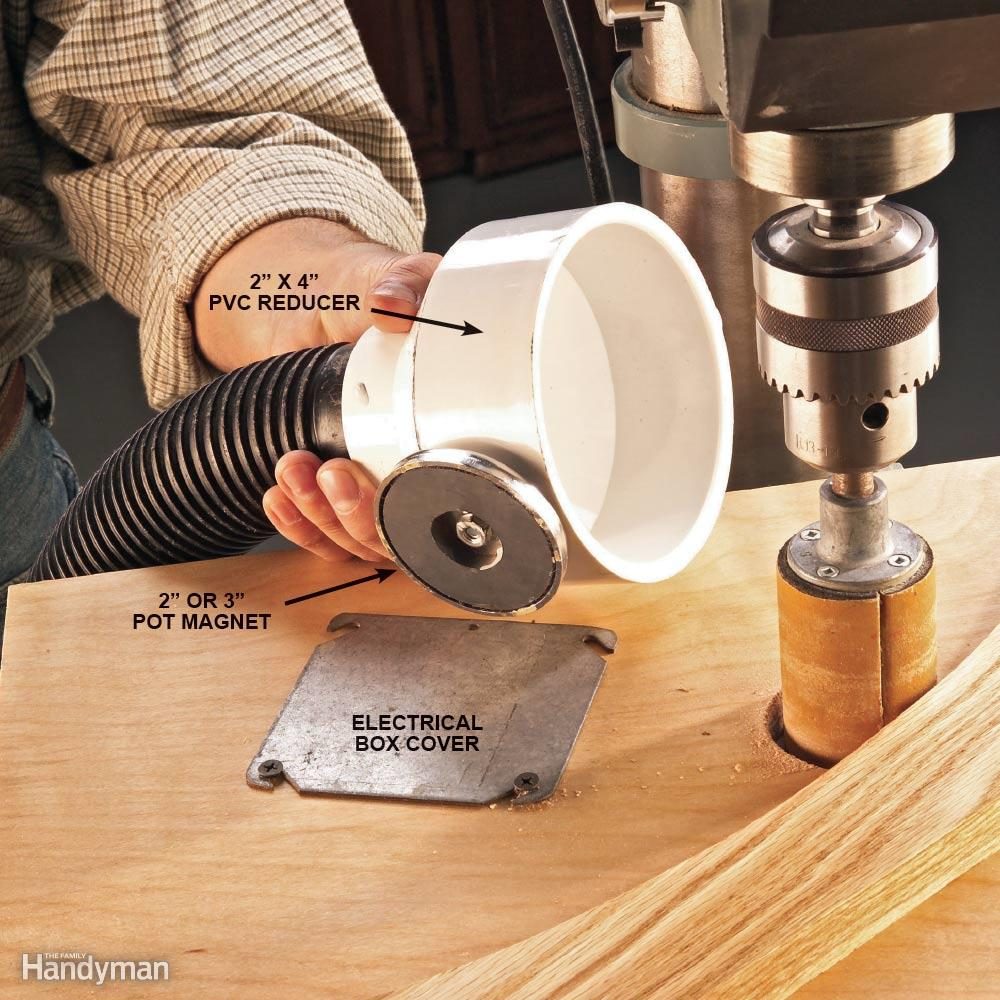
PVC dust catcher
Vacuum dust and chips right at the source! Bolt a two-in. pot magnet (available at home centres and hardware stores) to a four-in. x two-in. PVC pipe reducer and position it near the sander, saw, router or lathe that’s making a dust storm in your shop. A two-in. shop vacuum hose ‘press-fits’ nicely in the two-in. reducer end, and the pot magnet ferociously grips any metal surface.
If the working surface near the dust source is wood, screw a blank steel electrical box cover to the surface to hold the dust chute on target.
Make sure you avoid these popular life hacks from the Internet—they don’t work!
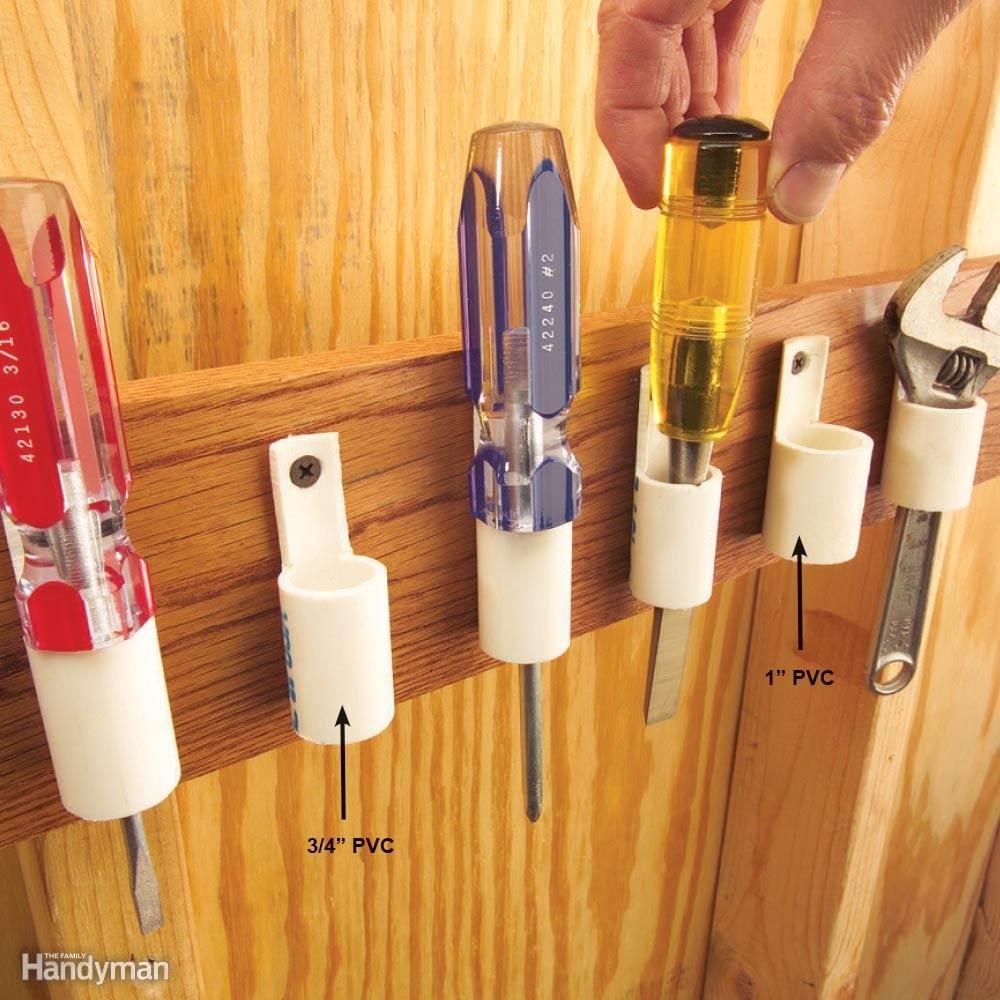
PVC tool pockets
Holster your screwdrivers, chisels, files and other hand tools in 3-in.-long pieces of 1/2- and 3/4-in. PVC pipe. Cut away the upper open section with a hacksaw or band saw, drill a hole, screw the piece on a board, and drop in the tools. If you’re using a band saw, slice off the cutaway section from a long length before cutting off the 3-in. holster.
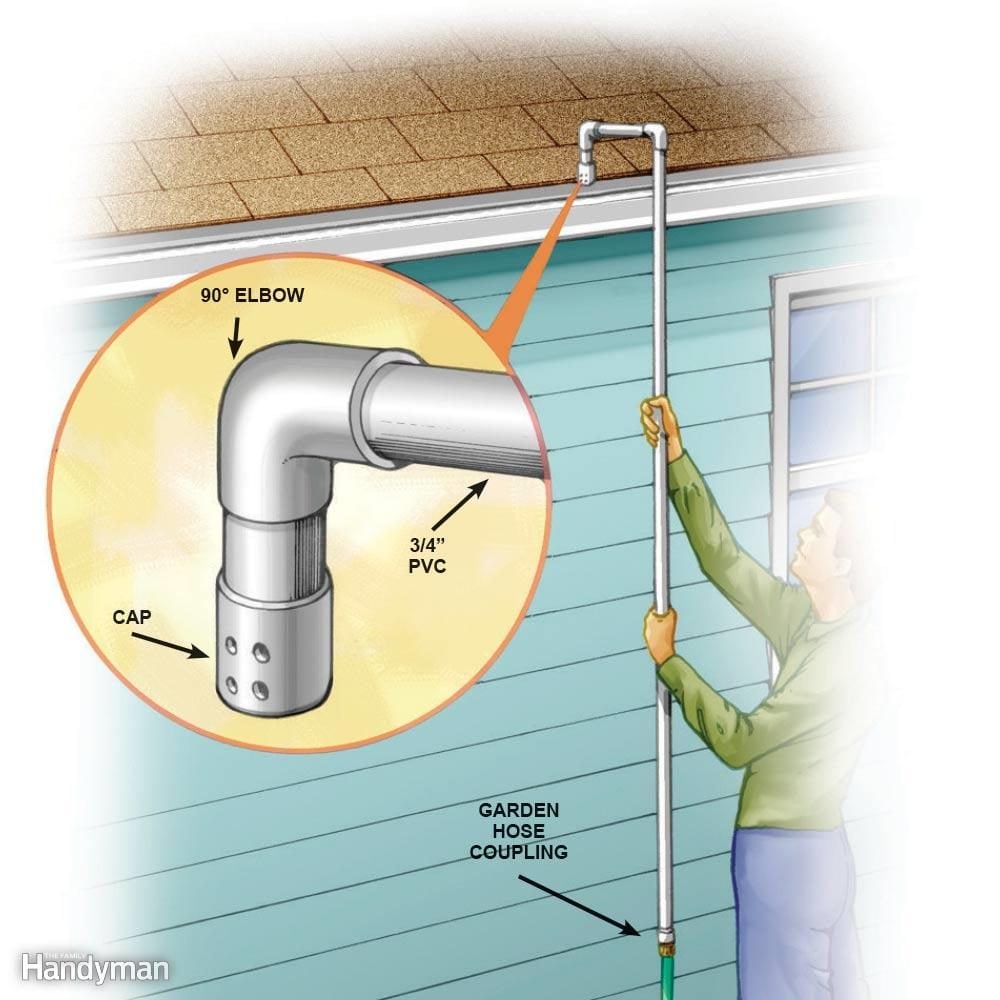
No-ladder gutter cleaner
This gutter cleaner is inexpensive, takes about 10 minutes to make and will help you avoid ladder climbing. Buy 3/4-in. PVC pipe, two elbows, a garden hose coupling and a cap at a local home centre. Drill 1/16-in. holes in the cap as shown. Make the handle long enough to comfortably reach your gutters, and cement the parts together with PVC glue.
Psst—make sure you never plant these five flowers in your garden.
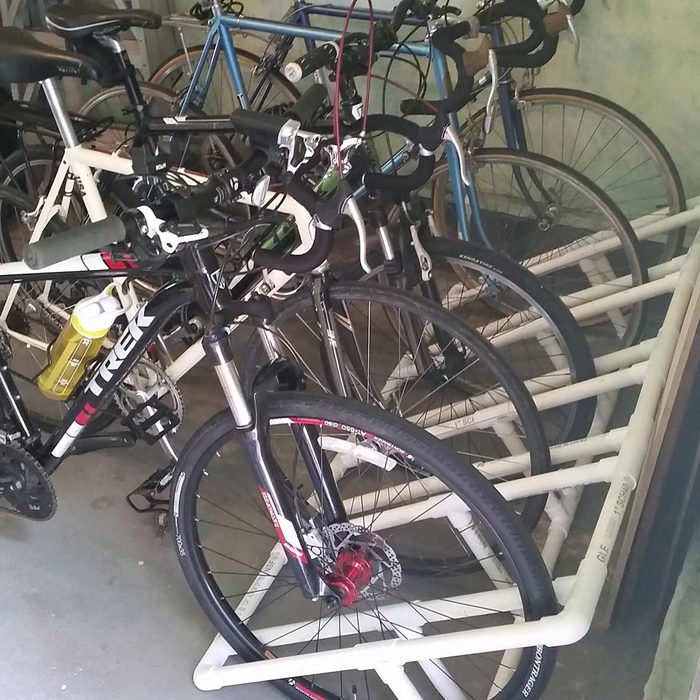
Bike rack
Use PVC pipe to build a bike rack. Perfect for a corner of the garage, this DIYer used PVC to make a bike rack that holds five bikes upright. Depending on your bike wheel specifications, you can modify dimensions so they all fit snugly.
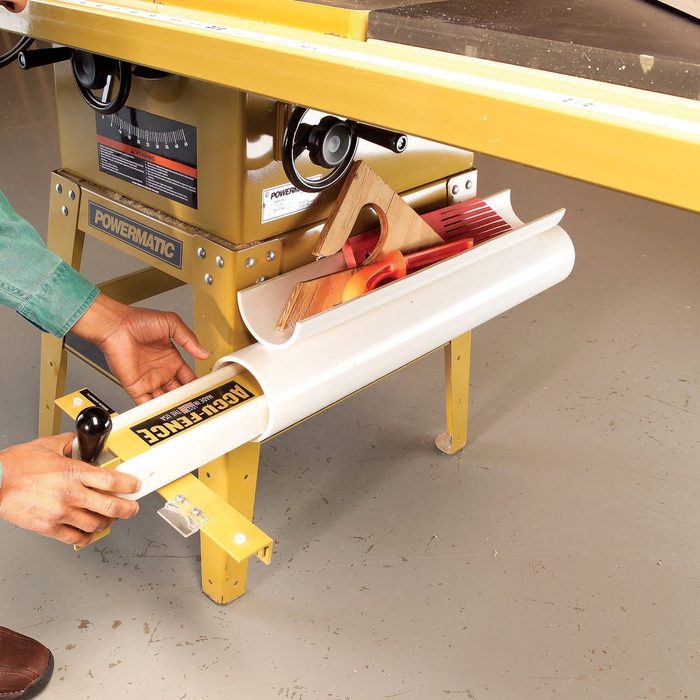
Table saw fence sheath
It’s a lot easier to crosscut boards on a table saw or use the surface as a workbench without the fence in the way. But where do you put it? How about tucking it away in a piece of PVC pipe bolted to the saw base? Buy and install a length of 4- or 5-in.-diameter PVC (measure your fence first!). Rip the leftover pipe in half and screw it to the top of the sheath. It’s a great shelf for push sticks, wrenches, featherboards and other accessories. Thanks to Martin Kipp for inspiring this tip!
Find out how to get rid of that musty smell in your basement.
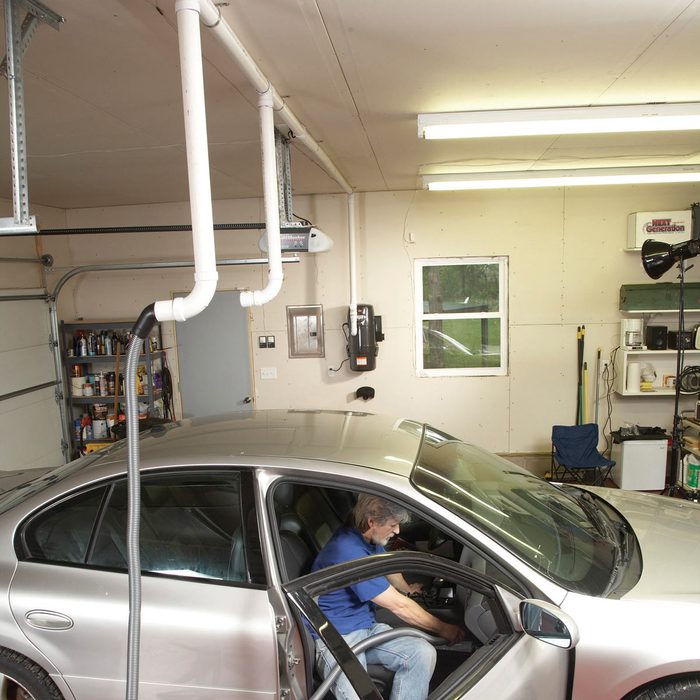
Central vacuum for the garage
Install 2-in. sanitary tees on the ceiling and drop a pipe near each car door. Install a long 90-degree bend and a stubout to connect the hose. Cap off the stubout with a standard 2-in. pipe cap when not in use.
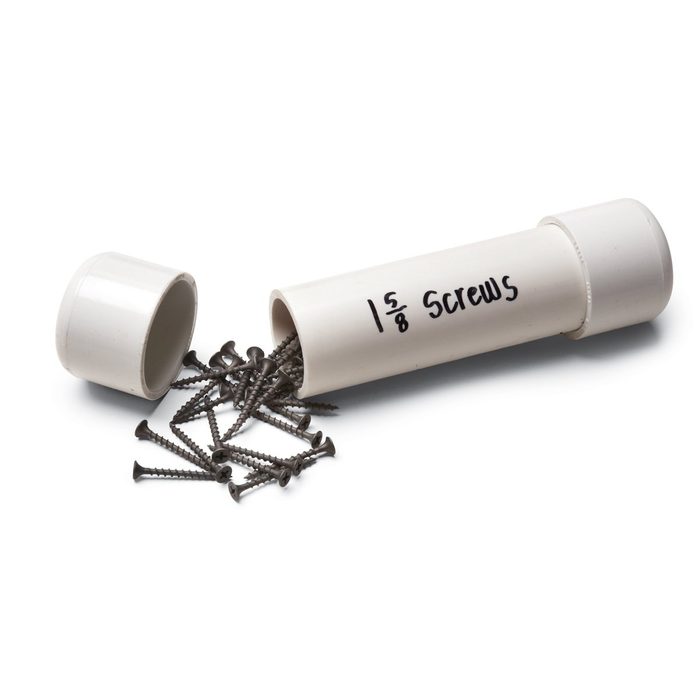
PVC pipe blade and bit organizer
I always seem to have extra bits, jigsaw blades and other small items lying loose in my toolboxes and bags. To keep things organized, I cut different diameters of PVC pipe to the lengths needed for my accessories. I glue one end cap in place, put my items inside and slide on the other end cap. Use a marker to label each container and you’ll be able to find all your bits, blades, screws and whatever when you need them. —Tom Richardson
Psst—make sure you never store these things in your garage!
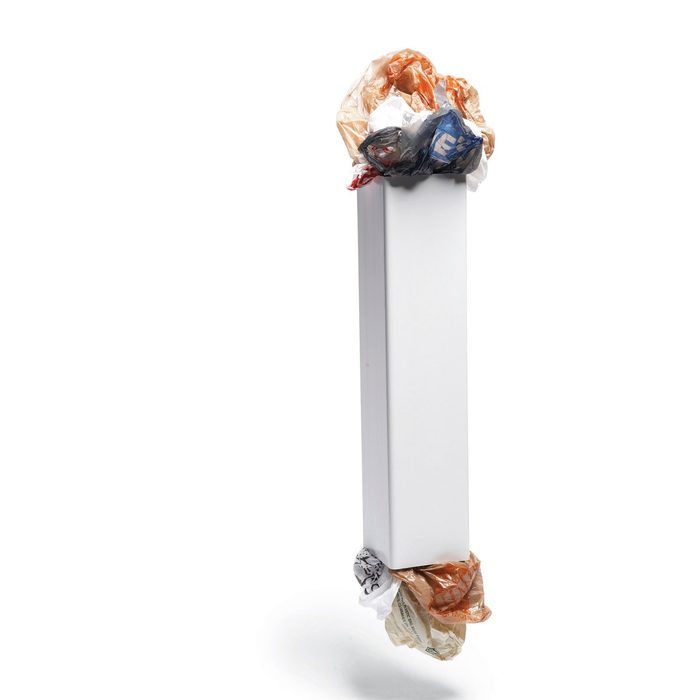
PVC plastic bag dispenser
After building a PVC fence, I was left with a few extra 2-ft. lengths of fence post. I turned one of them into a home for grocery bags that I reuse. I stuff them into the top and pull them out the bottom. If you don’t have any leftover fencing, 3-in.-diameter PVC pipe works well too. Attach it to the door inside a pantry or closet, or to a wall of your workshop or garage. —Dave Mitchell
Find out how to put plastic produce bags to work all around the house.
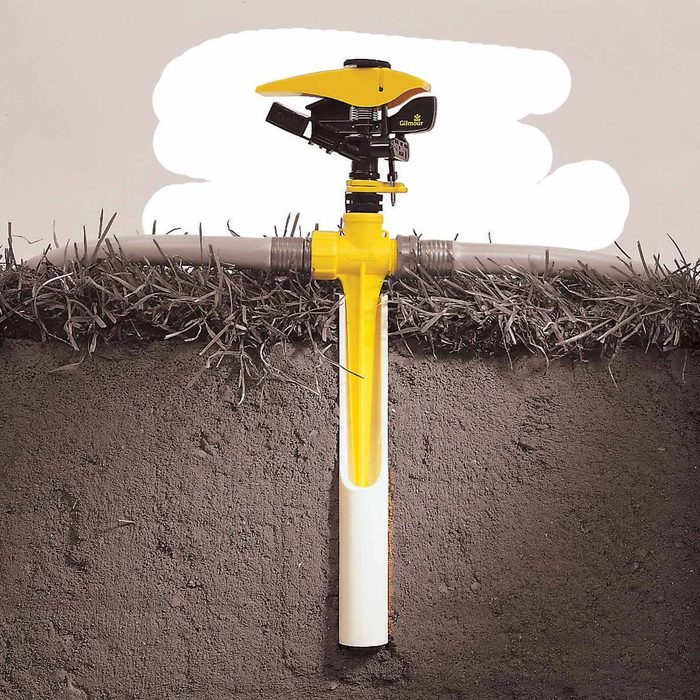
Sprinkler socket system
If you use spike-type sprinklers, try setting them into permanent sockets made from 1-in. PVC pipe. Not only will these sockets make moving the sprinklers a snap, but they’ll keep the sprinklers upright and shooting water where you want it.
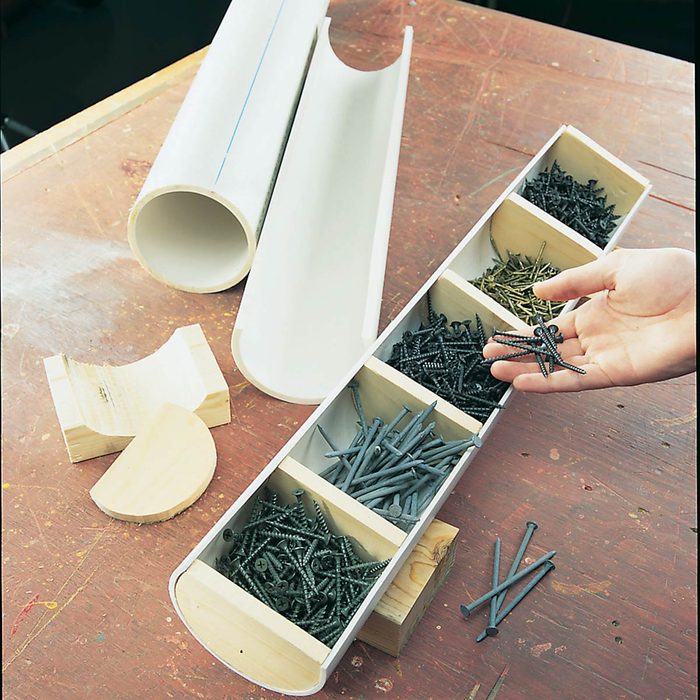
Fastener trough
Cut a 2-ft. length of 4-in. PVC pipe lengthwise with a scroll saw, creating a trough that’s a little more than half the pipe’s diameter. Glue or screw in 1/2-in. thick wood partitions to create compartments for often-used screw and nail sizes. To make it tip-proof, trace the pipe’s curve on a couple of scrap 2×4 blocks, power-sand or saw out the curve, and screw the pipe on this scrap block base.
Find out 13 things home inspectors wish you knew.
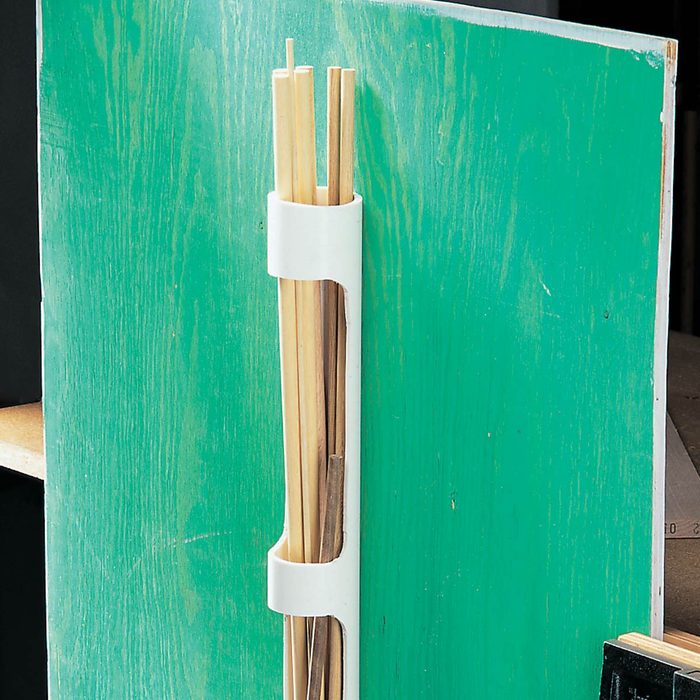
Dowel quiver
Use a saber saw to cut lengthwise notches in a 30-in. long piece of 3- or 4-in. dia. pipe then glue on a PVC end cap. Drill pilot holes in the pipe opposite the notches and screw the quiver to a shop wall. Your notched-out quiver will hold any size dowel— from standard 36-in. lengths to stubby leftovers—for instant access. Thanks to George Marchalk for sending this tip down the pipeline.
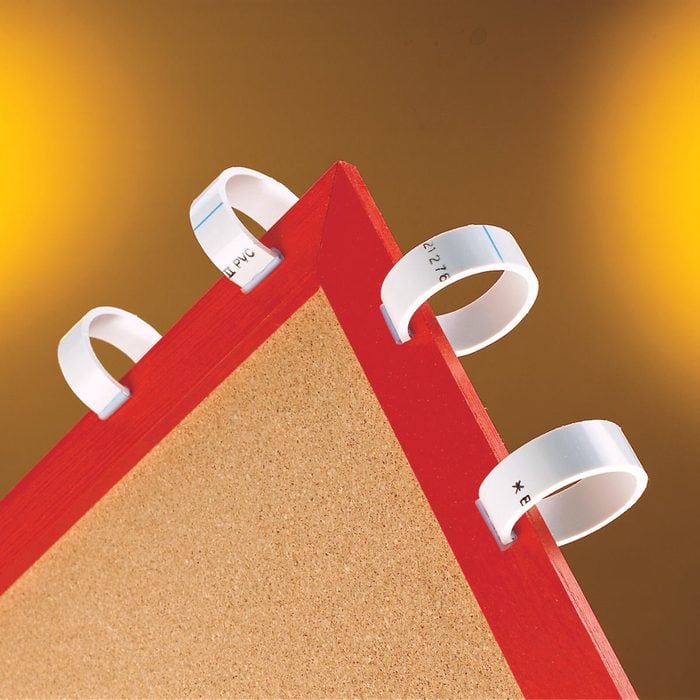
PVC spring clamps
If you’re ever in a pinch for spring clamps, reader John Larson advises making them yourself from short sections of PVC pipe. Use 1-1/2 to 3-inch diameter pipe, cut into 1-1/2-inch wide sections; slit the sections across the width. They’ll give eight to 10 pounds of clamping pressure for all kinds of gluing and holding tasks.
Feeling crafty? These DIY furniture hacks are sure to inspire!
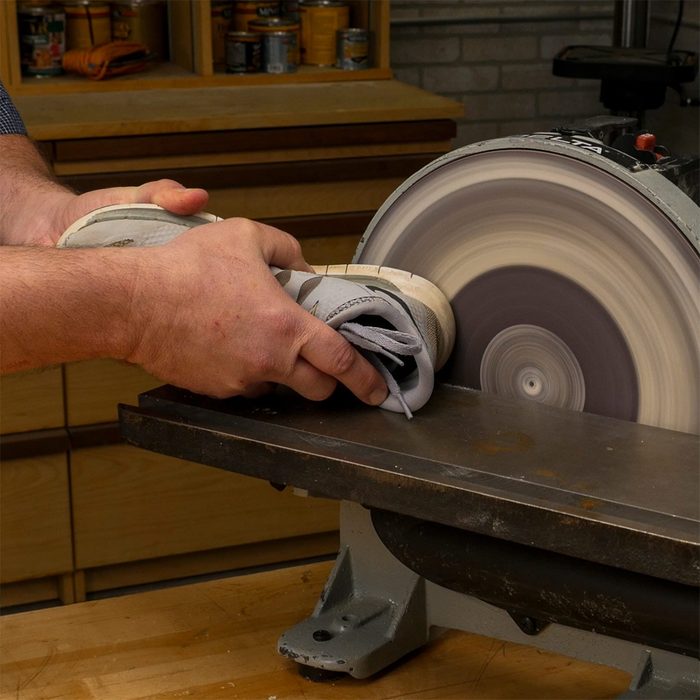
Use a sneaker to clean sandpaper
Make sandpaper nearly new again with a lowly old sneaker. Start up your power sander and dust collection system (remember to wear hearing and eye protection). Then slowly press the rubber sole of an old sneaker along the sandpaper—you’ll see a difference instantly!
Here are more cleaning hacks for hard-to-remove stuff.

How to magnetize a screwdriver
Magnetize the end of a screwdriver to drive screws with just one hand. This hint is especially useful for working in tight spaces where there isn’t room for you to hold a screw with one hand while you turn the screwdriver with the other.
Stuck inside? It’s the perfect time to tackle these indoor DIY projects.
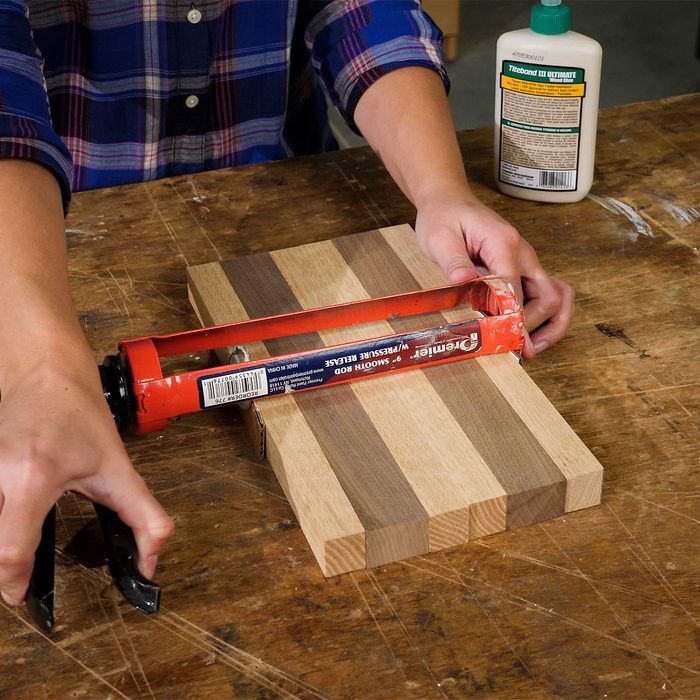
Caulk gun clamp
Did you know that you can use a caulk gun as a clamp? It’s perfect for gluing up small projects such as a cutting board. Just place a couple of pieces of scrap wood or cardboard at the ends of the caulk gun and then squeeze the trigger to apply pressure.
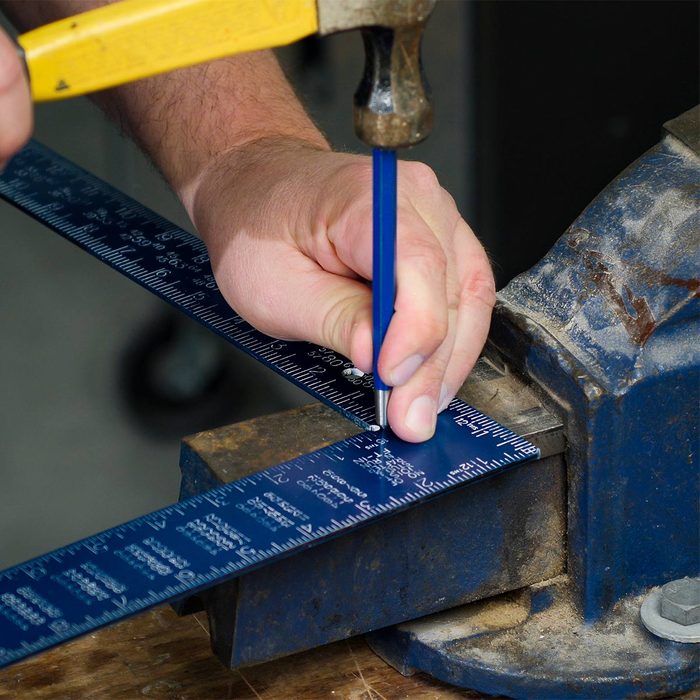
How to fix a square
Before tossing your off-kilter square and spending money on a new one, try fixing it with this simple process. Use a centre punch, a hammer and an anvil. If the sides of the square are too close together, punch the inner corner. If the sides are too far apart, punch the outer corner. Check your progress, and repeat as needed until the square is square.
Not sure what to do with your old wall-mounted phone jack? Cover yours up with these clever DIY solutions!
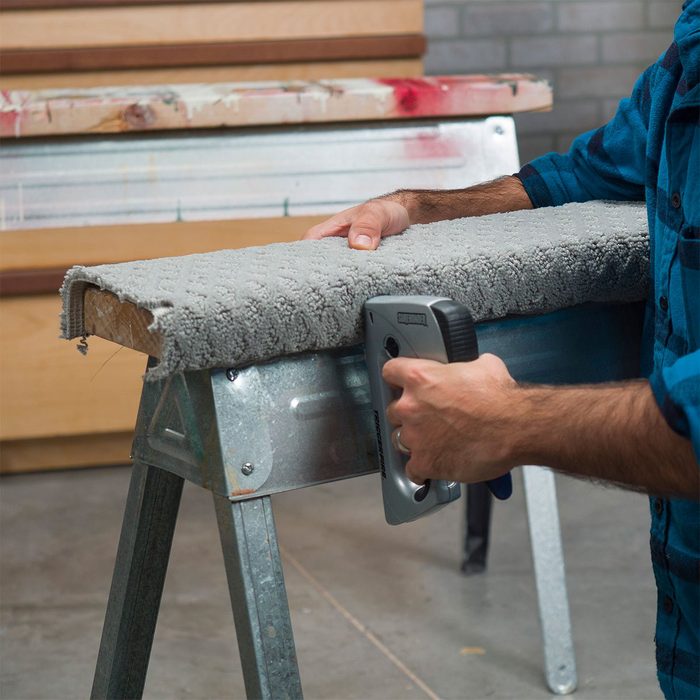
Saddles for sawhorses
Give your sawhorses padded, non-marring surfaces that protect your projects by wrapping the top rails with pieces of old carpet or rugs. Use a utility knife and a straightedge to cut the carpet along the woven backing; then secure the pieces to the sawhorses with staples.
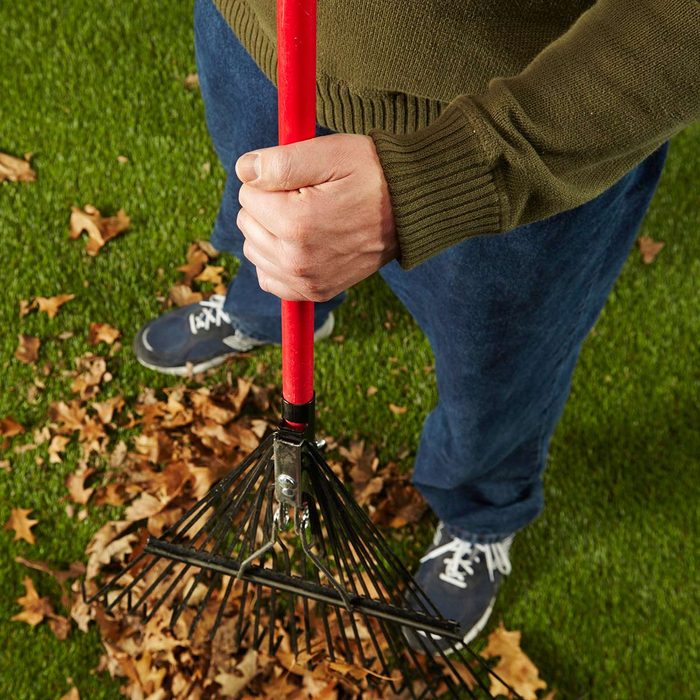
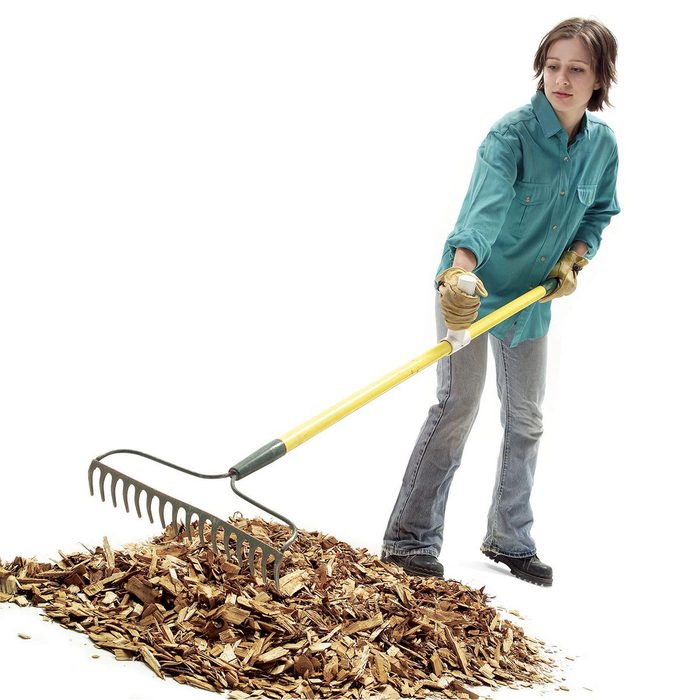
Blister buster
I rake leaves like I’m sweeping the floor with a broom. I always used to get a blister between the index finger and thumb of my lower hand. Now I just keep my thumb and fingers on the same side of the pole. You get just as much gripping power—without the blisters! —Kipp Beck
These fall yard maintenance tips will make quick work of leaves.
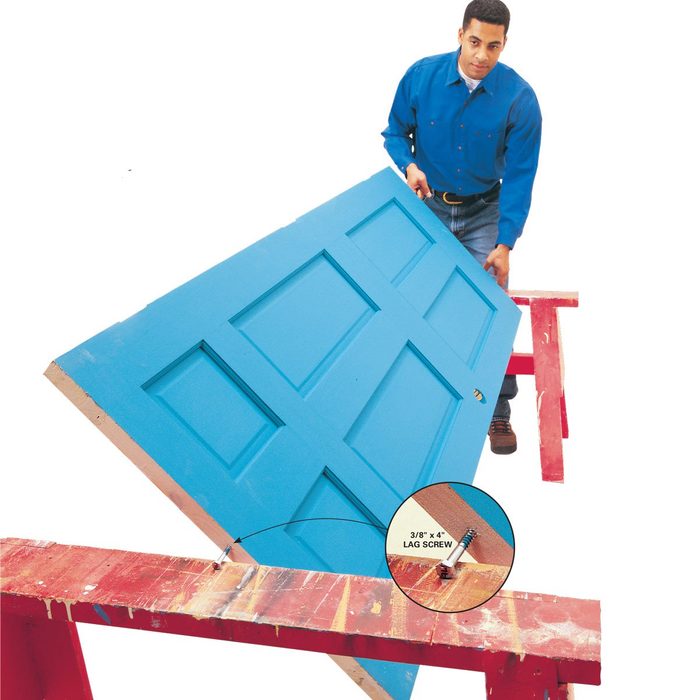
Topsy-turvy door painting
Here’s how to paint a door without waiting for one side to dry before flipping it over: Drive one lag screw into the centre of the top edge and two near the bottom corners. Set the screws on sawhorses, paint, flip and paint the other side.
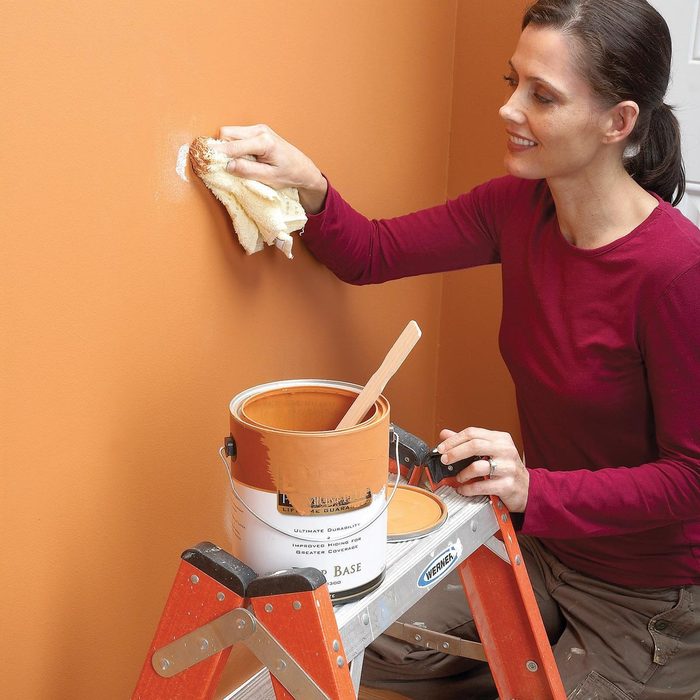
Touch-up without cleanup
No need to mess up a brush to fix a wall wound. Just dip an old washcloth in the paint and throw it away when you’re done. A washcloth leaves the same texture as a paint roller, so your repair will blend nicely.
Don’t miss HGTV star Sarah Richardson’s budget-friendly decorating fixes.
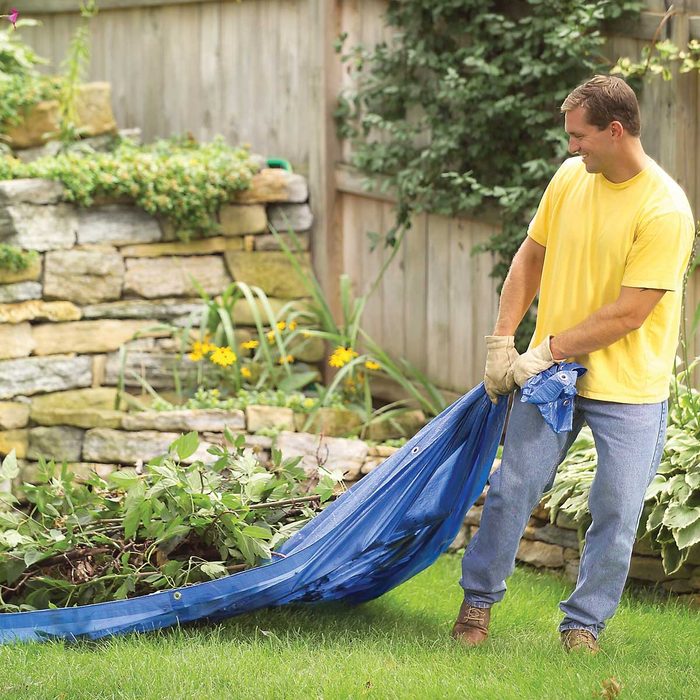
Tarp trailer
With a big, cheap plastic tarp you can drag leaves, branches or mulch around your yard.
Check out more landscaping hacks that are guaranteed to come in handy.
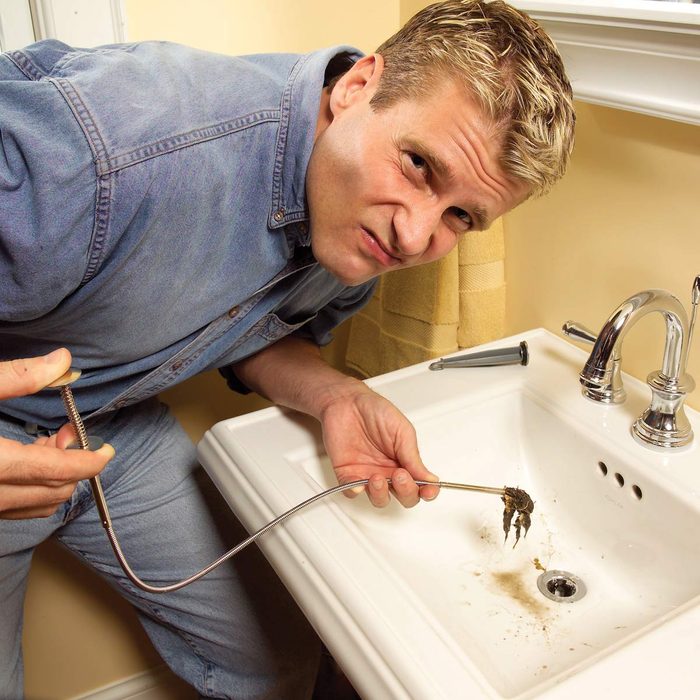
Clog claw
Every homeowner should have a flexible-shaft pick-up tool for grabbing stuff out of hard-to reach spots. They’re also great for yanking clogs out of drains!
Making this mistake with a clogged toilet can actually make things worse.
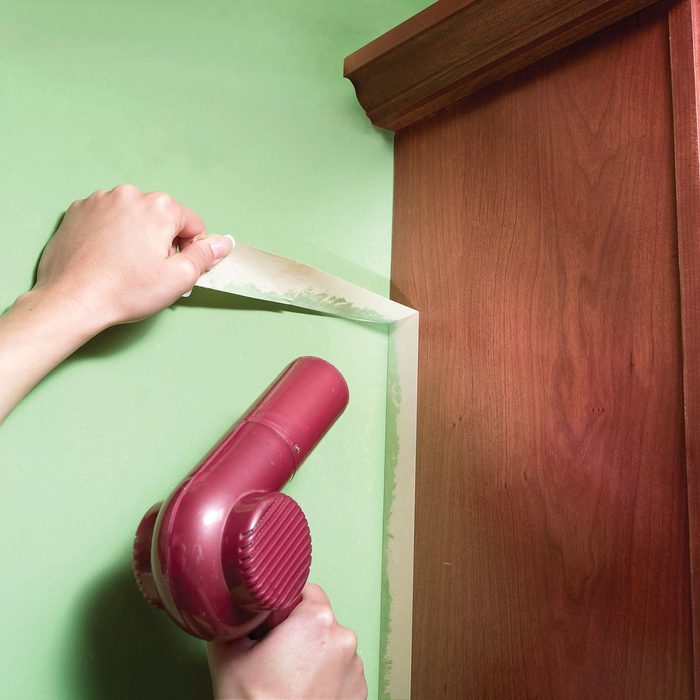
Heat up sticky stuff
A hair dryer softens the adhesive under tape or bumper stickers and makes them easy to pull off. A dedicated heat gun also does the trick, if you have one.
Did you know a hairdryer could also be the secret to your best-ever Thanksgiving turkey?
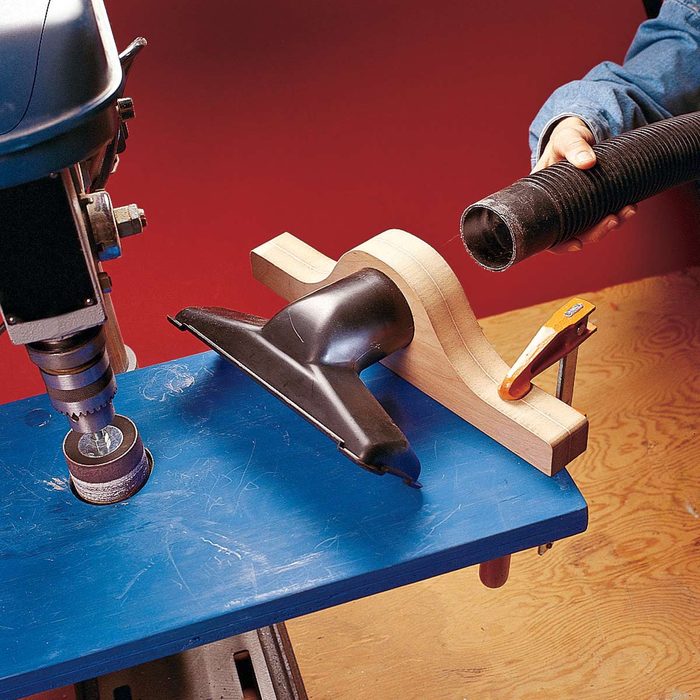
Dustless drilling and drum sanding
Whenever I have curves to sand, I chuck a sanding drum into my drill press. The only problem is that the sawdust flies everywhere. I wanted to catch the dust with my shop vacuum, so I made a bracket to hold the nozzle. I glued together two 3/4-in.-thick pieces of medium density fiberboard (MDF) and cut out the curved shape with my jigsaw. When I want to use it, I just clamp it to my drill press table. I made the hole just big enough so that the tip of the nozzle fits snugly. —Doug Kaczmarek
Discover the surprising ways you’re shortening the life of your vacuum cleaner.
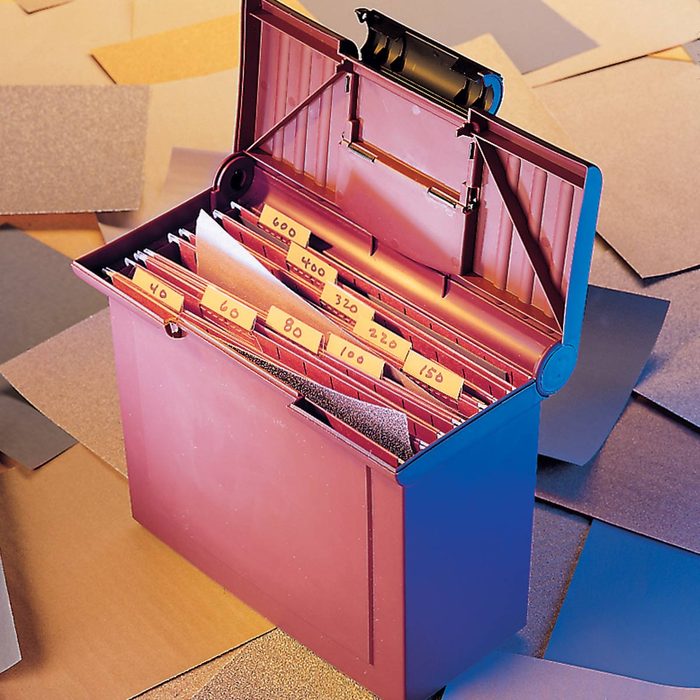
File by grit
Tired of digging through a drawer full of sandpaper and turning over each sheet to figure out the grit, I devised this handy sandpaper organizer using a plastic file box. Each hanging file contains a different grit, and I write the grit numbers on the tabs so I can instantly find the sandpaper that I’m looking for. —Lynette Aitchison
These clever sandpaper hacks are sure to come in handy.
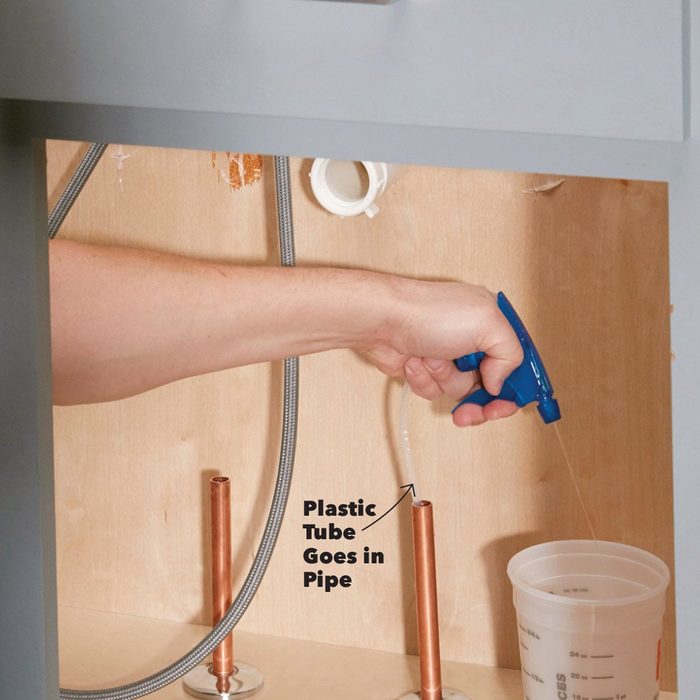
Spray-bottle pipe pump
When soldering a fitting onto a copper pipe, you have to get the water out of the pipe or the solder won’t melt. But removing the water from vertical pipes is tricky. That’s when I grab the spray nozzle from a plastic bottle. I just stick the plastic tube down into the pipe and pull the trigger a few times. It helps to have a small cup to shoot the water into. —Dean Debeltz
Learn the right way to thaw frozen pipes (before they burst).
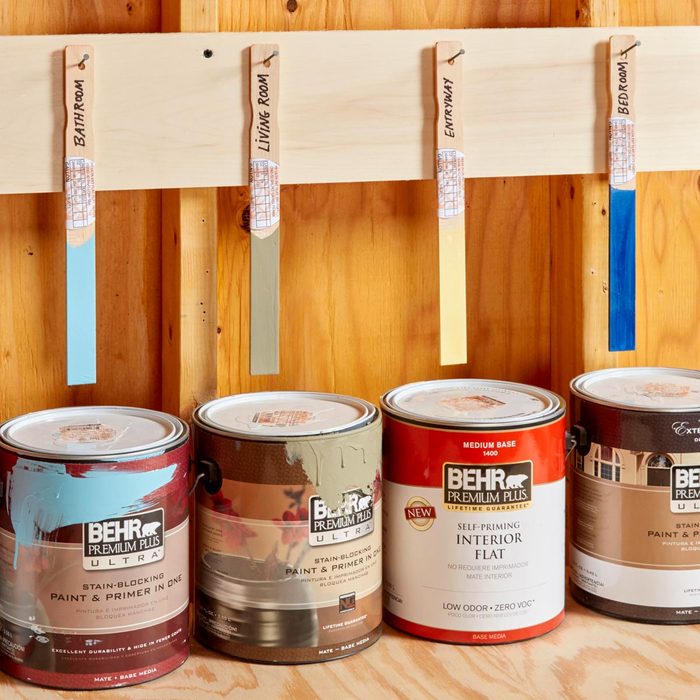
Stir-stick paint organizer
When you buy custom-mixed paint, the paint clerk slaps the mix label on top of the can. I always ask for an extra label to wrap around a stir stick. When I’m done with the project, I let the stir stick dry and drill a hole near the top of it. Then I label both the stick and the can with the name of the room where I used the paint. I hang the stir sticks near the cans of leftover paint. With both the colour formula and a dried paint sample in view, I don’t have to pull down every can to find the right one for touch-ups. —Perry Parson
Take inspiration from these clever home improvement ideas under $200.
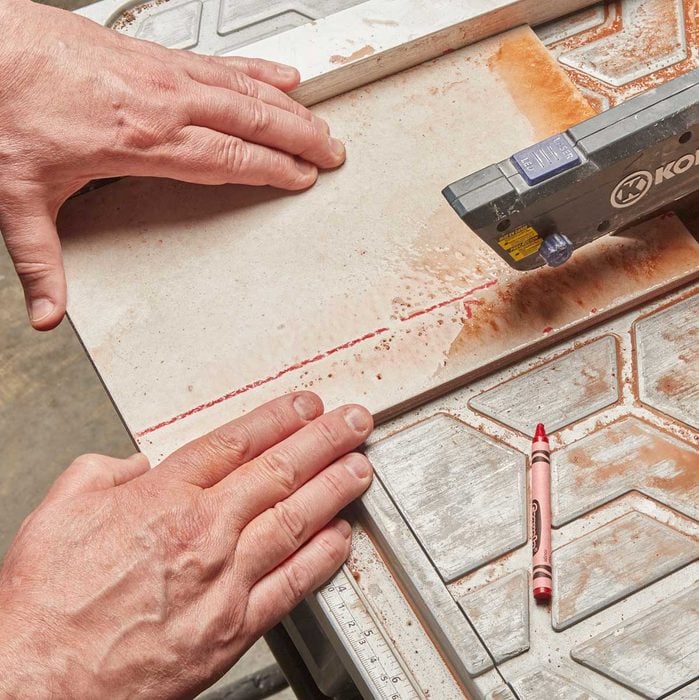
Wet-saw marking tip
Use a crayon to draw the cutting line on tile before using a wet saw. Unlike a pen or pencil line, a crayon mark won’t wash off and is easier to see in the muddy water. —Mike Winter
These easy DIY home projects deliver a huge impact.
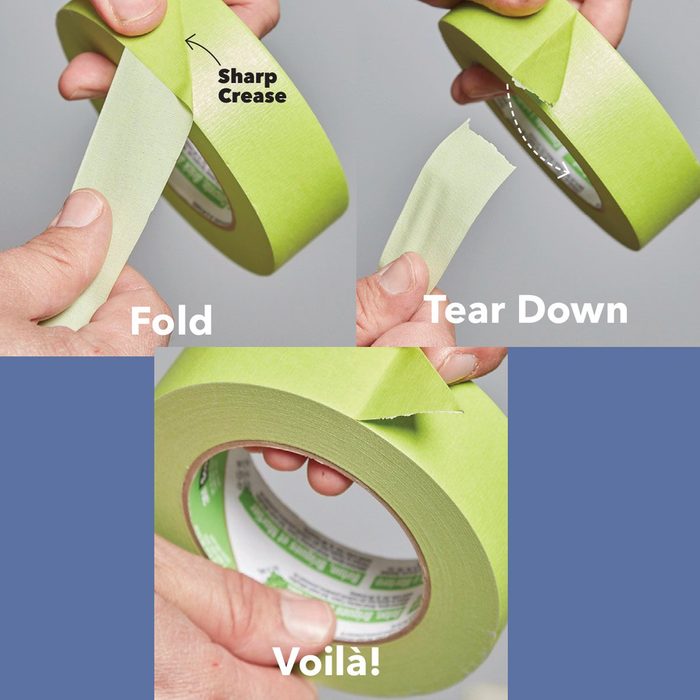
Tape-tearing tip
Here’s an easy way to tear tape and get a starting edge at the same time. Simply fold the tape under at a 90-degree angle to the roll. Then, with a snapping motion, pull the tape against the edge of the roll. The tape tears, leaving a triangular starting tab. This won’t work with plastic tapes; those must be cut. —Chris Henrichs
Don’t miss these design tips from Brian Gluckstein—Canada’s most in-demand interior designer.
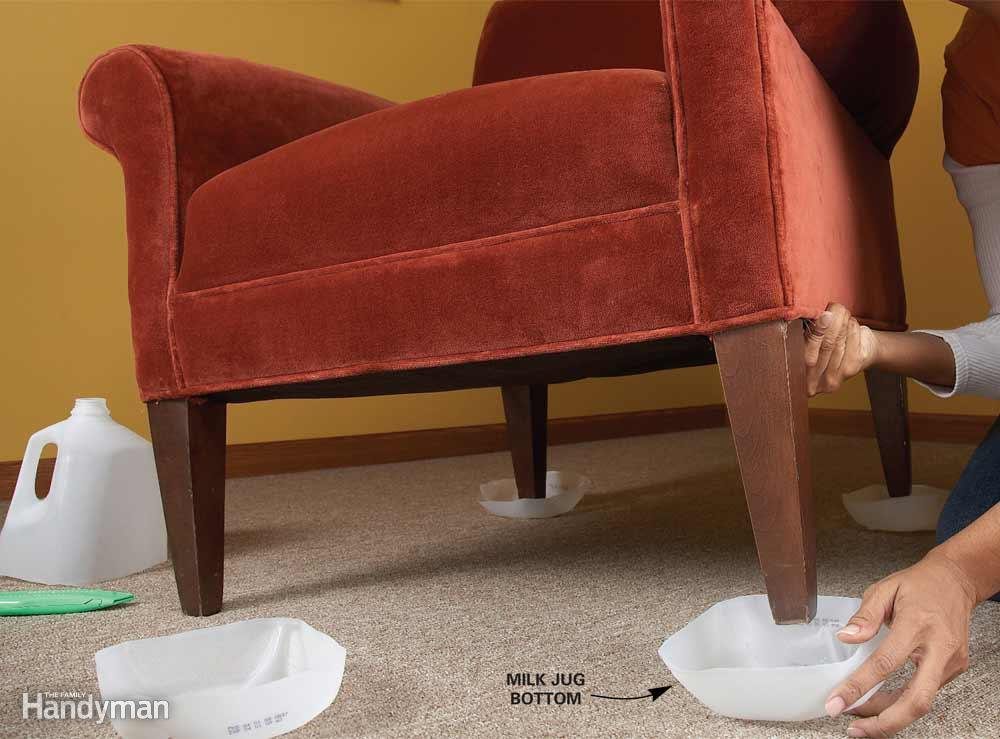
Milk jug furniture movers
When you have to move heavy furniture on carpeting, don’t just drag it around. That’s hard on carpet and you might damage the furniture legs. Make the job easier with these homemade moving pads. Cut the bottoms off four plastic water or milk jugs with a utility knife and rest each furniture leg on its own slider. The rounded, slippery bottoms make them perfect for furniture moving. Yes, you can buy fancier versions of these things—for 15 bucks or more! But these work just as well, and best of all, they’re free!
Find out the 50 biggest regrets of first-time home buyers.
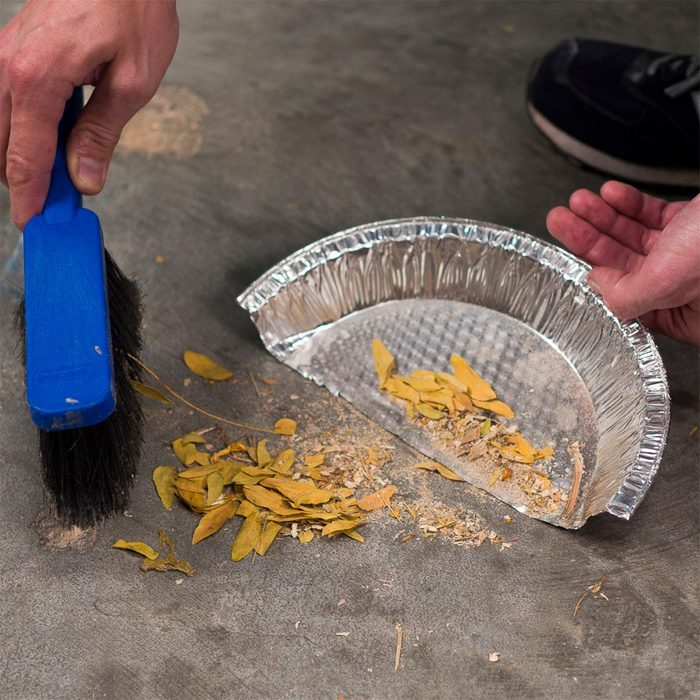
Pie plate dustpan
Create a quick disposable dustpan out of an aluminum pie plate. Use tin snips or heavy-duty scissors to cut the pie plate in half. Sweep up the mess and toss it in the trash!
Don’t miss these surprising uses for kitchen tongs all around the house.
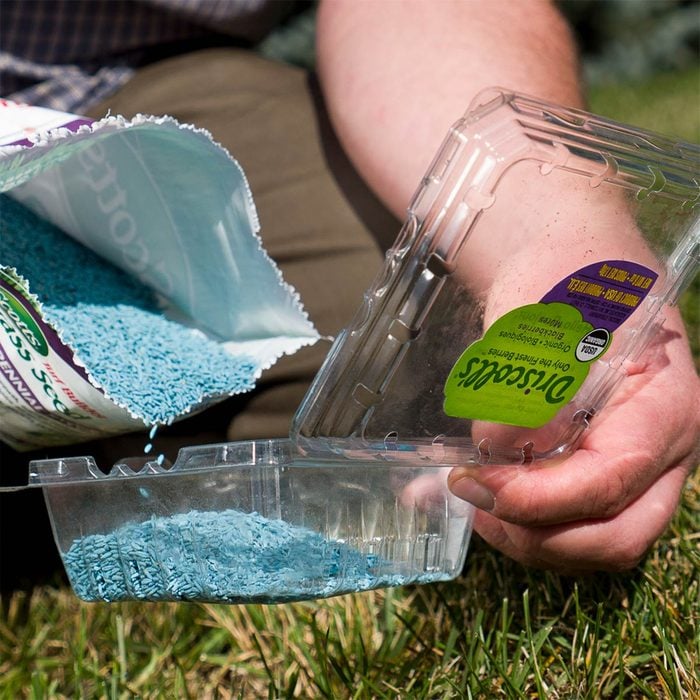
Grass seed broadcaster
When it’s time to clean out the refrigerator, be sure to save those plastic berry containers for repurposing ideas. You can toss the mushy raspberries, but wash and dry the container—it’s perfect for spreading grass seed on your lawn!
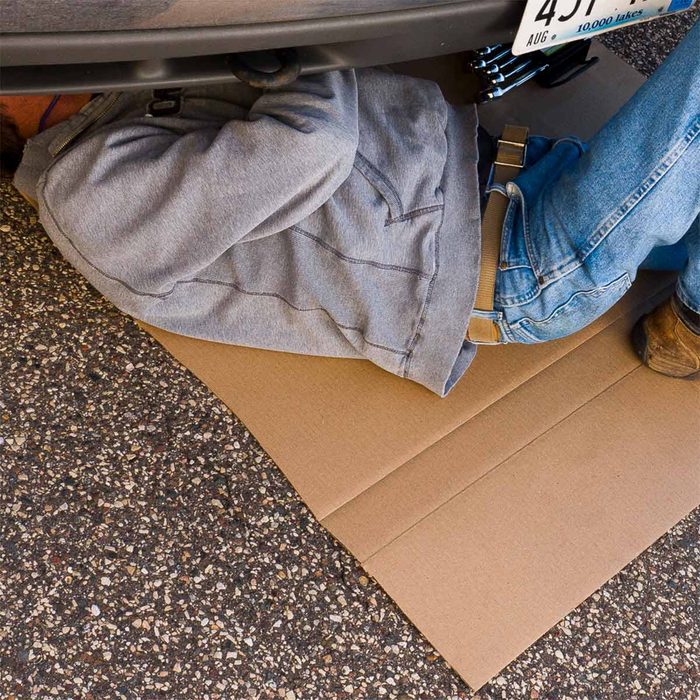
Cardboard drop cloth
Save large pieces of cardboard from boxes that you bring into your home. Store them along a wall in your garage or workshop so they’re at the ready when you’re working on a messy project such as refinishing furniture or changing the oil in your car. A large slab of cardboard makes a perfect disposable drop cloth.
Here’s invaluable advice on how to hire a reliable contractor.
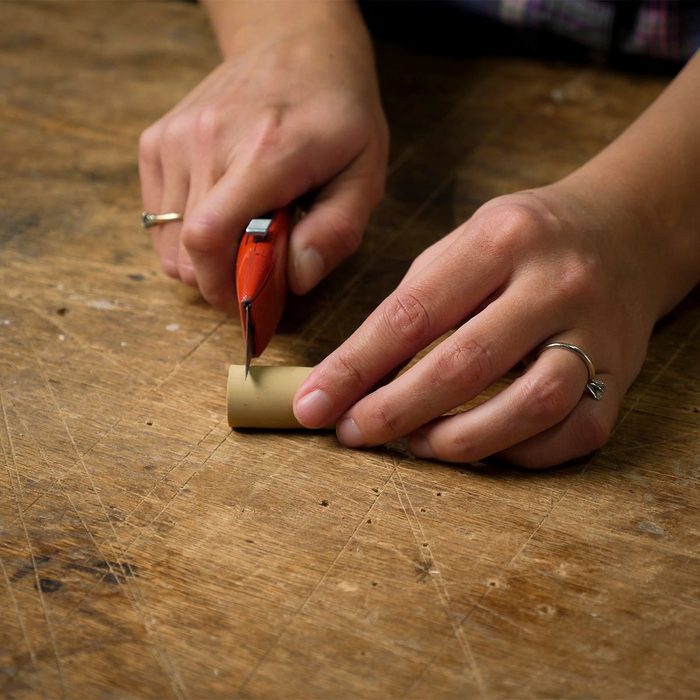
Wine cork wobbly table fix
Next time you open a bottle of wine, save the cork! You can use a slice of synthetic cork to brace a wobbly table leg. Just mark the amount of cork needed, slice it off with a utility knife and glue it in place.
You’ll wish you knew these clever ice cube tray hacks sooner!
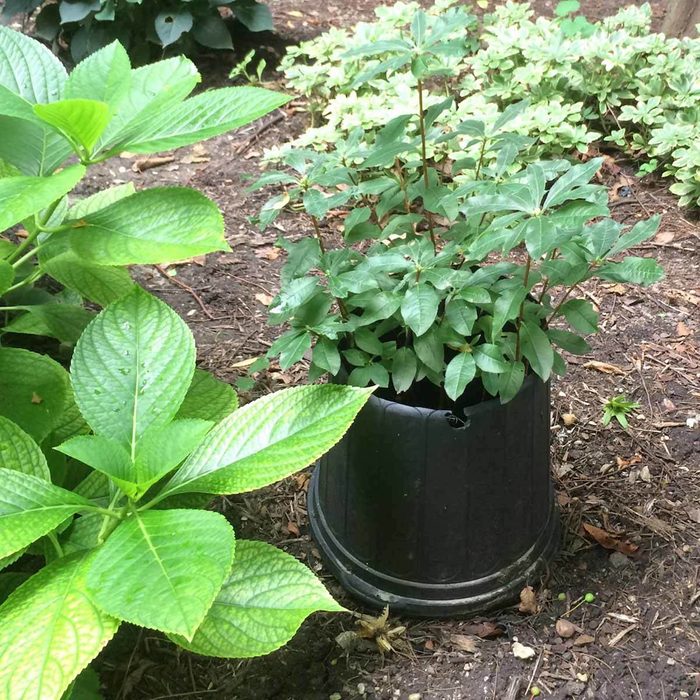
Reuse nursery containers
Plastic nursery pots have so many uses that it’s a shame to throw them away. Recycling them is good, reusing them is even better! You can save money gardening by reusing plastic nursery pots and cellpacks to raise new plants. Larger containers can hold hand tools. Or remove the bottoms and place the pots upside down around prized plants that are prone to rabbit browsing, as seen here.
Find out more genius gardening hacks that will save you time, money and effort.
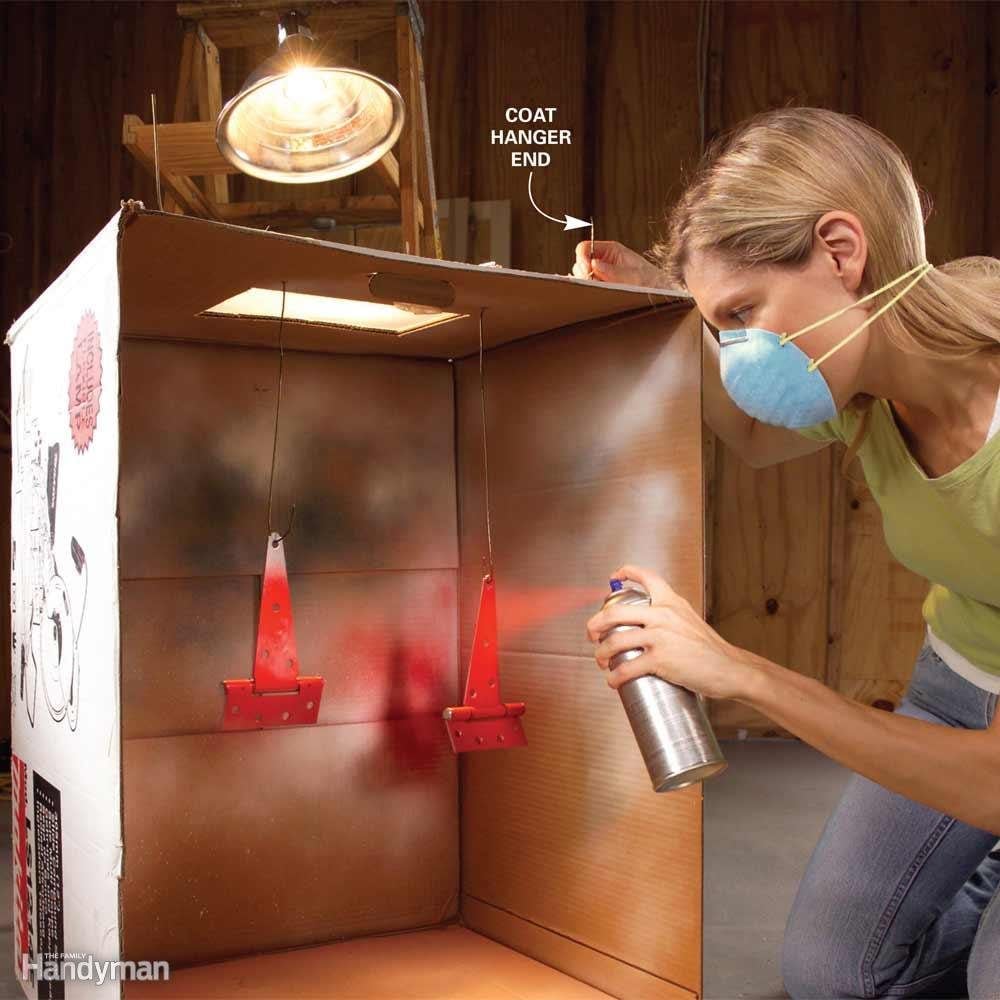
Cardboard spray booth
Prevent paint “overspray” with this clever spray booth made from a cardboard box. Cut a hole in the top of the box. Cover the opening with plastic wrap and position a shop light above to illuminate your project. You can use coat hangers, poked through the cardboard, to hold and rotate the objects as you’re painting them. Not only will your shop be neater, but your paint projects will now be thumbprint free.
These DIY painting ideas will inspire your next home improvement project.
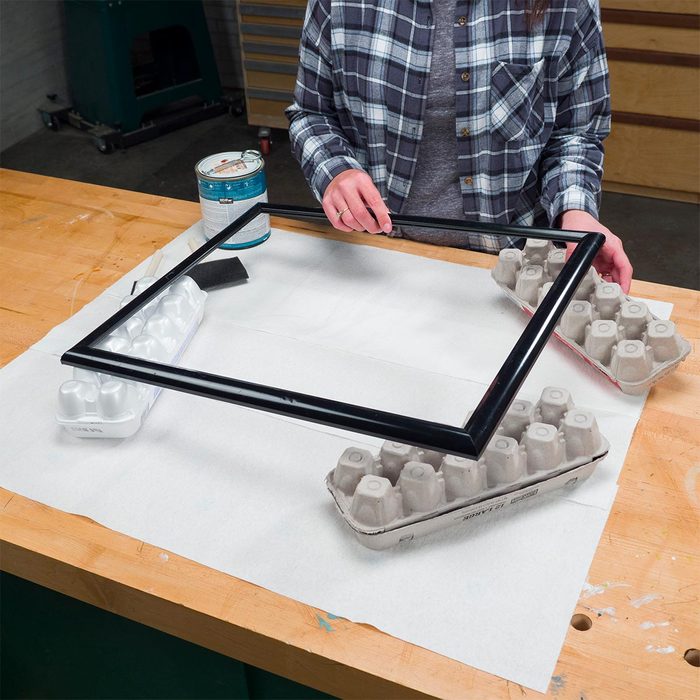
Egg carton painting props
Keep a few empty egg cartons with the rest of your painting supplies. They’re great for lifting a small project off of a work surface, making it easier to paint nooks and crannies and along the base of the project.
Don’t miss these interior painting tips for flawless walls.
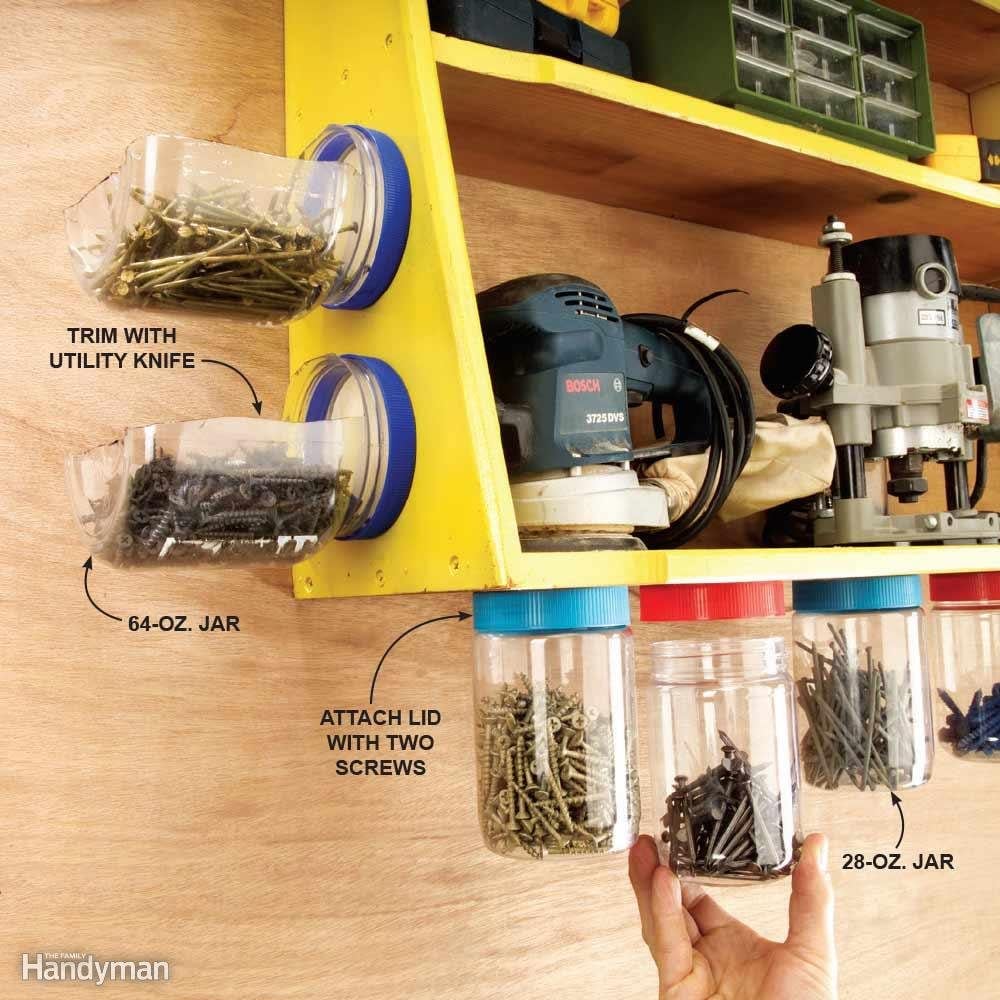
Recycle peanut butter jars
Plastic peanut butter jars work better for storage than glass baby food jars because they hold a lot more hardware and won’t break into shards if you drop one. Attach the lids of 28-oz. jars under a shelf with two screws (so the lid can’t spin when you loosen the jar) and screw on the loaded jar. For quick access, cut away half of a 64-oz. peanut butter jar with a sharp utility knife, leaving the neck intact, then attach the lid and jar to the side of a cabinet. If you load it with lemon drops, we won’t tell.
Check out more DIY garage storage solutions.
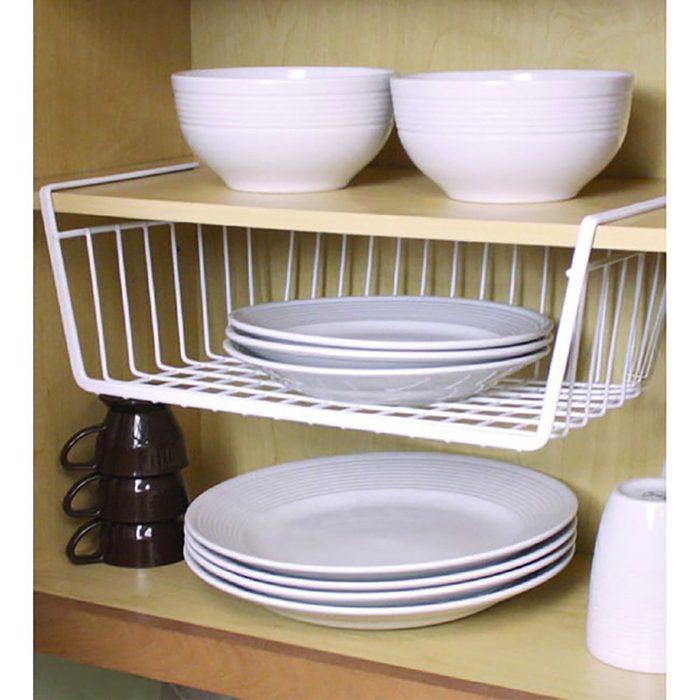
Stop piling dishes with this storage basket
Save space (and the state of your dishes) by hanging a few of these vertical cupboard dividers from your existing shelves.
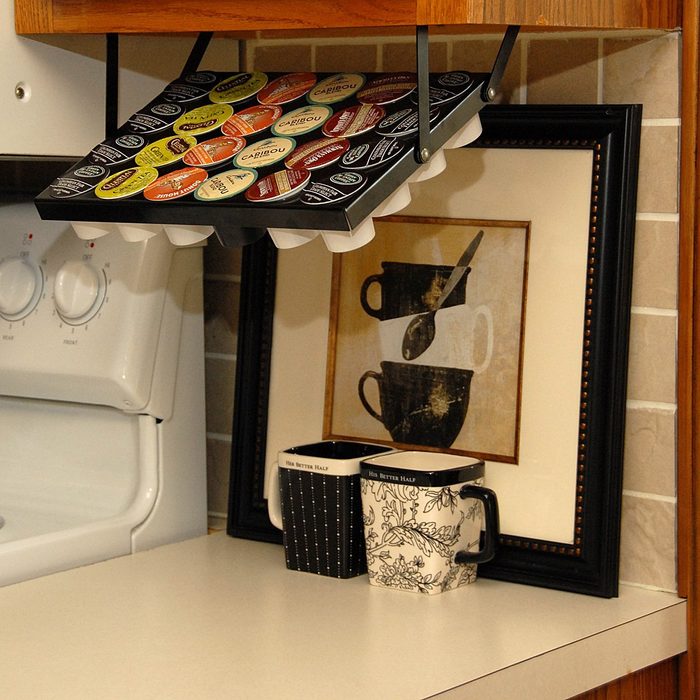
Keep your k-cups close
Love your Keurig, but hate having to always reach for the coffee pod boxes? This makes reaching far for those boxes a thing of the past. This cabinet k-cup holder can slide down for an easy grab, and back up so it’s out of your way.
Avoid these kitchen organizing mistakes everyone makes.
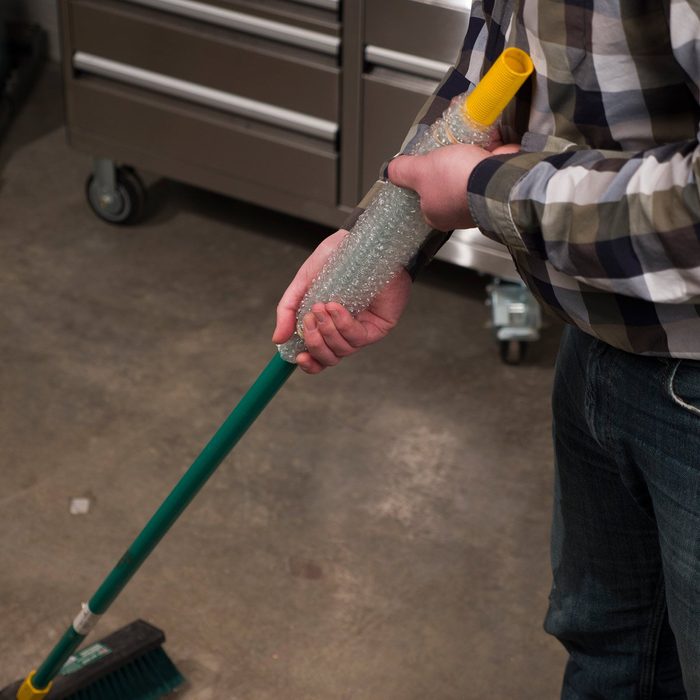
Blister prevention
Bubble Wrap® can help prevent blisters by placing some on the handle of a rake or a broom.
Find out 13 things you should never vacuum.
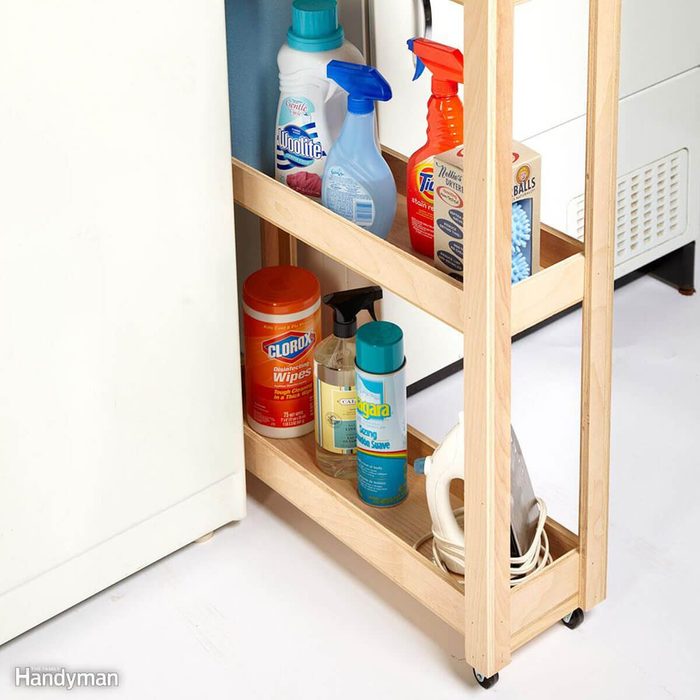
Skinny laundry room cart
A lot of laundry rooms have a narrow wasted space either next to or between the washing machine and dryer, and it’s usually a hideout for socks and lint. To take advantage of this space, build a simple plywood laundry room cart on fixed casters to hold detergents and other laundry supplies.
Here are 30 more home organizing hacks you need to try today.
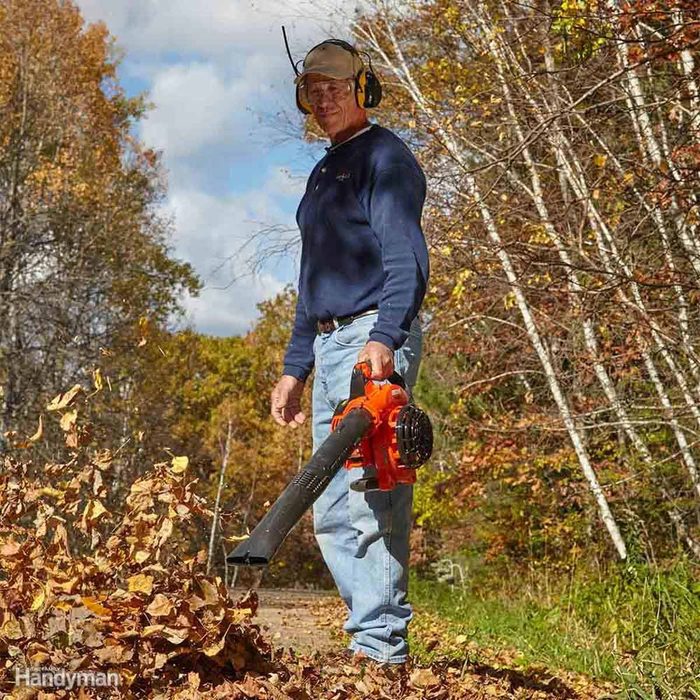
Get out the leaf blower
Don’t put your leaf blower away for the season, put it to your advantage! Leaf blowers work great for removing light, fluffy snow.
Here are seven mistakes to avoid when removing snow.
Handy rake handle
Save your back when raking mulch or shoveling heaps of dirt by adding another handle to your long-handle tools. A section of PVC pipe with a tee fitting and cap work perfectly. Add a screw through the tee fitting and into the handle for won’t-budge stability.
Use these shed storage tips to organize your space at last.
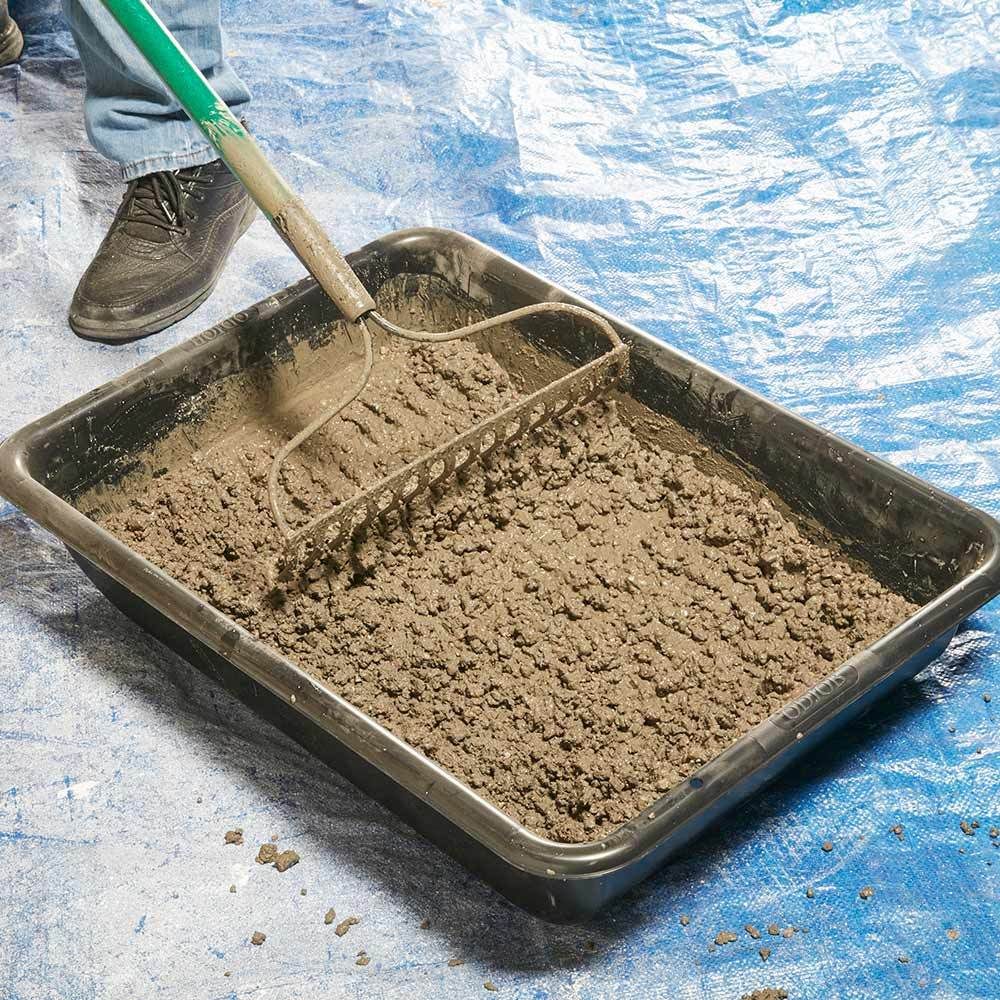
Mix concrete with a rake
Try a garden rake instead of a hoe the next time you have to mix concrete. The rake won’t splash as much water over the edge, and the tines do a good job of combining the water with the powder. With a hoe, you waste a lot of time just pushing powder around the tub.
Find out 14 DIY projects that will add to your home’s value.
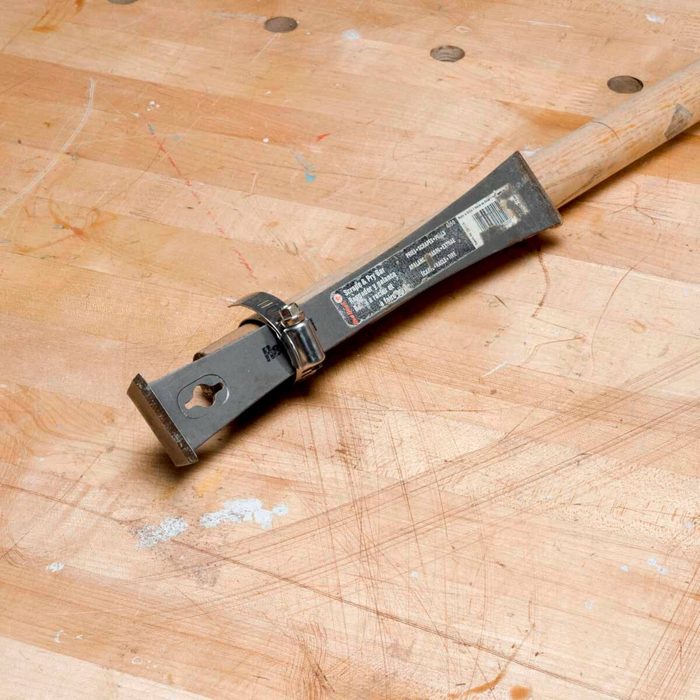
Makeshift trench tool
I had to dig a 2″ wide x 6″ deep x 50′ trench for low voltage wire between my rock walkway and landscape rock planting area, about 4-6″ wide area to work in. I started with a trowel and then moved to 2″ wide x 12″ long pry bar on my hands and knees, not great for my old knees and slow. An idea came to mind, why not mount the pry bar on an old hoe handle I had in the garage. It worked great!
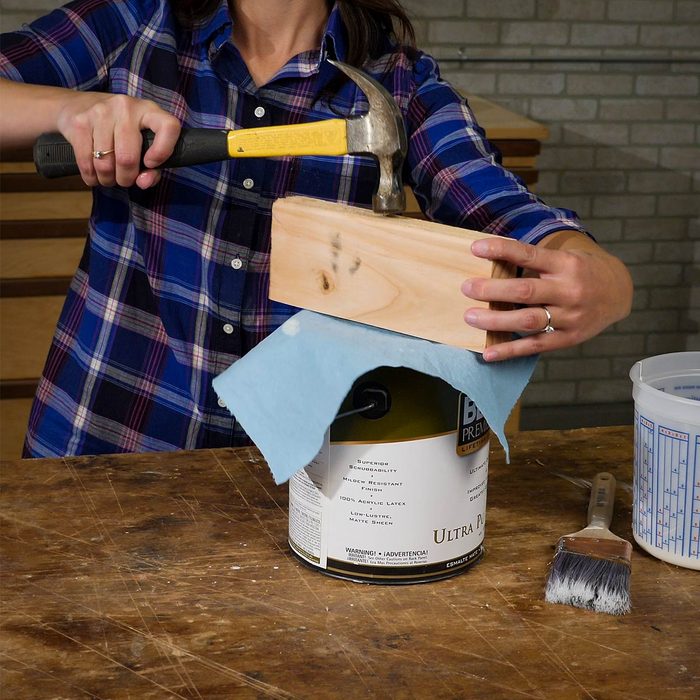
Close paint cans with less mess
Stop paint splatter when you re-seal a paint can lid by covering it with a rag or paper towel. Then place a wood block just larger than the diameter of the paint can across the lid and hammer the centre of the block. Rotate the block a few times, hammering the centre each time, to seal the lid without damaging the top of the can.
Discover 20 painting tips the pros don’t want you to know.
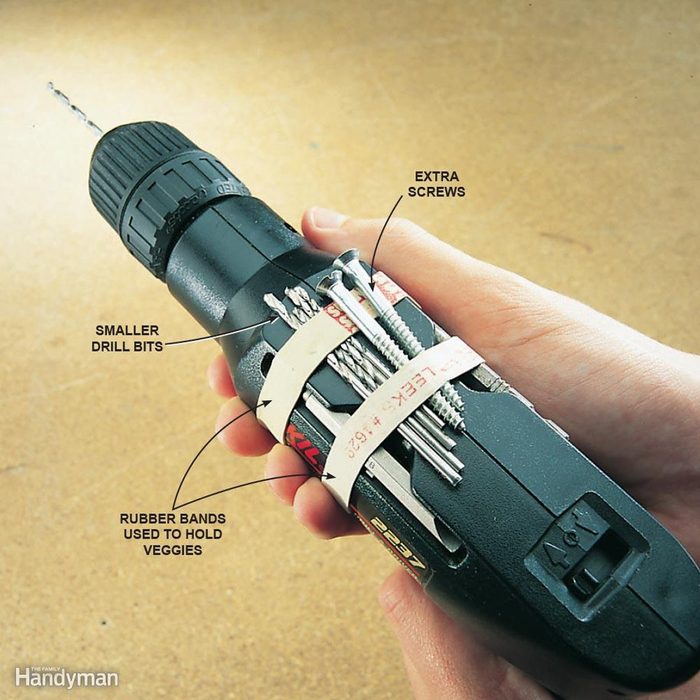
Drill bit girdle
Save those wide rubber bands that are wrapped around broccoli and other veggies and stretch them over your electric or cordless drill. Use them for onboard storage of smaller drill and driver bits and screws. Wrangle the rest of your drill bits and other pointy tools with this wall-mounted ‘pincushion.’
Here are 20 essential tools no home mechanic should be without.
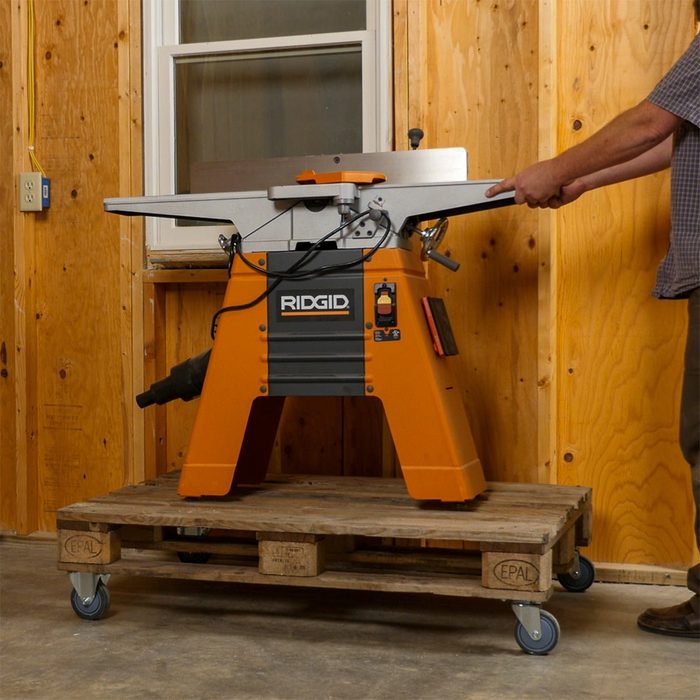
Pallet dolly
This simple and inexpensive hauler is perfect for transporting loads of lumber or heavy tools around the workshop. Add a bit of reinforcement to the pallet first; then install four swiveling casters, one at each corner. You’ll wonder why you didn’t make a pallet dolly sooner!
These hilarious DIY jokes will bring down the house.
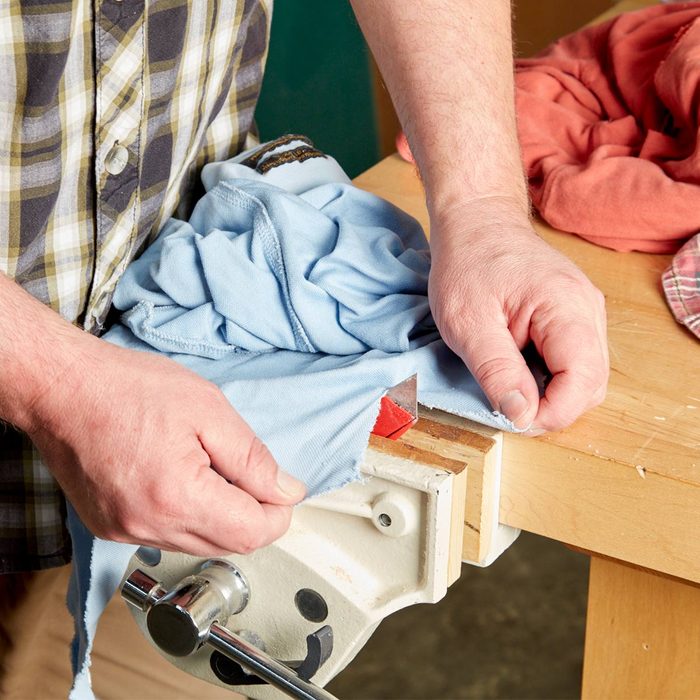
Handy rag cutter
Easily cut up old t-shirts and towels to use as shop rags with this simple cutter: Clamp a sharp utility knife in a vise and start cutting the material. Continue cutting or tear the material into the desired size and shape.
You’ll be glad these hilarious DIY disasters didn’t happen to you.
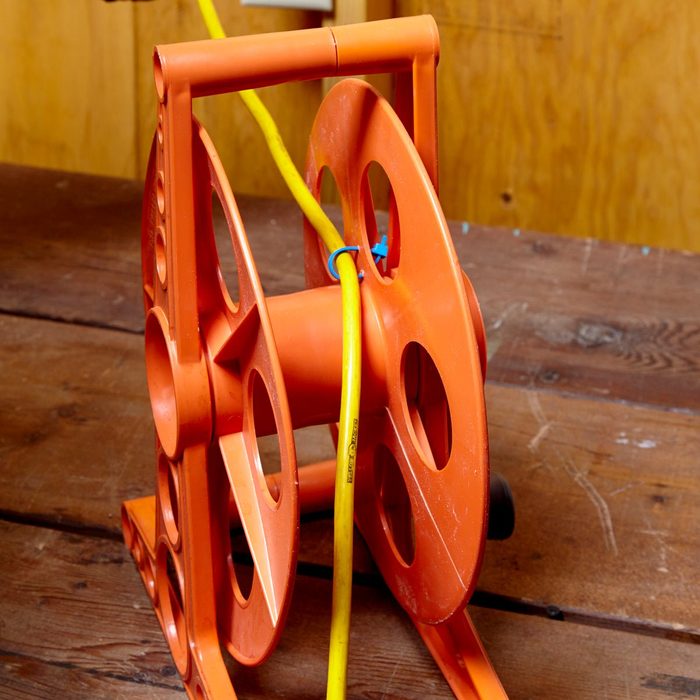
Stay-put cord
Zip ties are great to have on hand for quick repairs and fastening jobs around the shop. I like to zip-tie one end of an electrical cord so it stays with the cord reel. I keep the connection loose enough that I can pull out enough cord to reach an outlet. — Oliver Rodriguez
Don’t miss these brilliant bungee cord hacks!

Hands-free light
I was working under the kitchen sink and couldn’t see what I was doing, so I used zip ties to attach mini flashlights to a pair of safety glasses. Now I use this pair whenever I climb into the attic or do any repairs in unlighted spaces. Everywhere I look is illuminated. —Nathan Rodgers
Here are the home improvement projects you should never ever DIY.
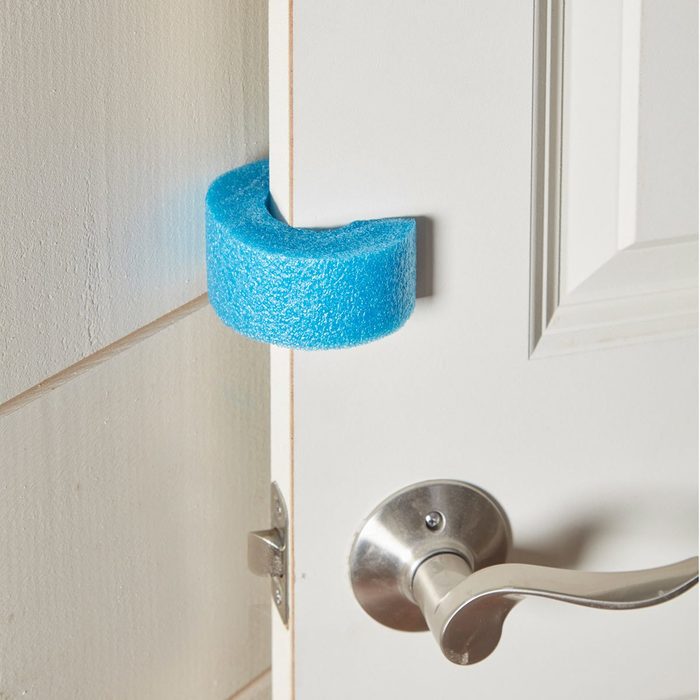
Dinky door bumper
Here’s a trick for keeping that pesky door from banging into a piece of trim or wall while you’re running in and out. Simply cut a slit lengthwise in a short section of pool noodle and slip it onto the edge of a door, cupboard or gate to guard against marring walls.
Check out more dollar store solutions for life’s little dilemmas.
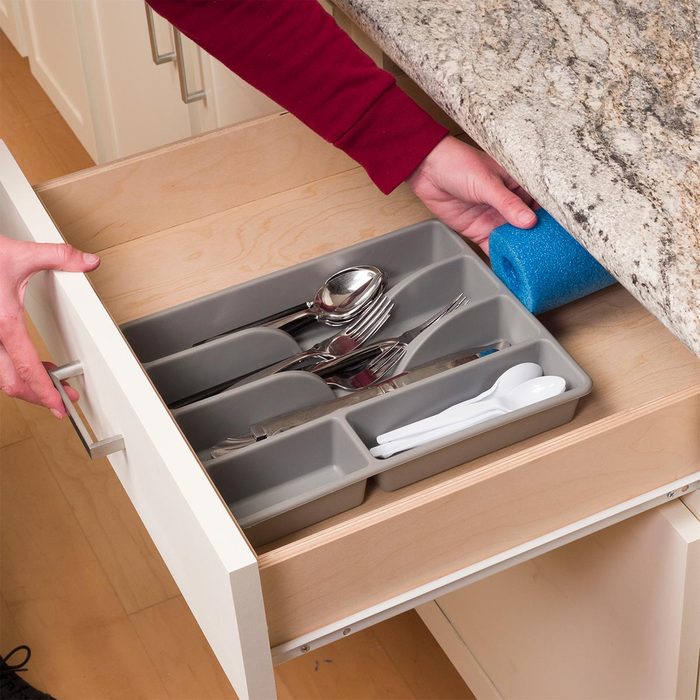
Stay-put drawer organizer
I have always hated the way drawer organizers move around when you open and close a drawer. I solved the problem at my house with a pool noodle! I measured the distance from the back of the drawer organizer to the back of the drawer and used a utility knife to cut the noodle to size. The pool noodle fits snuggly in place, so the drawer organizer doesn’t move around anymore. You could also cut the pool noodle in half lengthwise to reduce the amount of space that it takes up. —Roy Allison
These kitchen organizing ideas will help you conquer clutter.
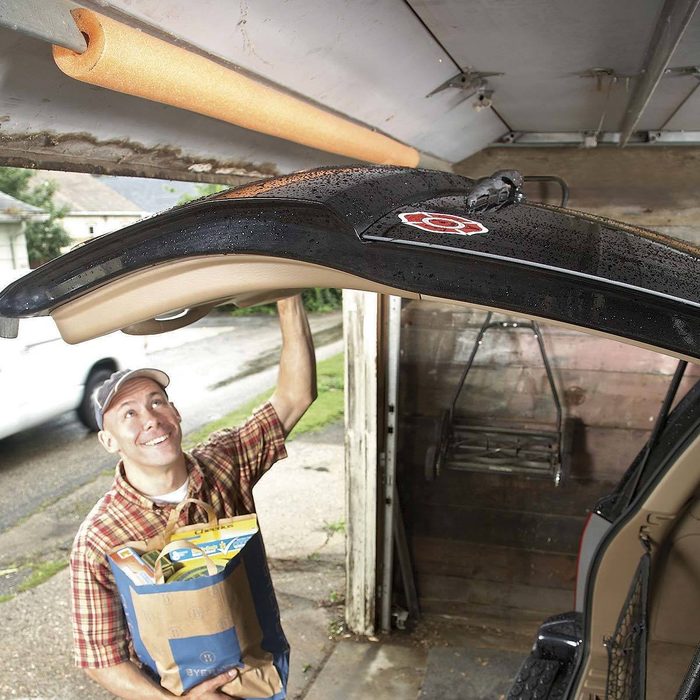
Lift gate protection
When you open the lift gate of your van or SUV, it’s easy to hit a cross brace of the garage door and chip the paint on the gate. Protect it by using a swim noodle as a cushion. Just slit the swim noodle with a utility knife and slip it over the brace. You can also use pre-slit foam pipe insulation. If it slips off, use double-face tape to hold it in place. —Mary Sprang
Find out 10 habits of people with organized garages.
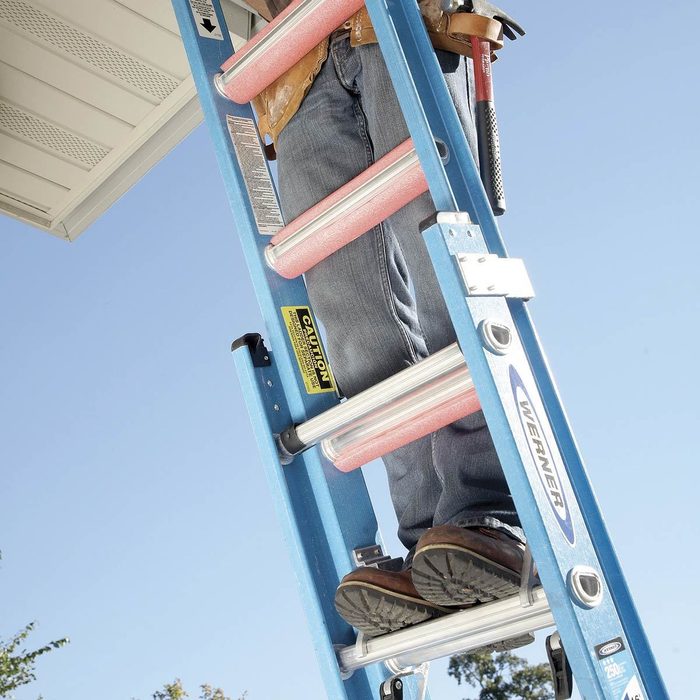
Ladder padding
I spend a lot of time on my ladder, and leaning against the rungs all day was taking a toll on my shins and thighs. Then I got smart and slit pieces of my kids’ pool noodles lengthwise and wrapped them around the front of the rungs. Instant relief! The cushions are easy to move as you work. Just make sure you never stand on the pool noodles, and always place them higher than you’ll step since they can create an uneven step or fall off if you step on them. —Dave Switzer
Make sure you avoid these common mistakes during a home remodel.
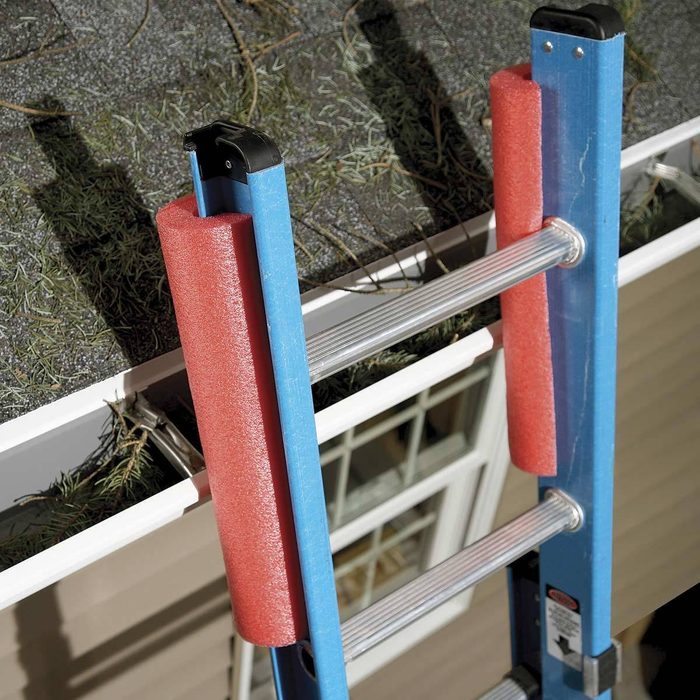
Use your noodles!
I recently installed new gutters. When it came time to clean them out, I didn’t want my metal ladder to dent or scratch them, so I made ladder protectors out of an old swim noodle (foam pipe insulation would work too). I cut 2-ft. sections of the foam noodle, slit them with a razor knife and stuck them on the sides of the ladder. They were the perfect cushions! If the foam doesn’t stay put, tape it on. —David Gugliuzza
Find out more home hacks that will save you time and money.
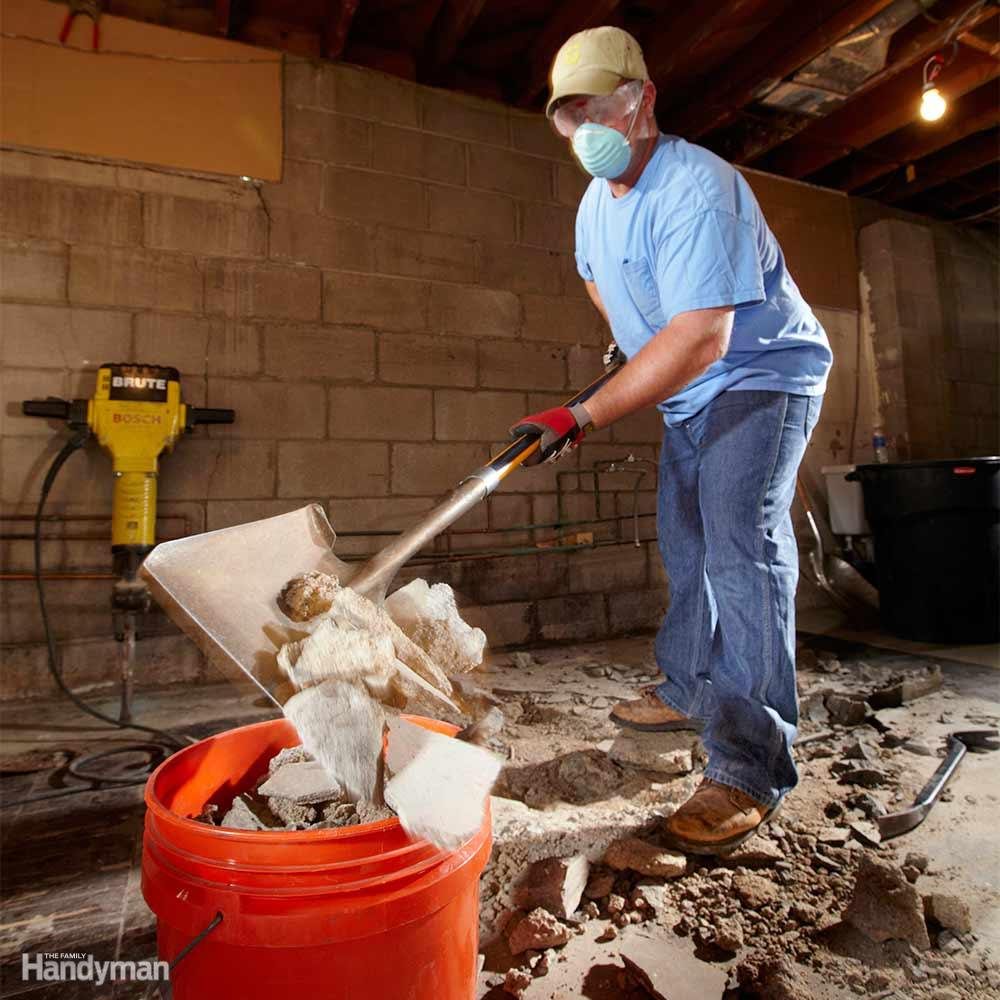
Limit the mess and get the job done
Sometimes major demolition inside the house is unavoidable. You can limit the pain and discomfort this causes by moving the debris out of the house quickly and getting rid of it promptly.
Here are seven questions you need to ask before renovating your home.
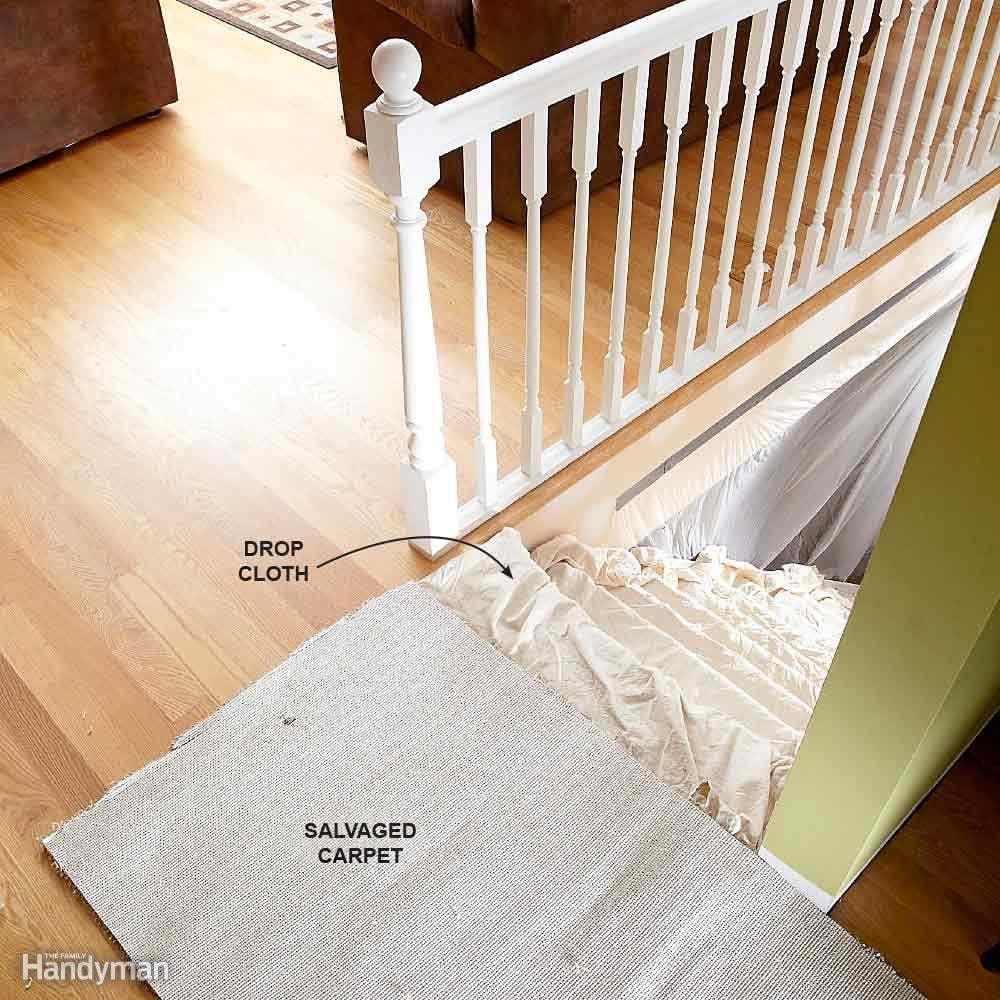
Lay down a protective path
It’s impossible to demo a wall or bust up a floor without making a mess, but that doesn’t mean you need to track that mess all over the rest of the house. The next time you have to tear out some carpet, cut several long strips, and use them as pathways to protect the flooring in other areas of the house. Make sure to flip the carpet upside down so the abrasive backing won’t scratch the finish on wood floors. Canvas drop cloths are still the best method for protecting stair treads.
Here are more wood floor maintenance tips to protect your investment.
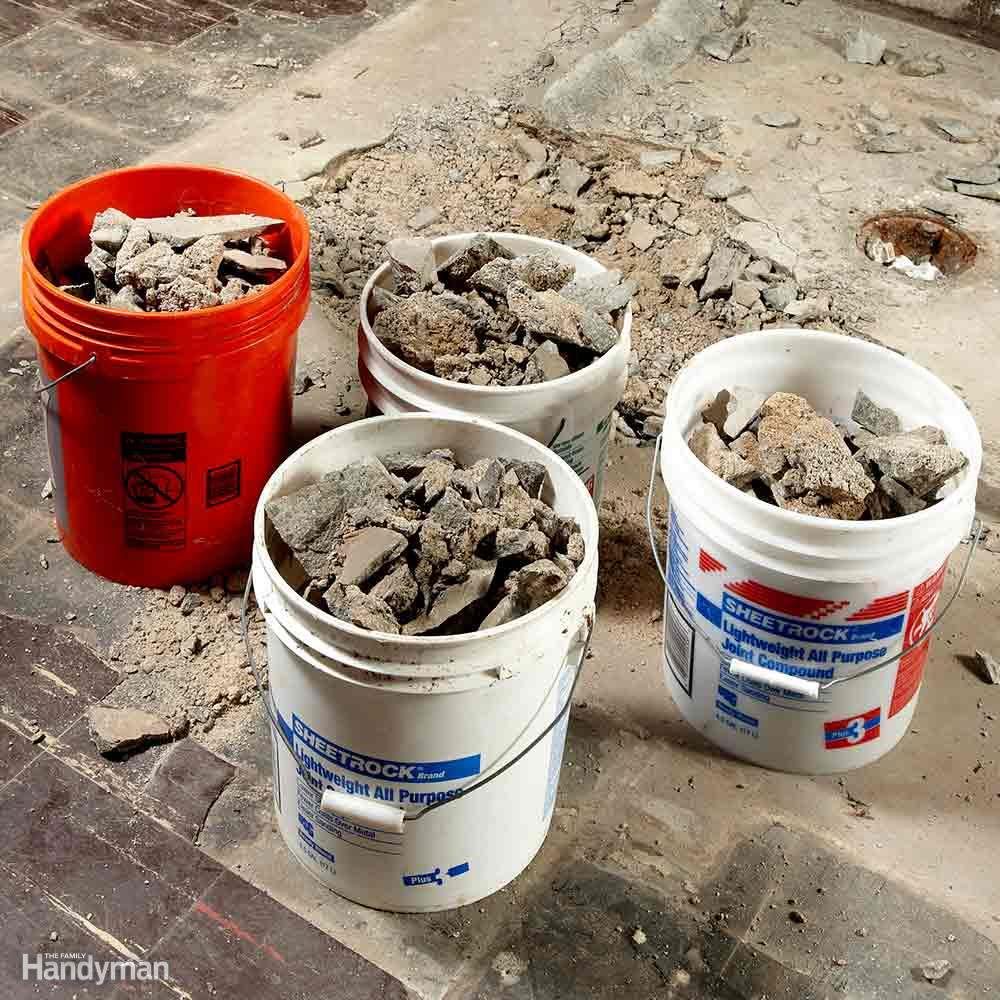
Save those buckets
Buckets are a remodeler’s best friend. They work great for mixing, hauling heavy debris, storing water, dragging tools in and out, organizing fasteners, setting stuff on, bailing water, sitting on. There’s a reason why home centres sell empty ones. Never, ever throw away a usable bucket!
Here are 50 more things you should repurpose before tossing out.
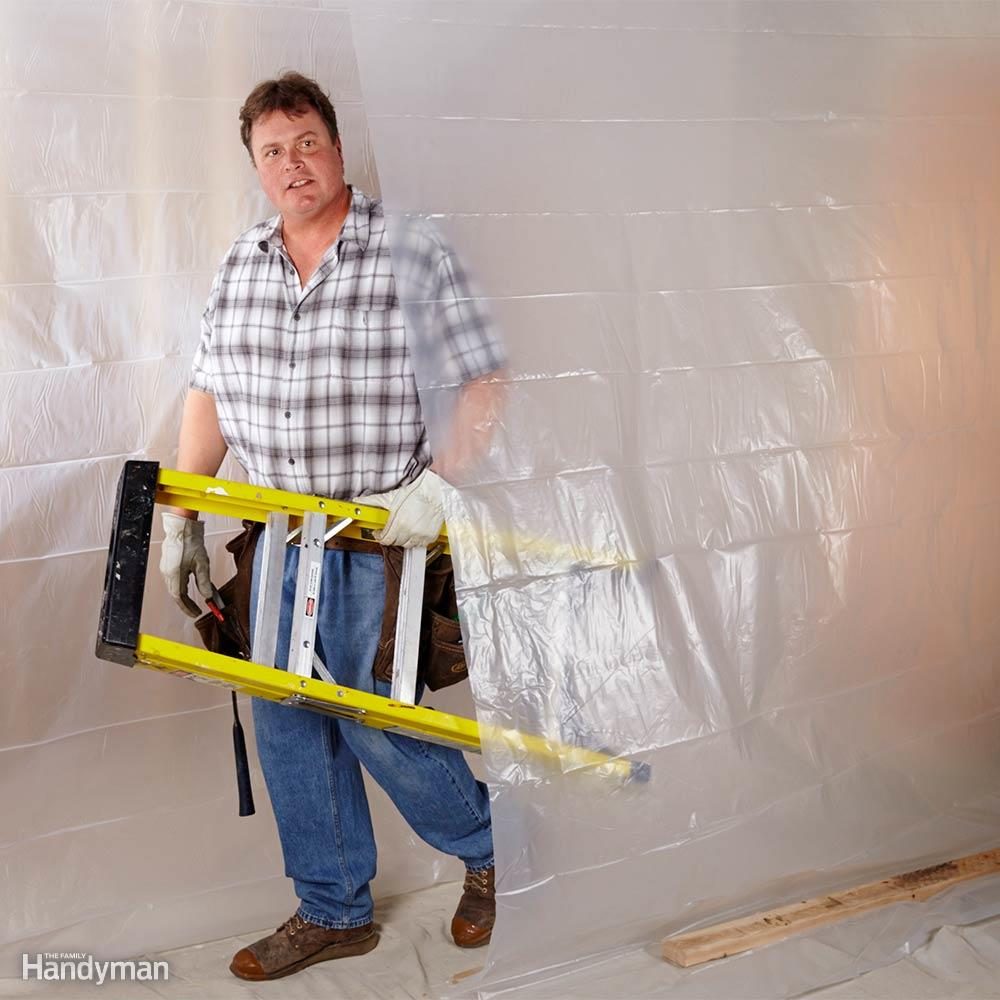
Make a plastic passage
Hanging sheets of plastic from the ceiling is a good way to isolate a room that’s being remodeled. But instead of hanging one continuous sheet to keep the dust in, hang two and overlap them four feet or so. That way you’ll have a handy door to walk through, which beats having to duck under the plastic every time you come and go. Lay a scrap piece of lumber on the bottom of the plastic to keep it in place.
Next, find out 100 vintage home hacks that have stood the test of time.