

15 Small Space Storage Hacks You’ll Wish You Knew Sooner

There's often much more storage potential in your home than you're currently using—discovering it just takes a little outside-the-box thinking! Check out these 15 ideas for creating more storage in a small space.
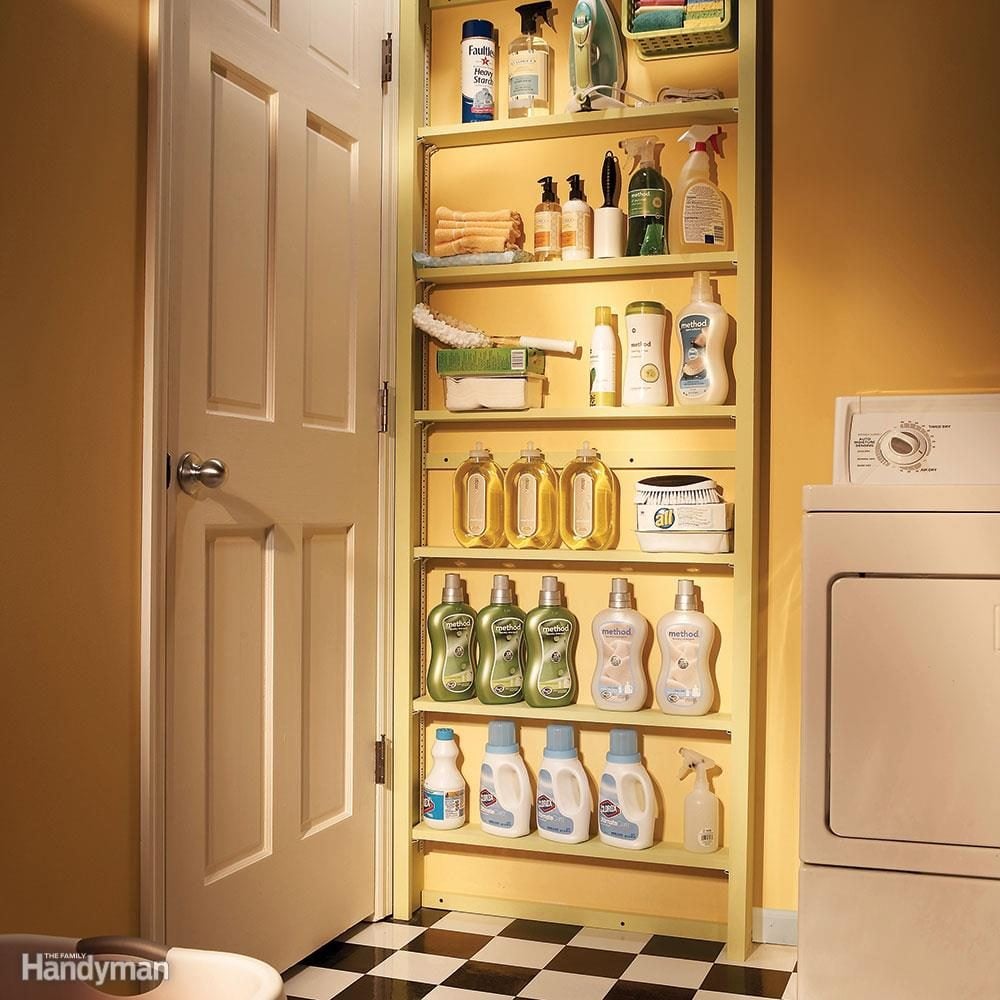
Behind-the-Door Shelves
The space behind a door is a storage spot that’s often overlooked. Build a set of shallow shelves and mount it to the wall behind your laundry room door. The materials are inexpensive. Measure the distance between the door hinge and the wall and subtract an inch. This is the maximum depth of the shelves. Here, we used 1x4s for the sides, top and shelves. Screw the sides to the top. Then screw three 1×2 hanging strips to the sides: one top and bottom and one centred. Nail metal shelf standards to the sides. Complete the shelves by nailing a 1×2 trim piece to the sides and top. The 1×2 dresses up the shelf unit and keeps the shelves from falling off the shelf clips.
Locate the studs. Drill clearance holes and screw the shelves to the studs with 2-½-inch wood screws. Put a rubber bumper on the frame to protect the door.
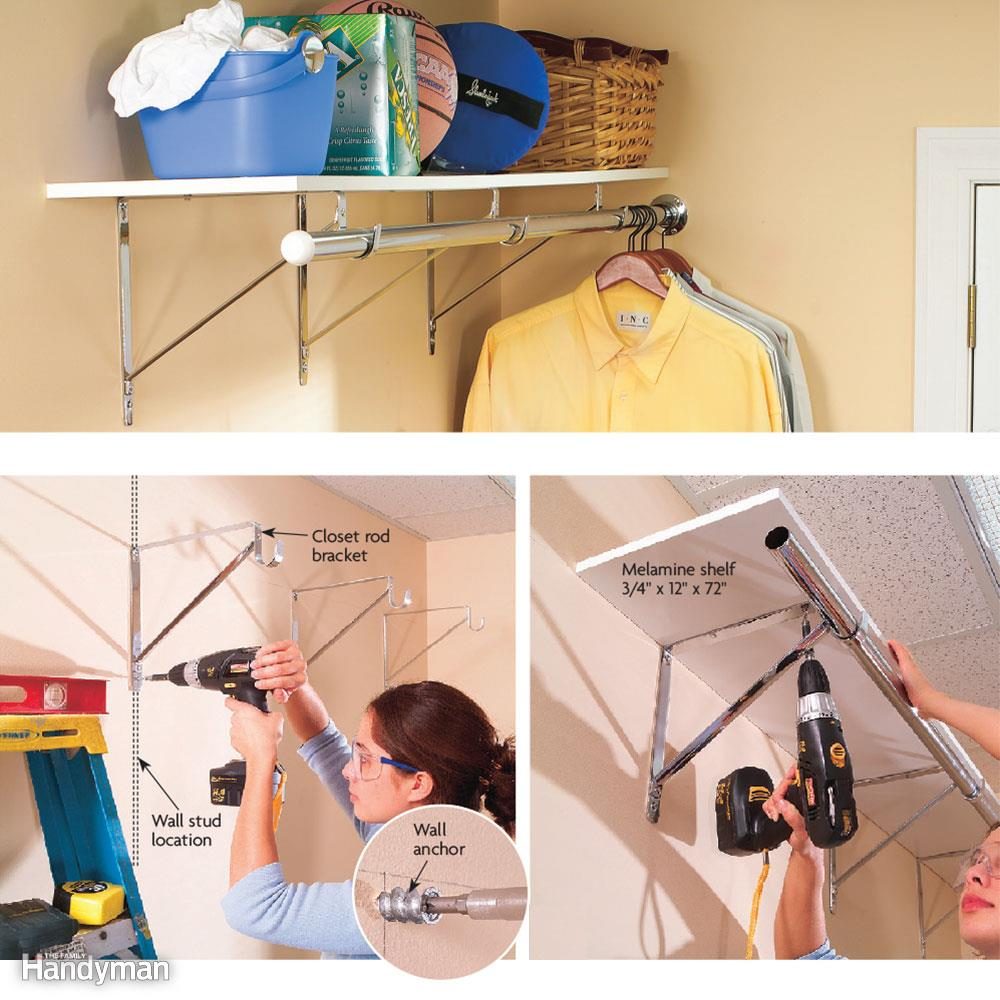
Install a Shelf and Clothes Rod
This laundry room hanging rod project will save you hours of ironing and organizing. Now you can hang up your shirts and jackets as soon as they’re out of the dryer—no more wrinkled shirts at the bottom of the basket. You’ll also gain an out-of-the-way upper shelf to store all sorts of odds and ends.
Just go to your home centre and get standard closet rod brackets, a closet rod and a pre-cut 12-inch-deep melamine shelf. Also pick up some drywall anchors, or if you have concrete, some plastic anchors and a corresponding masonry bit. Fasten shelves to the wall and add the closet rod for instant laundry room storage.
Need help clearing the clutter? These awesome Netflix organizing shows are sure to inspire.
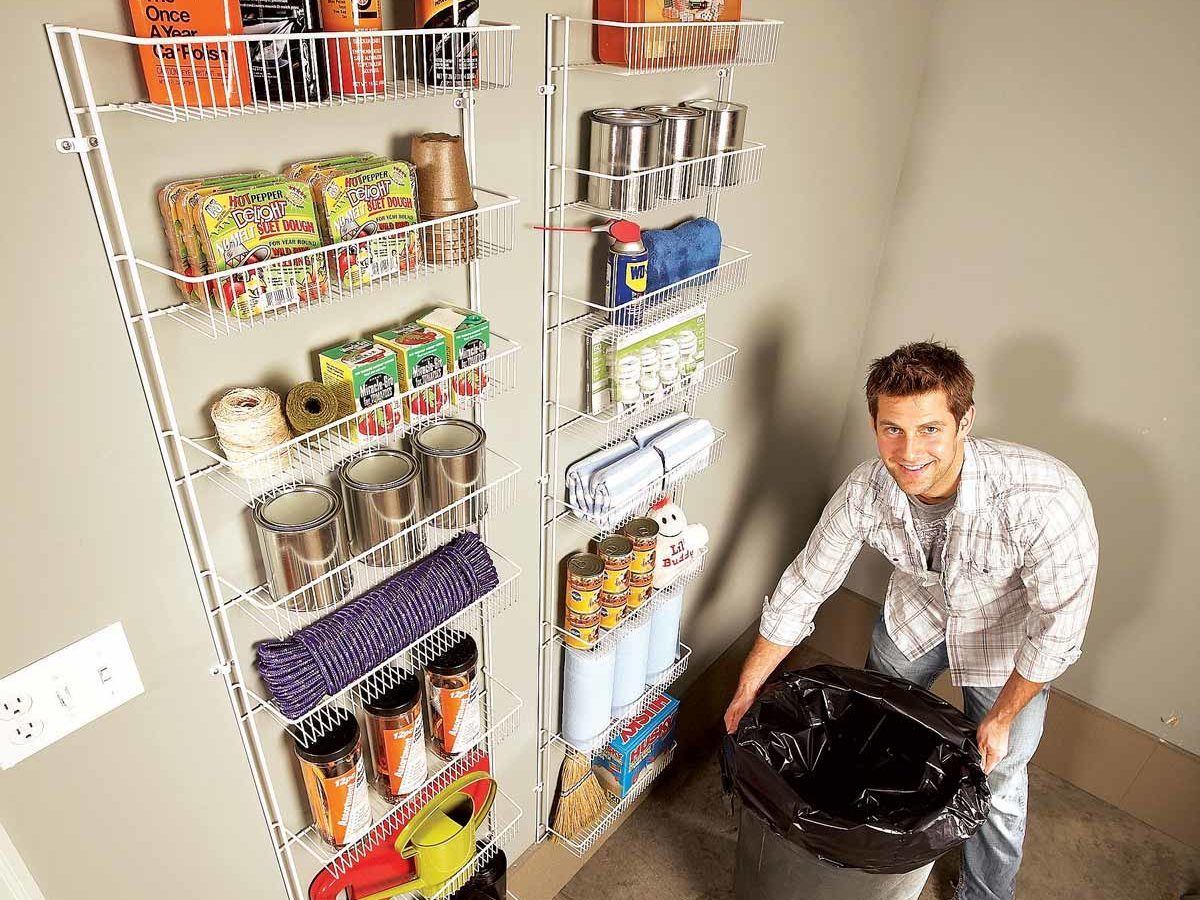
Tight-Space Shelves
Wire pantry shelves aren’t just for pantries. They’re perfect for any wall where full-depth shelves won’t fit: garages, laundry rooms, utility rooms, etc. The perfect space-saving storage solution!
Don’t miss these genius DIY storage tips for the garage.
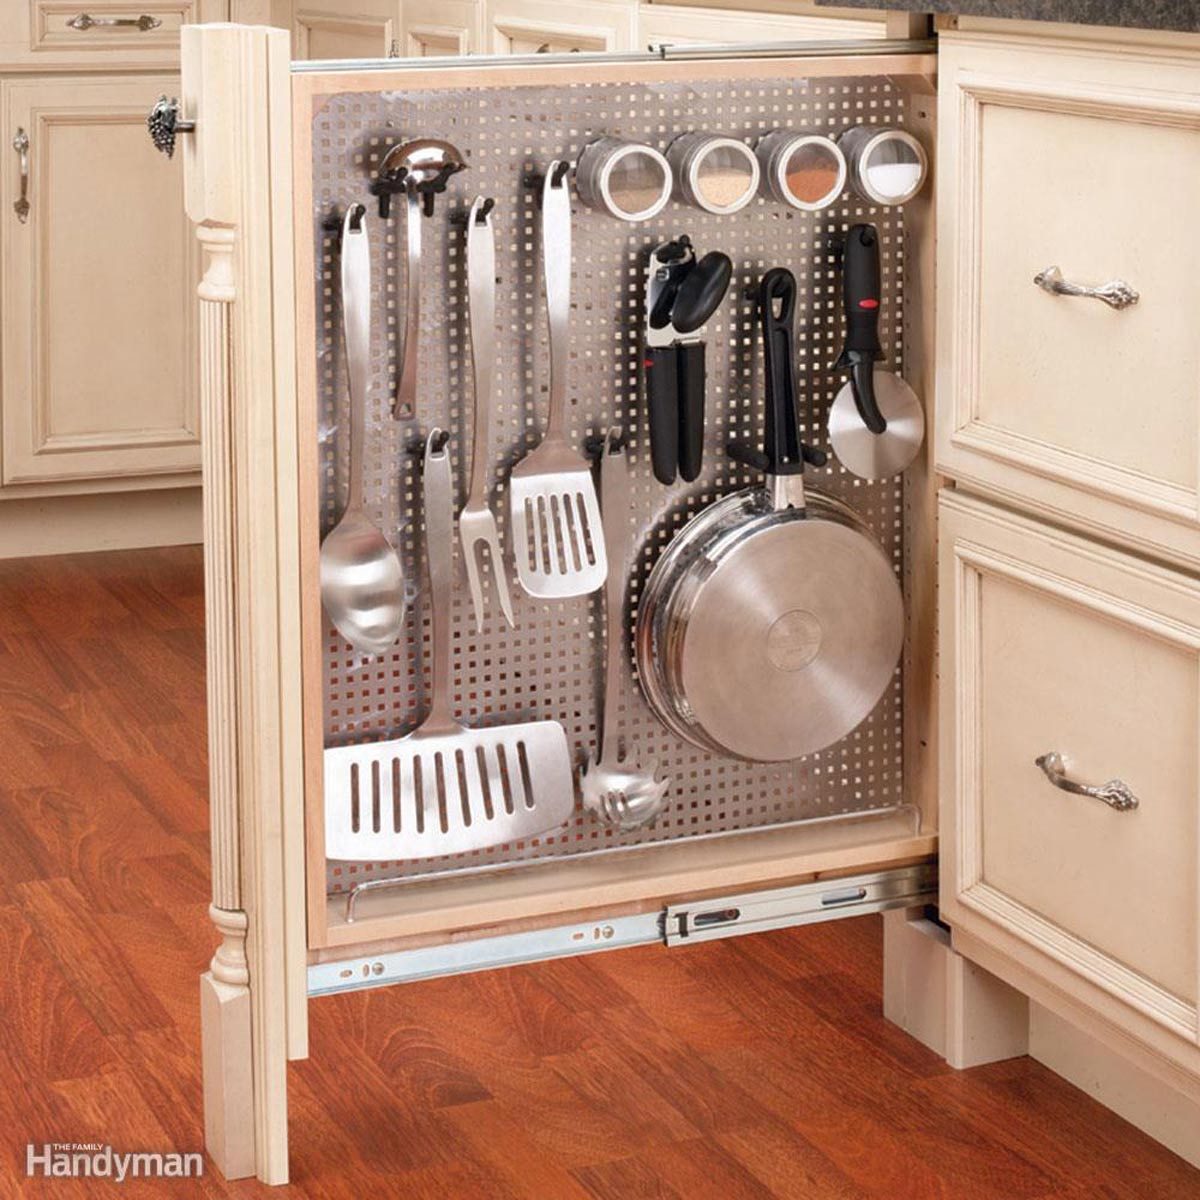
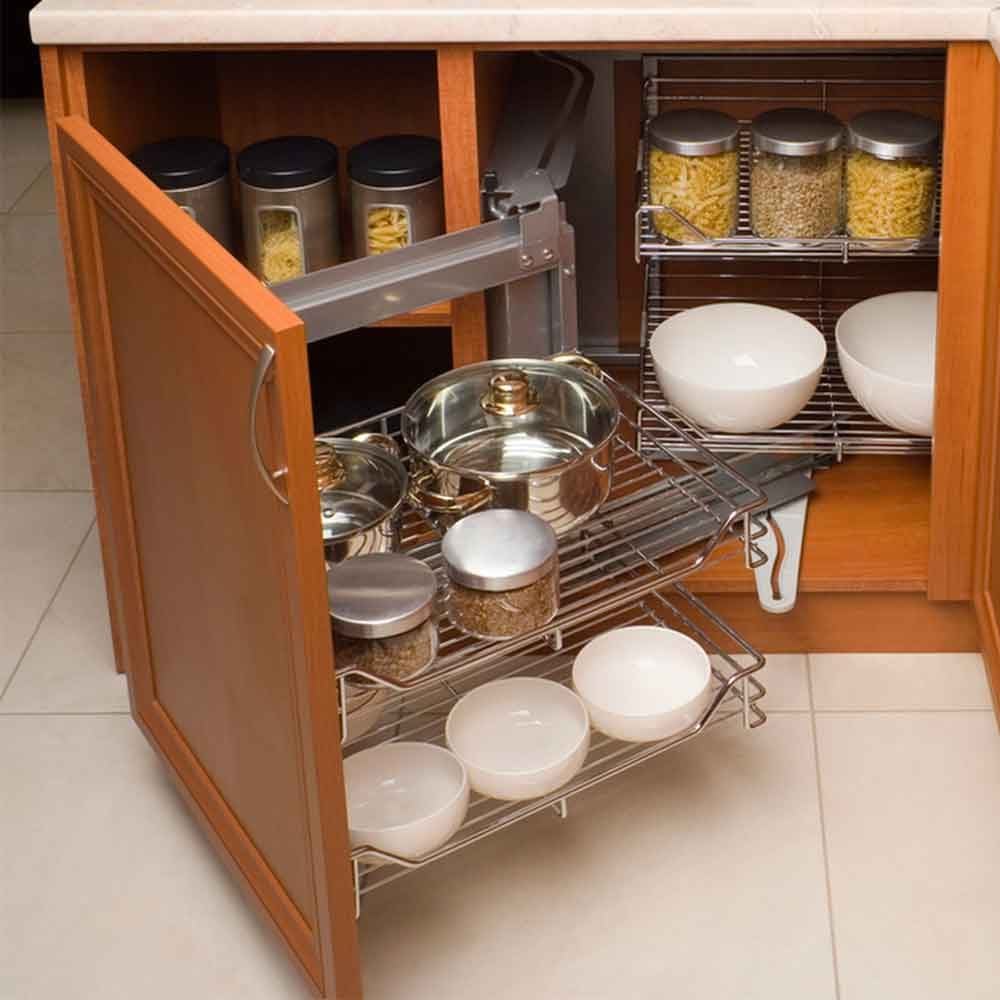
Make the Most of Skinny Spaces
In a small kitchen with little storage space, you can make even narrow filler spaces work harder by installing a vertical pegboard rollout. Kitchen designer Mary Jane Pappas typically recommends 18- to 30-inch-wide roll-out drawers for cabinets: “Any larger and they’re too clumsy. Any smaller and too much of the space is used by the rollouts themselves.” But there is one type of rollout that makes good use of narrow spaces, even those only 3 to 6 inches wide. Pappas says that pull-out pantries—single tall, narrow drawers with long, shelves, drawers, baskets or even pegboard—can be an efficient way to put skinny spaces to work. Shown is the 434 Series 6-inch Base Filler with stainless steel panel from Rev-a-Shelf, the perfect pull out drawers for cabinets.
These clever kitchen organizing ideas will also come in handy!
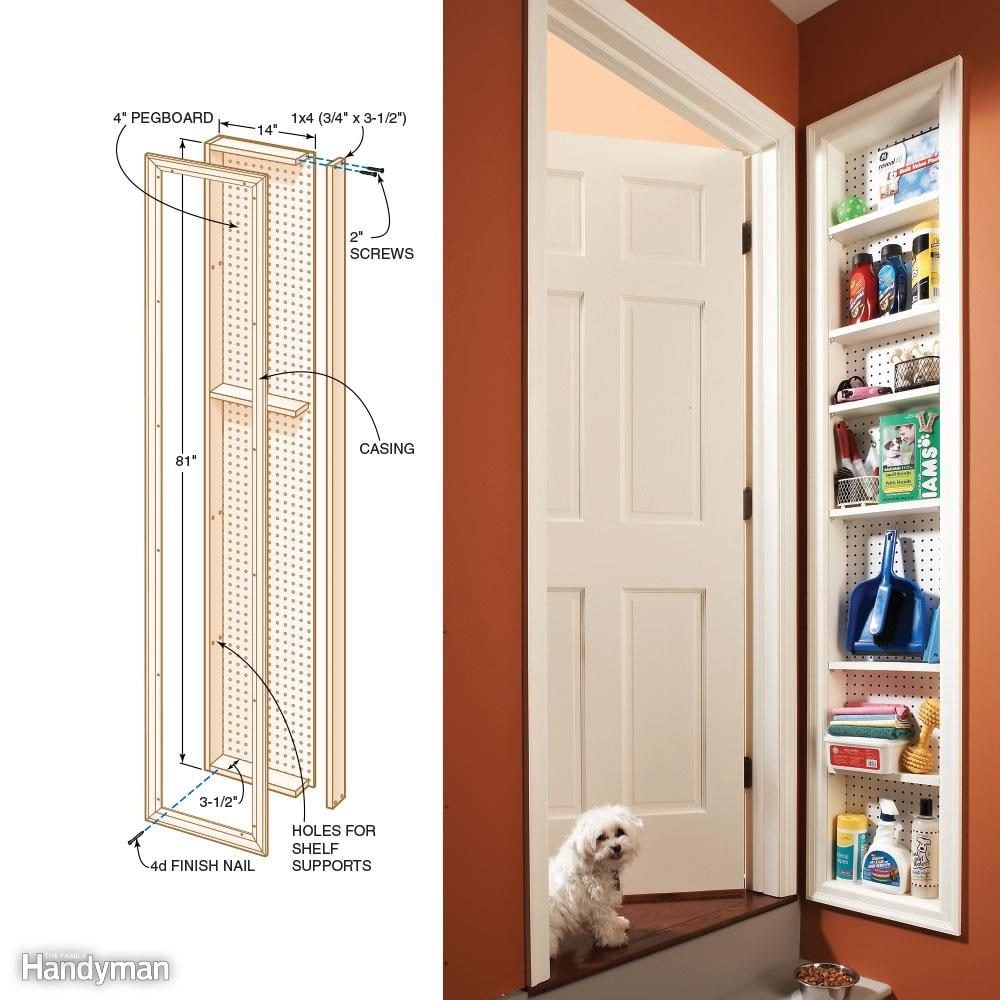
Narrow Storage Shelves: Stud Space Cabinet
When you can’t find a convenient nook for a set of narrow storage shelves, you can often create one by recessing the shelves into the wall itself. Choose the location before you build the project to make sure it will fit. Start by looking for a space with no obvious obstructions. Locate the studs with a stud finder. Some stud finders can also locate electrical wires and plumbing pipes inside walls. When you’ve found a promising spot, cut a 6-inch-square inspection hole between the studs. Use a flashlight and a small mirror to inspect the stud cavity for obstructions. You often can modify the size of the cabinet to avoid obstructions.
When you find a good space, mark the perimeter of the opening and use a drywall keyhole saw to cut it out. Measure the opening and subtract 1/4-inch from the height and width to determine the outer dimensions of your cabinet.
For standard 2×4 stud walls with ½-inch-thick drywall, build the cabinet frame from 1x4s that measure 3-½-inches wide (see above). If your walls are different, adjust the depth of the frame accordingly. Then add a ¼-inch back.We screwed ¼-inch pegboard to the back so we could hang stuff from pegboard hooks. Add casing that matches the trim in your house. Drill holes into the sides to accept shelf supports. Shelf supports fit in 3mm, 5mm or ¼-inch holes depending on the style. Install the cabinet by slipping it into the opening, levelling it and nailing through the trim into the studs on each side. Use 6d finish nails placed every 12 inches along both sides.
Discover 20 secrets professional organizers don’t want you to know.

Storing in Suitcases? Roll Away
If you already have a few unused suitcases around, they can be suitable for storing seasonal clothes (and won’t take up any extra room). Roll common clothes like shirts, sweaters and pants into loose bundles before storing them. They take up less room this way, and can breathe easier.
Discover 50 dollar store solutions for life’s little dilemmas.
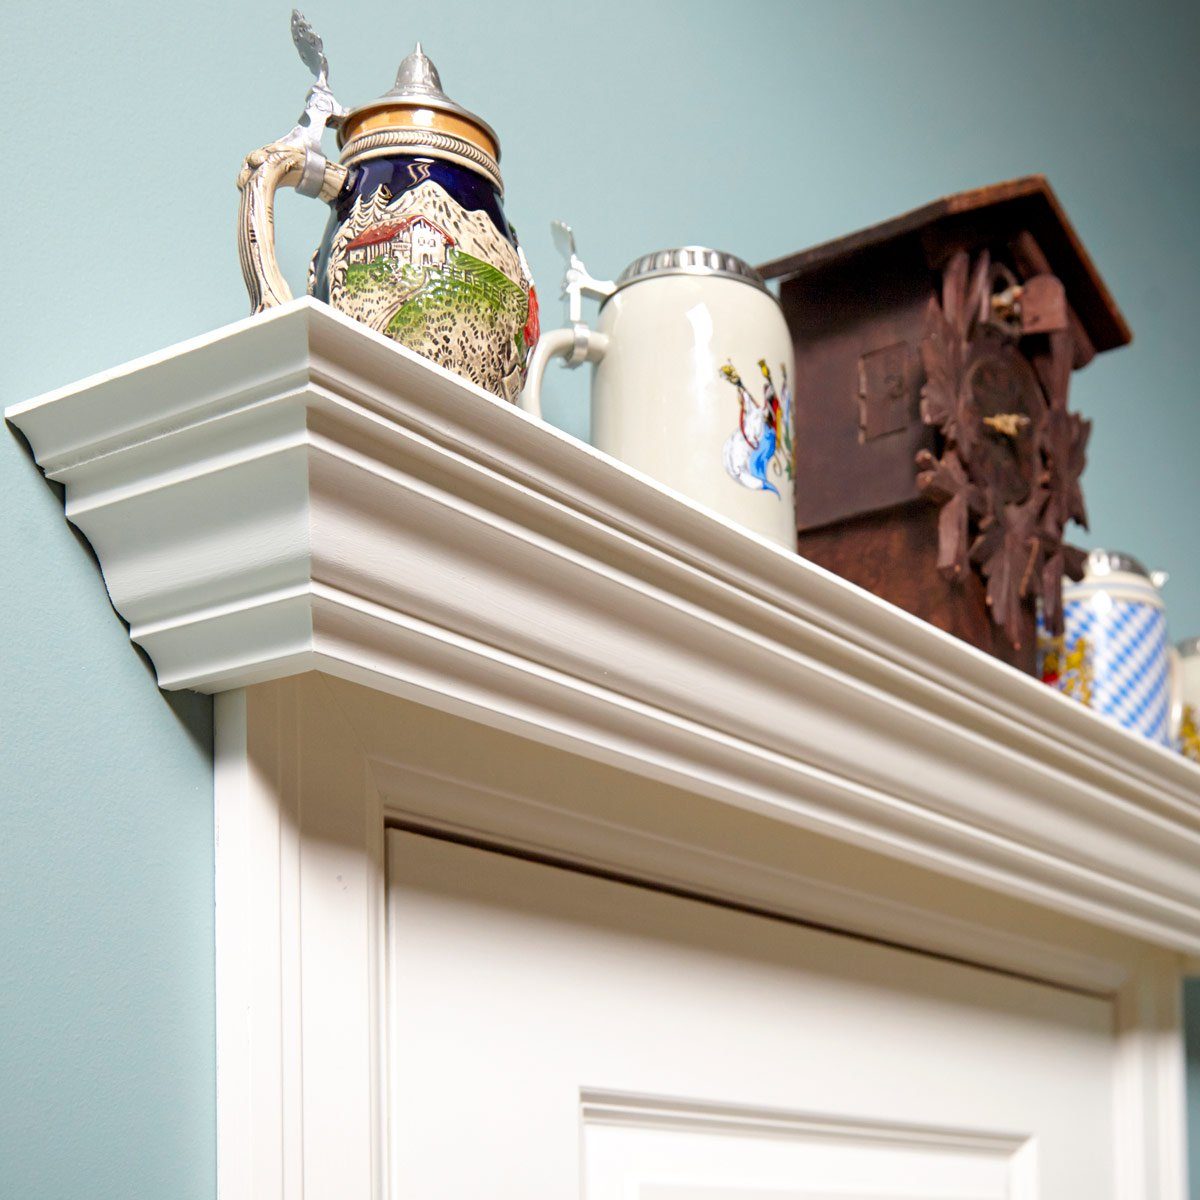
Over the Door Bookshelf
Build a display shelf over the door to show off your knick knacks, books or to add storage space to a small room. As a bonus, if you increase the height and depth of the “box” that forms the core of each shelf, these shelves can double as valances for window curtains or blinds.
Find out the kitchen organizing mistakes everyone makes.
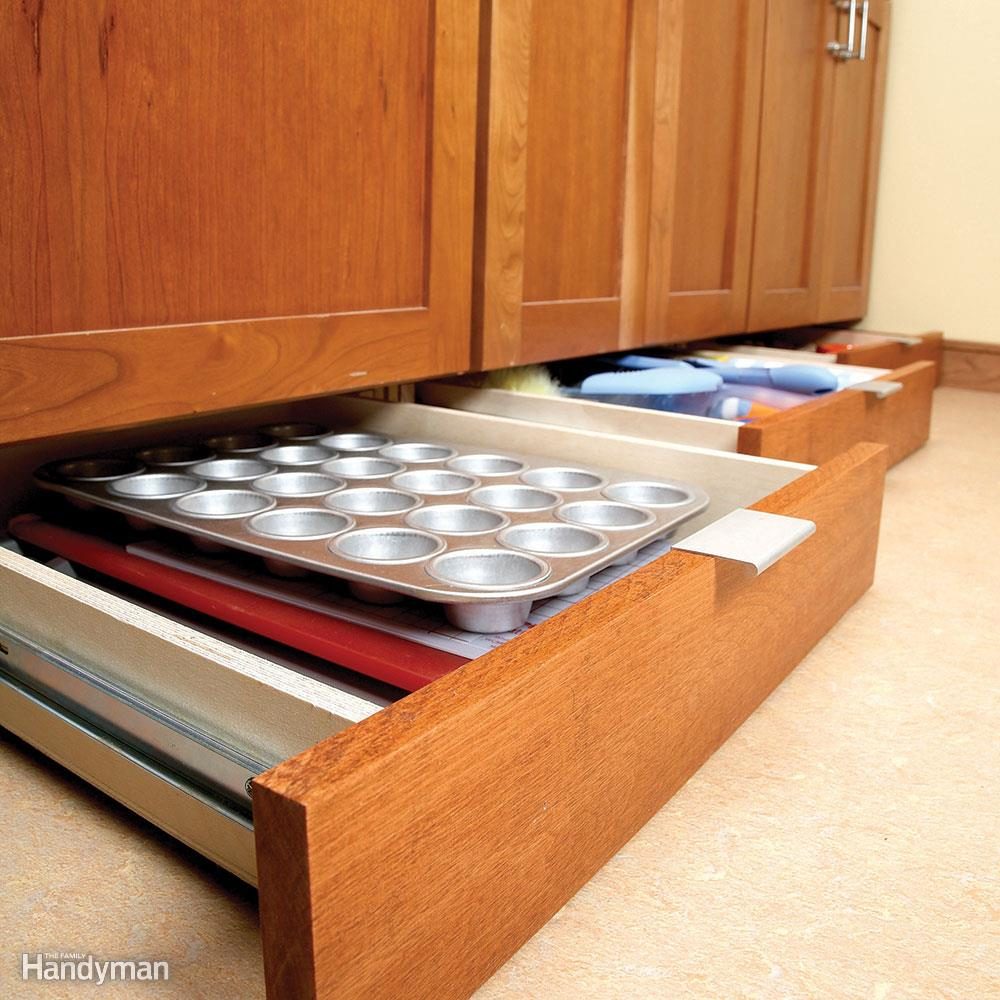
Build Rollouts at Ankle Level
Turn wasted toe-kick cavities into clever flat storage space for serving trays, cutting boards and baking pans. This article shows you how to construct self-contained rollout shelving units that you assemble in your shop and then just slip into place beneath your existing kitchen cabinets. We walk you through measuring and building the shelf and carrier units, and then installing them in your kitchen. Even if you’ve never built or installed a drawer before, this article will show you how.
Don’t miss HGTV star Bryan Baeumler’s best kitchen design tips.
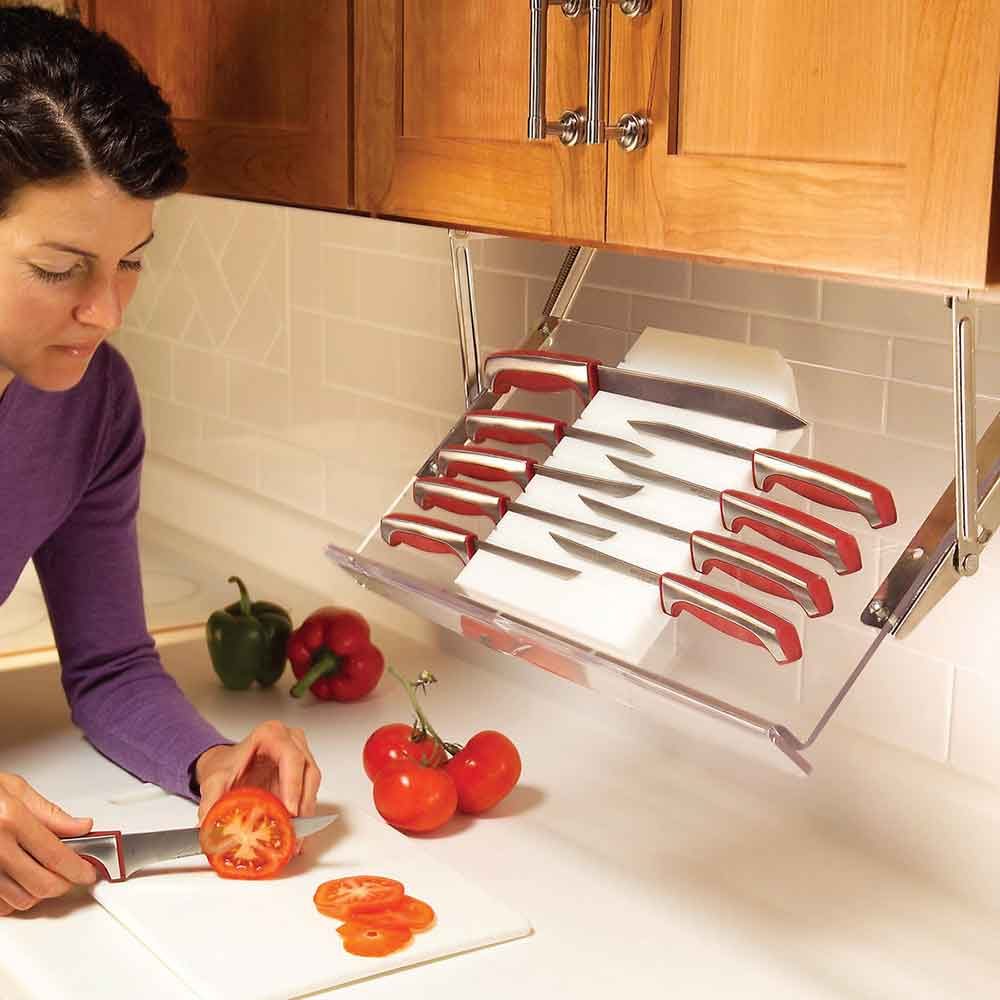
Install Under-Cabinet Storage Racks
Pull-down racks give you instant access to kitchen essentials without the clutter of spice racks or knife holders. When the cooking is done, the rack swings up against the underside of the cabinet. You can buy ready-made racks or buy a pair of hinges and make your own wooden rack to hold knives, spices or other small items that take up counter space. You’ll find a variety of racks and hardware at IKEA and other online retailers.
Here are 50 things you should be repurposing around the house.

Pantry Storage: Spice Storage
Small spice containers use shelf space inefficiently and are difficult to find when surrounded by taller bottles and items. Use a small spring-tension curtain rod as a simple shelf. It’s easy to install and strong enough to support the spices.
Here are more clever kitchen hacks that’ll change the way you cook.
Install Expandable Shelves in Cabinets
Expandable or pullout shelves are an easy way to add extra room to your kitchen without changing anything else. This is a relatively small project and you can typically find a very good pullout shelf accessory for around $50.
Find out more quick home repairs you can tackle in 10 minutes (or less).
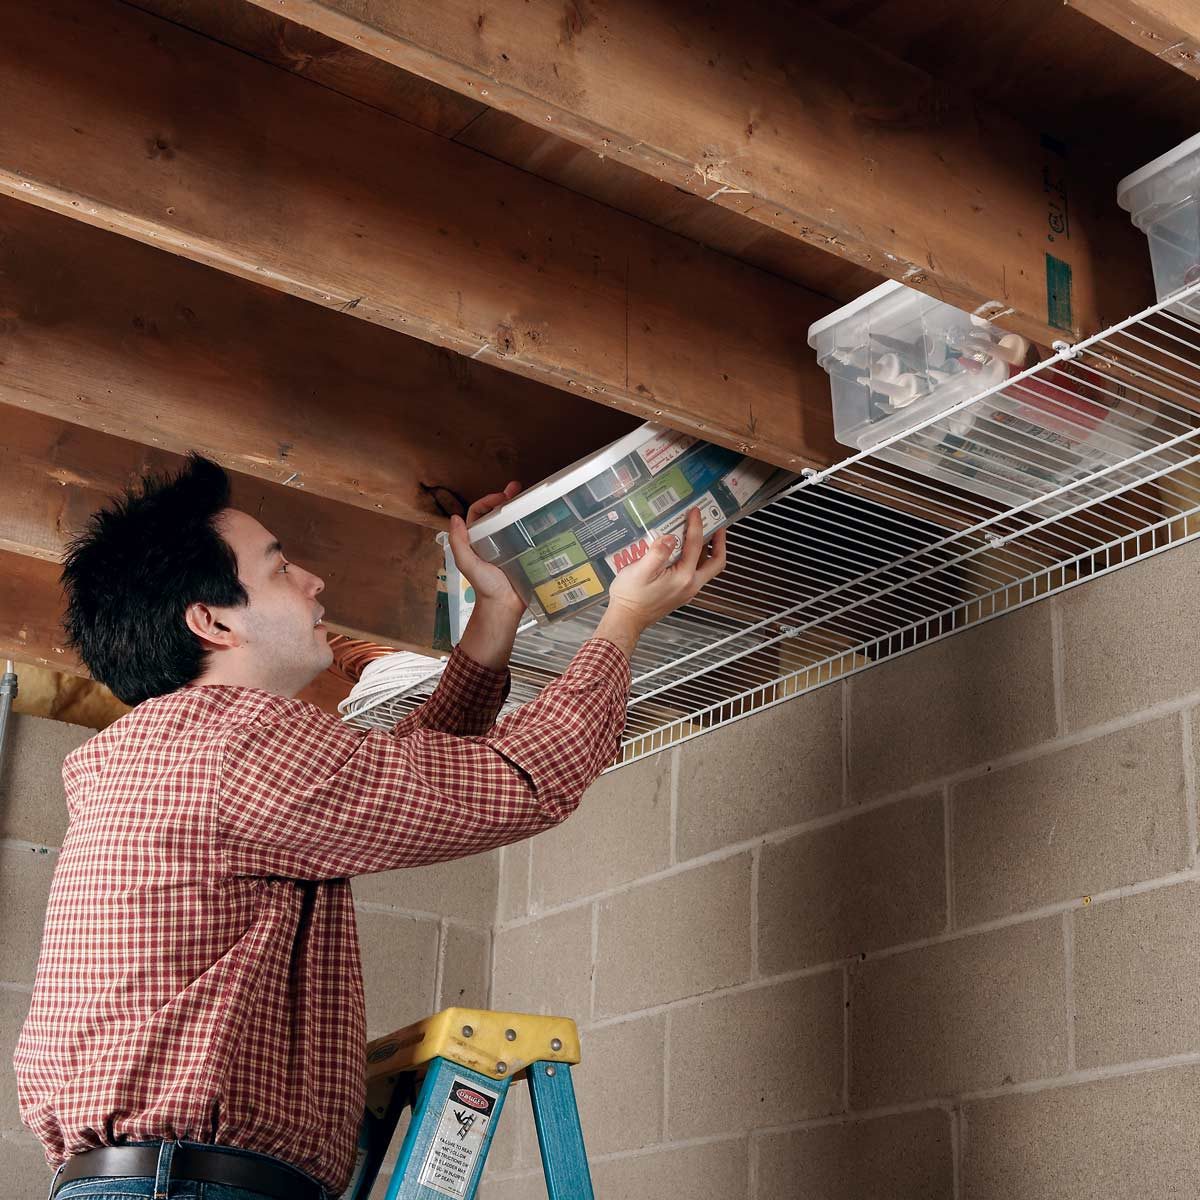
Joist Space Storage
Don’t waste all that space between joists in a basement or garage. Screw wire shelving to the underside of the joists. An 8-foot x 16-inch length of wire shelving and a pack of plastic clips (sold separately) costs about 20 bucks. Don’t forget that wire shelving also shines on walls.
Here are 10 things people with organized garages have in common.
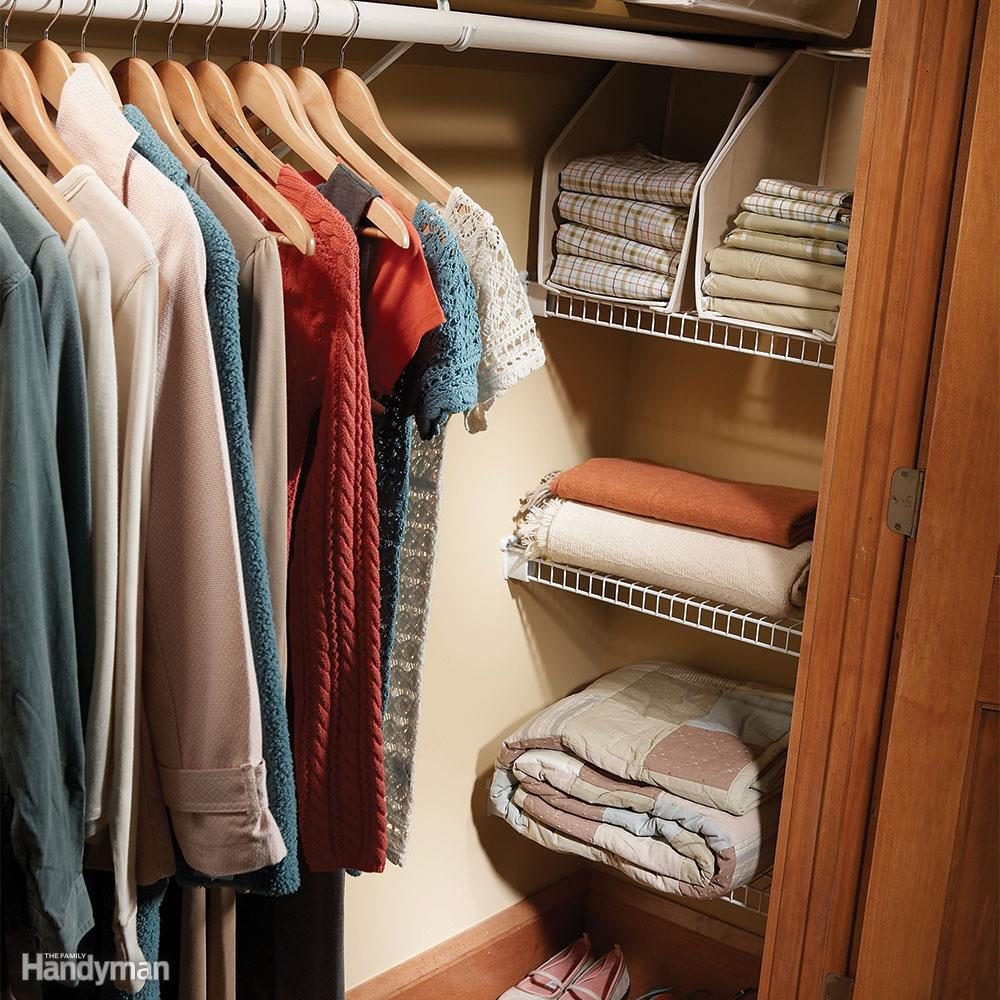
Closet Nook Shelves
Salvage the hidden space at the recessed ends of your closets by adding a set of wire shelves. Wire shelves are available in a variety of widths. Measure the width and depth of the space. Then choose the correct shelving and ask the salesperson to cut the shelves to length for you. Subtract 3/8-inch from the actual width to determine the shelf length. Buy a pair of end mounting brackets and a pair of plastic clips for each shelf.
Looking for a lighter project? Here are 30 things you can organize in 30 minutes—or less!
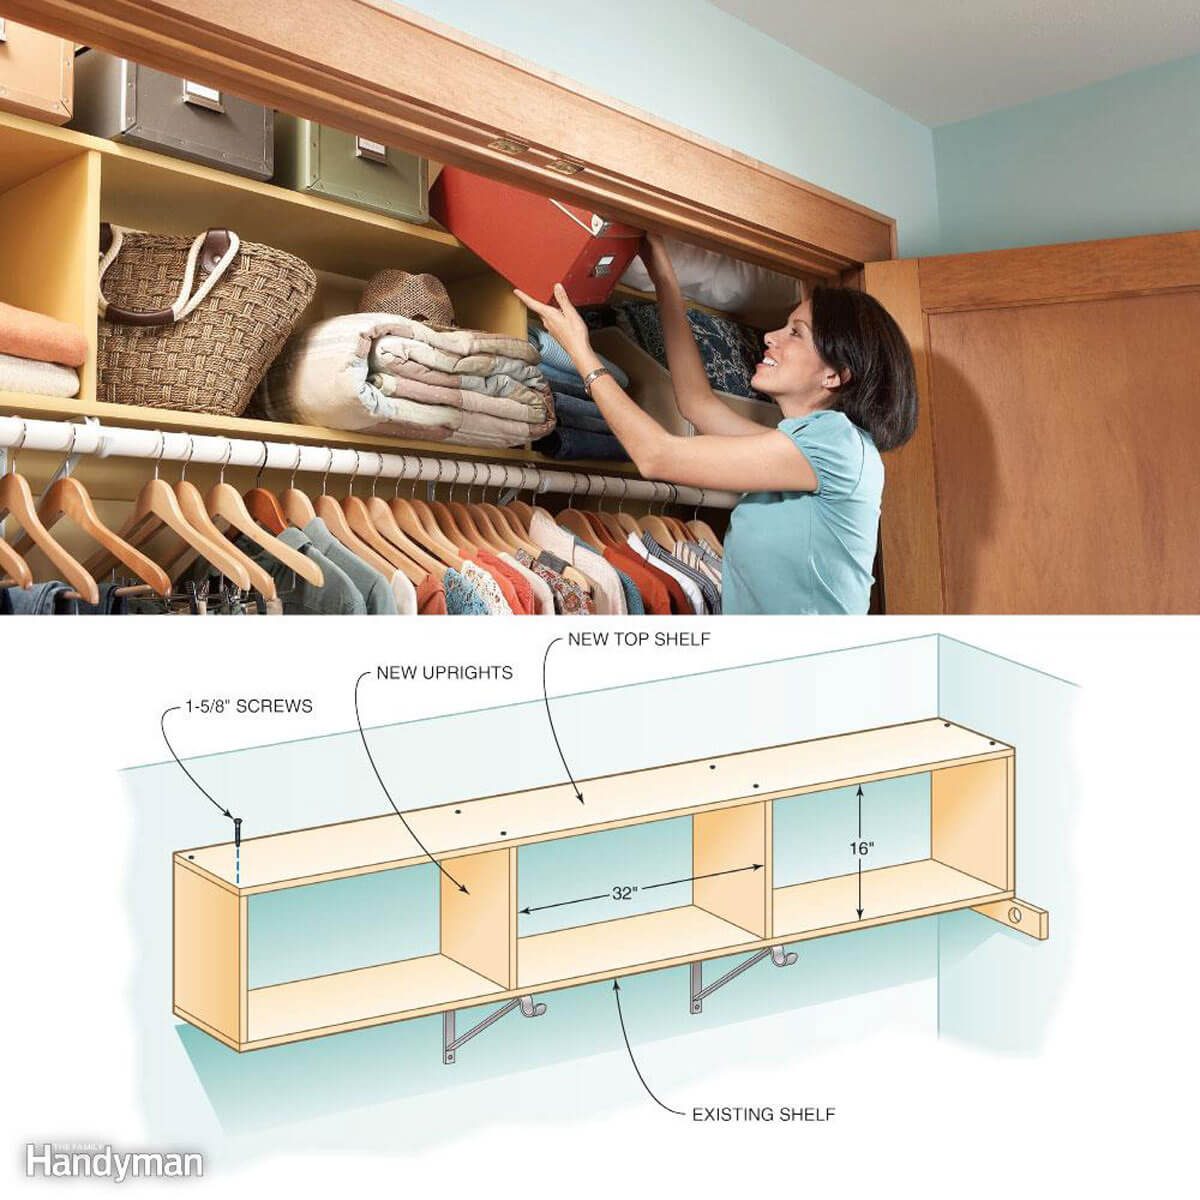
Storage for Small Spaces: Two-Story Closet Shelves
There’s a lot of space above the shelf in most closets. Even though it’s a little hard to reach, it’s a great place to store seldom-used items. Make use of this wasted space by adding a second shelf above the existing one. Buy enough closet shelving material to match the length of the existing shelf plus enough for two end supports and middle supports over each bracket. Twelve-inch-wide shelving is available in various lengths and finishes at home centres and lumber yards.
We cut the supports 16 inches long, but you can place the second shelf at whatever height you like. Screw the end supports to the walls at each end. Use drywall anchors if you can’t hit a stud. Then mark the position of the middle supports onto the top and bottom shelves with a square and drill 5/32-inch clearance holes through the shelves. Drive 1-5/8-inch screws through the shelf into the supports. You can apply this same concept to garage storage.
Find out how to organize your nightstand (and why you should).
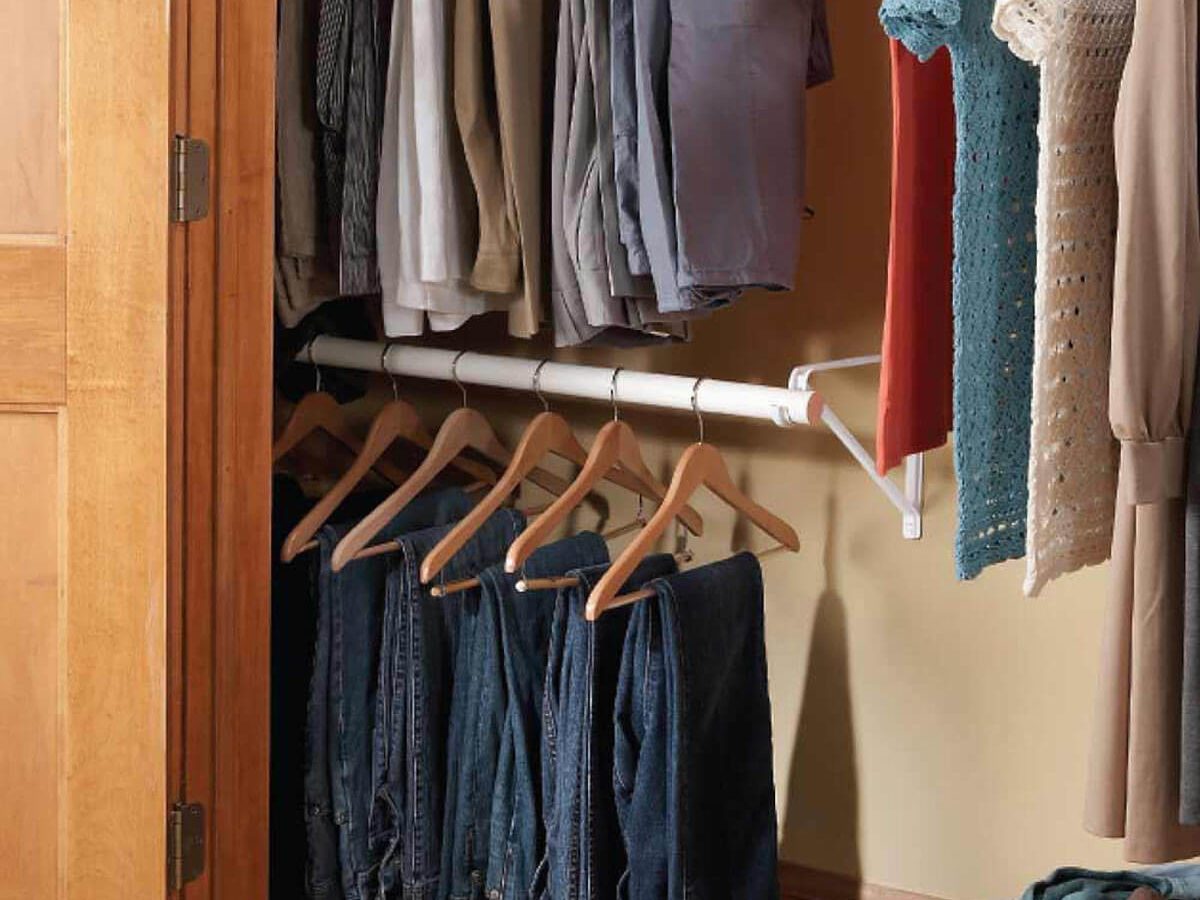
Clothes Storage Ideas for Small Spaces: Double-Decker Closet Rod
All you need to gain a lot of hanging space in your closet is two metal closet brackets and a length of closet rod. If your existing closet rod is at least 66 inches from the floor, there’s enough space to add a second rod below it and still hang shirts and slacks. We placed the top of the rod 35 inches from the floor, which allowed just enough room to hang two levels of pants.
Locate studs on the back wall of the closet with a stud finder. Then attach metal brackets to the studs. Use a level to align the brackets along the top. Space the brackets no more than 32 inches apart.
Next, check out 40 brilliant home organizing hacks you’ll wish you knew sooner.