

Changing Brake Pads: What You Need to Know Before You Attempt to DIY
 Updated: Oct. 04, 2018
Although changing brake pads is a job most vehicle owners leave to the pros, it is possible to do it yourself—provided you have the proper tools, equipment and expertise. Here’s what you should know before you attempt to replace disc pads.
Changing Brake Pads: Step-by-Step Instructions
Does your car come with ABS?
If your vehicle is equipped with Anti-Lock Brake Systems (ABS), it may be necessary to temporarily disconnect or remove some of the ABS parts before changing brake pads. (ABS is a computer-controlled system that requires additional mechanical and electrical parts to prevent the wheels from locking up during braking.) Check an appropriate manual to ensure that all brake parts have been properly. reinstalled and reconnected.
Do you have the right tools and equipment?
Before you begin changing brake pads, you’ll need to have the following at your fingertips:
- Large C-clamp
- Wrenches
- Jack
- Jack stands
- Wire brush
- Screwdriver (or pry bar)
- Pliers (or vise grips)
- Hammer
- High-temperature lubricant
- Replacement brake pads (get the correct brake pads for your vehicle from your local NAPA Auto Parts store)
Mind the dust…
Some brake linings contain asbestos. Try to avoid creating or breathing dust when you’re changing brake linings or cleaning brake parts.
Set the stage
Choose a solid, level place to work, and ensure the vehicle’s parking brake is set.
Siphoning the brake fluid
Siphon roughly half of the brake fluid from the brake fluid reservoir into a container and dispose of it properly. (Never reuse removed brake fluid.)
Handle with care
Brake fluid is so corrosive, it will dissolve paint!
Jacking the vehicle
Loosen the lug nut. Regardless of whether you’re using bumper, scissors or hydraulic jacks to raise the vehicle, never attempt to work under a vehicle supported only by a jack. Ensure the wheels remaining on the ground are blocked, and support the vehicle with adjustable jack stands or drive-on ramps rated for the weight of the vehicle. After you’ve jacked up the wheel or axel you’re working on, remove the lug nuts and the wheel.
Take it one wheel at a time
If you work on just one wheel at a time, you’ve got the other side intact for use as a reference.
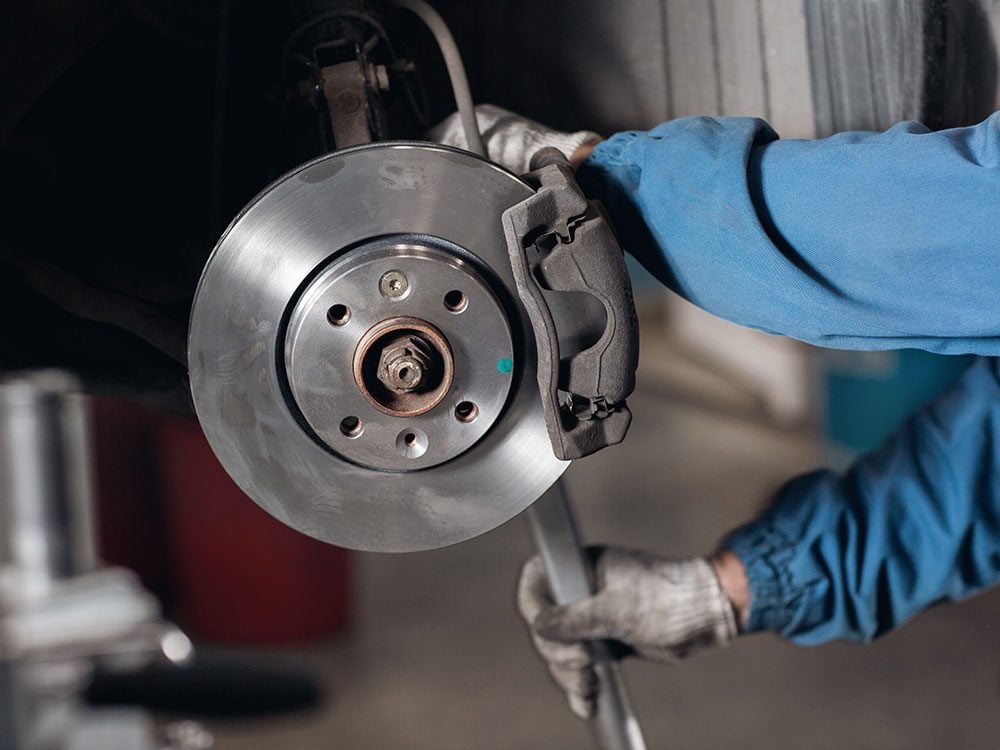
How to Remove Brake Calipers
In most cases, you’ll need to remove the calipers to change the brake pads.
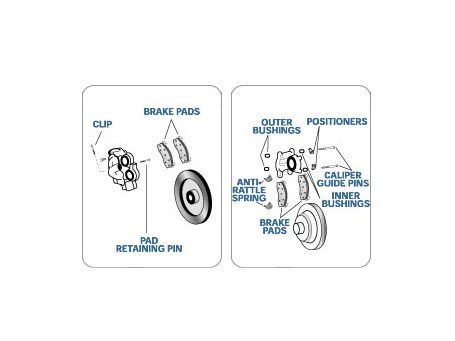
- For fixed calipers, remove the caliper mounting bolts only if the pads won’t come out the back of the caliper.
- For floating calipers, remove the two caliper mounting bolts or guide pins. Note the location of any bushings or positioner pieces so they can be replaced in their original locations. Lift the caliper off the rotor. Sometimes a twisting motion will push the piston back a bit to give you enough clearance for removal.
- For sliding calipers, a support key or retaining clip holds the caliper to the adapter or anchor. Remove the screws or pins holding the key or clip and drive it out. The retainers will lift off when the screws are removed. Note the position of any support springs, anti-rattle springs or clips. Lift the caliper up and off.
How to Remove Brake Pads
- Push back the piston before removing the old brake pads.
- For fixed calipers, push against the old pads before you remove them. If the caliper must come off, push back one pad at a time until the pistons are seated, after you remove the caliper.
- For floating or sliding calipers, you must remove the caliper to push the piston back. Use a large C-clamp and push on the inboard pad.
- Be careful not to damage the pistons, bores or the dust boots when pushing the pistons back. Do one side at a time and be sure you don’t pop one piston out while pushing on another. Remember to remove half of the brake fluid in the master cylinder before you start.
- Check for fluid leaks or rotor scoring and fix them (replace seals/calipers, machine rotors) before going any further. Certain pistons must now be screwed back with an Allen wrench or special tool to seat them. Remove the pads from the calipers.
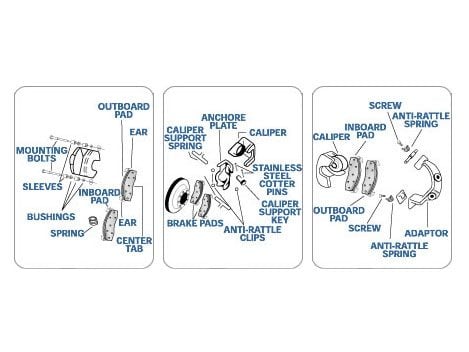
- For fixed callipers, remove any pins or retainers (push pads back and pull them out).
- For floating or sliding calipers, separate the pads from the caliper. The inner pad must be clipped to the piston. The outer pad may be pinned, clipped or pressed tightly on the caliper. Some pads may remain on the adapter or anchor when the caliper is removed.
- Thoroughly clean the entire caliper and the mount with a wire brush. Then use a damp rag to remove any dust or debris.
How to Install New Brake Pads
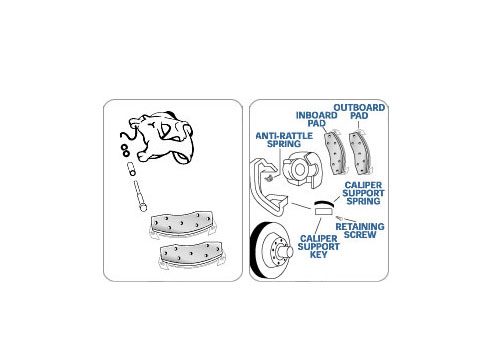
- Install the new pads in the caliper or anchor in the reverse order of their removal. Make sure all locating clips or anti-rattle springs are in position. Some outboard pads have “ears” that must be bent to fit tightly on the caliper. If necessary, bend the ears by tapping them carefully with a hammer, and use vise grips to press them into position. If the pad is loose on the caliper, it will squeal. Do not get grease or oil on the pad linings.
- Place the caliper in position and reinstall any bolts, guide pins, support keys or retainers. Some support keys must be hammered into position. Reinstall any retaining screws or pins. Make sure all bushings are in position.
- Lightly lubricate all sliding metal surfaces with high temperature lubricant.
- Tighten all bolts to factory specifications. Never replace bolts or pins with standard hardware. Use only special, high-tensile bolts or pins designed specifically for your vehicle.
- Fill the master cylinder with clean disc brake fluid, and bleed the brakes if necessary.
Check out these 13 Things You Should Know About Car Maintenance!
For more great tips on how to maintain your car and to find the parts you need, visit NAPA Canada.