How to Stack Your Own Stone Wall
 Updated: Sep. 28, 2018
A well-built wall can last for centuries and roadside boundaries throughout Europe are solid testament to simple stacking techniques.They were traditionally made from available stones and positioned without using mortar, a method called dry stack or dry stone.
In Australia a dry stone wall is used to landscape a backyard, terrace a garden, create raised planting beds or to shore up slopes.
It’s a popular DIY project, made easier with the luxury of choosing the best available stones from a garden or landscape centre where they’re often stacked on pallets and sold by the square metre. Larger feature rocks can be selected and bought individually.
Modernizing an Old Style
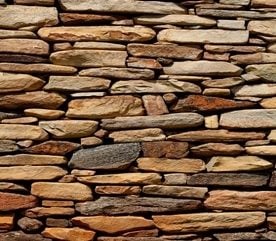
Constructing a true dry stone wall, without mortar, is an artisan task beyond the engineering skills and time commitments of most DIYers.
But combining modern materials such as poured concrete with traditional stacking creates a sturdy feature that looks and lasts like a classic. The facade has rocks of varying sizes fitting snugly but the structure has hidden, immovable strength.
TIP: A wall more than a metre high usually needs council approval.
Set Firm Foundations
Constructing a stone wall is like fitting together a three-dimensional jigsaw puzzle. The pieces are heavy so plan the placement, have a few mates on hand and consider wearing a back-support belt for lifting.
The security of the structure depends on how well the stones fit so choose square, chunky shapes for the easiest fit, using different sizes with base stones from 300 to 350mm long, wall stones 250 to 300mm and capstones of 200mm.
For strength position each higher row of stones back about 12mm to create a back-leaning face.
TIP: You can’t make a strictly vertical dry-stone retaining wall as it will eventually fall apart because of the pressure of the earth behind it.
Working with Stone
Shape flat stone using a two kilo lump hammer with a cold chisel to mark the breakage line, hitting the chisel with moderate force, going over the line several times until it breaks.
TIP: Dressed stone can be cut with a circular saw and masonry blade.
Low Wall on a Slope
This low retaining wall was built to landscape a sloping section of land that suffered from runoff, with poor soil that tended to become boggy after rain.
Using stones collected from nearby goat paddocks ensured the main materials were free and matched the surrounding landscape, although it was backbreaking work using a trolley to move them uphill.
Bringing in new soil and garden mix improved the drainage and made the area fertile for planting. The biggest expense was the soil, costing about $450, along with the cost of a slab of beer for a friend to bring in his bobcat, and buying established plants.
The entire project took a weekend and transformed the unattractive slope into a low-maintenance garden.
Building Your Stone Wall
The plan was to build a sturdy stone retaining wall into an existing slope for landscaping, adding rows of hardy, colourful flowering plants to attract birds and beautify the view.
1. Soil was delivered: Spread over the site using a bobcat. Six cubic metres of good soil was brought in for drainage which was covered with nine cubic metres of a garden mix containing sandy loam, mushroom compost, ash and cow manure for growing shrubs.
2. The soil is laid: After using a hose to mark out the curve of the wall. The first row of stones was positioned and geotextile landscape fabric tucked in behind them.
TIP: Place the heaviest stones on the base so they can be rolled rather than lifted into position.
3. Stones have been positioned: Then the fabric was folded forward over them while soil was added and backfilled level with the top of the wall. This process was repeated until four rows were laid, making the finished wall a metre high.
4. Soil has been shovelled: Raked in a final layer, a watering system was installed for drip irrigation then the entire area was covered with straw mulch to retain moisture.
5. New srubs were planted: To complete the project. A row of westringia was positioned by the deck and a grove of six cocos palms added some height.
Prostrate grevillea will provide groundcover and flowers for the birds, while sweet-scented murraya was positioned with cannas and agapanthus for summer colour, and cordyline red star to accent.