How to Build a Raised-Bed with a Retaining Wall
 Updated: Sep. 28, 2018
A stone wall does more than make a clean border along your lawn. It’s a handsome visual statement in itself; a great way to add depth and texture to a flat, featureless yard. It’s practical, too. If you have poor or clay soil, just fill the interior with topsoil and compost and you’ll have a wonderful raised planting bed. It also provides good drainage, making it a great solution for low-lying, soggy gardens. And it’s a good way to terrace a sloped yard and create nice, flat gardens.
Raised-Bed Basics
To reduce maintenance, add a 4-in.-deep trench that’s lined with plastic edging and filled with mulch. The edging keeps grass roots from creeping into the stone wall, and the mulch provides a mowing track for the lawn mower wheels. With taller types of grass, you can mow right over the plastic border and cut the lawn edge cleanly. There’s no need to trim the grass.
This project doesn’t require any special skills, just a strong back. Besides a good shovel and a wheelbarrow, you’ll need a cold chisel and a 2-lb. maul for breaking stones and driving edging stakes.
Design your raised bed to blend into the contours of your yard like a natural feature. You can handle slopes in one of two ways. Either let your wall follow the slope of the yard for an informal look, or level the stones and step the wall up or down as the slope requires to maintain approximately the same height.
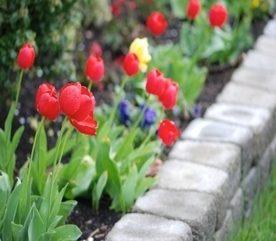
The exact size of stacking stone for walls varies by region. Visit a local landscape supplier to check types. For lawn edging, limit the height of your wall to two courses.
Measure your wall length and make a sketch. The stone dealer will help you figure out the quantities of all the materials you need. The stone will probably be sold by the ton or pallet and it’s heavy. Have it delivered and dropped as close to the garden location as possible. And have gravel or sand delivered to use as a setting bed for the stone as well as topsoil to fill behind the wall. The stone or landscaping dealer will help you calculate how much of these you need.
Building Your Raised Bed And Retaining Wall
Get started by laying out the border with a garden hose or paint.
Draw a curve by setting a string at a center point and marking an arc with paint. The trench width will vary depending on the width of the stone.
Add 6 in. to the stone width (2 in. for the mowing edge plus 4 in. extra). Generally it’s best to keep the bottom row of stone an inch or so below the original soil level, but this will vary if you keep the stones level and the yard isn’t level. At some point, you may have to step the stones up or down or use thinner or thicker stones. There’s no rule here. Experiment when you lay the stones for the best appearance.
Lay the stones that have the most irregular faces in the first row so you can place the irregular face down in the gravel and level the top. Vary the sizes and colours for the best look.
Chip off irregularities with the maul and chisel. Then add the second row. Make this row as stable as possible so the stones won’t rock and fall off. As a last resort, stabilize the stones by shoving stone chips into the gaps.
Lay landscape fabric against the back of the wall before backfilling to keep dirt from washing out through the stone.
Add organic mulch to finish up the mowing edge.