How to Build a Dry Stone Wall on Your Landscape
 Updated: Sep. 28, 2018
Natural stone is the perfect choice for a wall that harmonizes with the beauty of any landscape, from an informal garden to a rolling, sloping yard. Building the wall is strenuous but rewarding work, and you can take your time with this project.
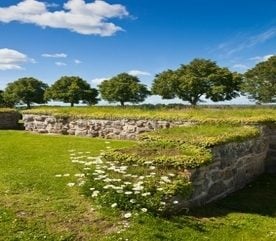
Throughout the world, stone walls have stood for centuries. From garden and crop terraces in Asia, to moats and enclosures in Europe, to the boundary fences in North America built by settlers clearing fields for farming, few things have endured so long or so well as natural stone walls built without mortar, concrete footings, or other modern modifications and additions.
The Pride in Building a Wall
You probably will not be concerned about building for the ages when you improve the landscaping of your home, but you will be concerned with beauty. And you may well need to deal with practical matters, too, such as shoring up a steep slope, making terraces, or creating raised garden beds. There are many kinds of walls that can do these tilings, but none fits in with the surroundings as gracefully as a wall built of natural stone.
Building a stone wall is a rewarding project in many ways. There is the satisfaction of turning a pile of rocks into something beautiful, useful, and enduring. There is the challenge of fitting together a giant, three-dimensional puzzle. There may even be a sense of pride in carrying on a human building tradition at least as old as civilization itself.
Whatever the reasons you choose to build a wall, it’s a big project, so you should do your best to make it enjoyable and satisfying. To begin, you need to understand how to plan and build a wall efficiently and correctly.
You also need to be realistic about how long it may take to build the wall. Don’t overwhelm yourself by trying to do too much too fast. It’s possible to turn any project into drudgery by overdoing it. Two hours of wall building is pleasant exercise; six hours is an ordeal. To keep the work enjoyable, approach your wall as a summer hobby, to be plugged away at on weekend afternoons, not a project to be completed in a single weekend. It takes nature millions of years to produce rocks; you can afford to take your time arranging them into a pleasing garden wall.
Buying Rocks
If rocks are scarce in your area, or if you have no way to transport them, you can buy a load (or loads) and have it dumped in your yard. Begin by looking under “Stone” in the Yellow Pages or by calling a landscaping supplier. In small towns, look in the local paper for ads by excavation contractors, gravel dealers, and farmers.
Don’t just phone in an order. Buying stone gives you a choice of types and colors. Go and look things over before you buy. Prices will vary widely, depending on what you get and whom you get it from. A farmer may deliver a load of fieldstone for little more than the cost of transportation.
You’ll also need 3/4-inch gravel or rock aggregate as a base for your wall. To find the number of cubic feet, multiply wall length by width (same as height) in feet by 0.5 (6-inch depth).
When the stone and gravel are delivered, have them dumped as close to your work site as possible. Choose a spot on the same level or uphill of the wall, so you don’t have to push wheelbarrow loads up a slope.
Dry Stone Wall Building Tips
These techniques and procedures are those used by experienced stoneworkers and landscape gardeners to construct dry stone walls in all kinds of climates. Here are some of their tips and special techniques for making the work easier or dealing with difficult spots.
– If you haul in or move dirt to create or enlarge a slope, it will be loose. Soak it thoroughly two or three times with a hose, or leave it uncovered in the rain, so it settles before you build against it.
– Big tree roots can slowly tear a wall apart. Cut back any that threaten to reach your wall. Don’t just cut them at the rear edge of the wall; go back farther if possible.
– Building with stone is like putting together a jigsaw puzzle. So begin by spreading out the rocks just as you would the pieces of a puzzle.
– Choose rocks for the face of the wall carefully – they are what will be seen. If you have different colours, mix them into a patchwork. For a neat, controlled look, lay stones with their flattest sides facing out; for a more natural, rustic look, leave the rounded, irregular sides exposed.
– Put the best wide, flat stones aside to be used as capstones.
– Use the biggest stones for the first course. Nestle extra-big stones down into the gravel foundation so they don’t stick up so much above their neighbors.
– Don’t try to be a lifting hero; that’s a sure way to strain or injure your back muscles. If there are some big or heavy stones to be used in upper courses, roll or slide them up a plank to put them in place.
– Fitting stones together is mostly trial and error. Cut down on both by mentally measuring the shape and size of the stone you need first. Then hunt for the perfect fit; you may even want to use a tape measure. Spreading out the rocks before you begin makes hunting easier.
– Stone cutting is hard work, and doing it well is difficult. Avoid it if possible. If you must knock off troublesome crags or knobs, use a heavy hammer and a cold chisel. Above all, wear eye protection and keep others out of the flying-chip zone.