

How to Apply Paint Protection Film to Your Vehicle
 Updated: Mar. 20, 2019
Formerly a pros-only product, paint protection film is now available in easy-to-apply spray-on kits. An expert from 3M shows how to do it.
How to Apply Spray-On Paint Protection Film
The paint on the leading edge of car hoods is on the front line for gravel and sand damage. Until recently, you only had two ways to protect the hood: install a “bra” or apply paint protection film. Bras are not only ugly but also lower gas mileage and trap road grit, which damages the paint. Paint protection film looks and works much better, but professional installation costs about $500. Now there’s a product that DIYers can apply to protect against paint chips-spray-on/peel-off paint protection film.
Several companies make this paint film, but we chose the 3M Paint Defender product for this story because it lasts up to a year. It costs about $25 and contains enough material to coat the bottom third of your hood. Find it at any auto parts store. We asked 3M product expert Todd Mathes to walk us through the prep and application process.
You’ll also need car-washing supplies, poly sheeting to cover the entire car and ground, clean-edge masking tape and a microfibre cloth. Or buy the optional installation kit and a spray trigger. The entire job takes less than two hours. Here’s how it’s done.
1. Prep the Vehicle
The engine and hood must be cool when you apply the paint protection film. A hot engine will heat the hood and force-dry the spray between coats, defeating its self-levelling feature. So check the weather report and pick a time when it’ll be cool, dry and calm. Park the car in a shaded area the night before. Then start the project by washing the car with car wash soap. Make sure you remove all traces of bug splatter and tar. Then rinse and dry completely.
Next, pop the hood and prop it open about 10cm with a roll of paper towels or a block of wood.
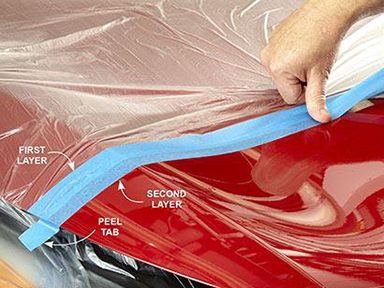
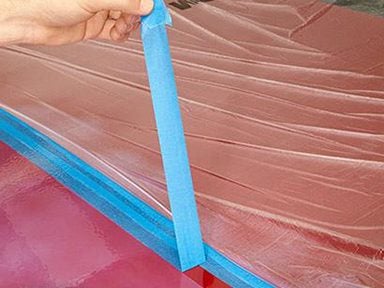
2. Tape the Poly Sheeting to the Hood
Spread a poly sheet over the entire vehicle. Then spread sheeting on the ground to catch any overspray. Starting at the grille, use a scissors to cut straight up the centre of the poly, stopping about half a metre from the bottom edge of the hood. Then cut right and left out to the fenders until you have formed a “T” cutout. Tuck the flaps under the hood and tape them inside the engine compartment to prevent them from moving while you spray. Secure the rest of the sheeting to the car and floor with tape to prevent it from blowing onto the wet finish.
Carefully apply the first layer and then the second layer directly below it. Make the second tape line as straight as possible, and press down along the edge to seal it to the hood as you apply. Double over one end of the tape to make a peel tab.
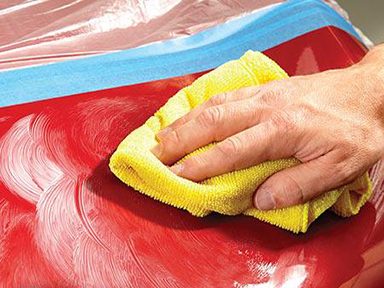
3. Wax the Exposed Hood Area
Next, tape the top of the “T” to the hood. Apply another layer of tape to form the clean edge between the spray film and the rest of the hood. Once the poly is in place, apply the synthetic wax included with the product. Squirt a dollop of wax onto the hood and work it in with a microfibre towel. Continue wiping until the surface is free of haze. Waxing is an important step to make removal easier a year from now. So even if you’ve recently waxed the car, do it again using the wax packet included with the product.
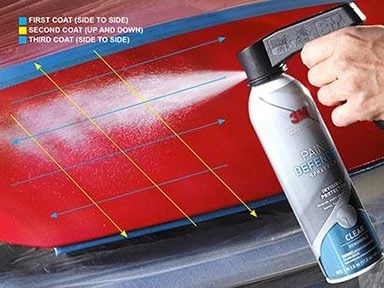
4. Spray the Hood With Protectant
Shake the can of 3M Paint Defender for a full minute before applying. Then hold the nozzle 15 to 20 cm from the hood and apply three coats to one-half of the hood. Spray all three coats in one continuous motion (don’t stop and start at the ends of each row or coat). Continue spraying onto the fender, over and above the tape line, and below the bottom edge of the hood to get a uniform film thickness at the edges. A proper application of the paint protection film should have an “orange peel” texture and a slightly milky look. Don’t worry-the product self-levels and dries clear. Then spray the second half of the hood.
Move the can at the rate of six seconds per pass. Starting at the tape line and spraying down to the bottom edge of the hood, spray the product continuously in alternating left to right rows at the rate of two seconds per foot. Overlap each row slightly. Immediately spray a second layer, moving up and down over the same section. Then apply a third coat in the side-to-side pattern.
5. Remove the Tape While the Spray Is Wet
When you’re done, remove the clean-edge tape while the spray is still wet. Grab the doubled-over peel tab and pull the clean-edge tape up and away from the wet edge.
Park the car in the sun and let it dry for two to four hours. The film cures fully in one to four days, depending on the air temperature and humidity.

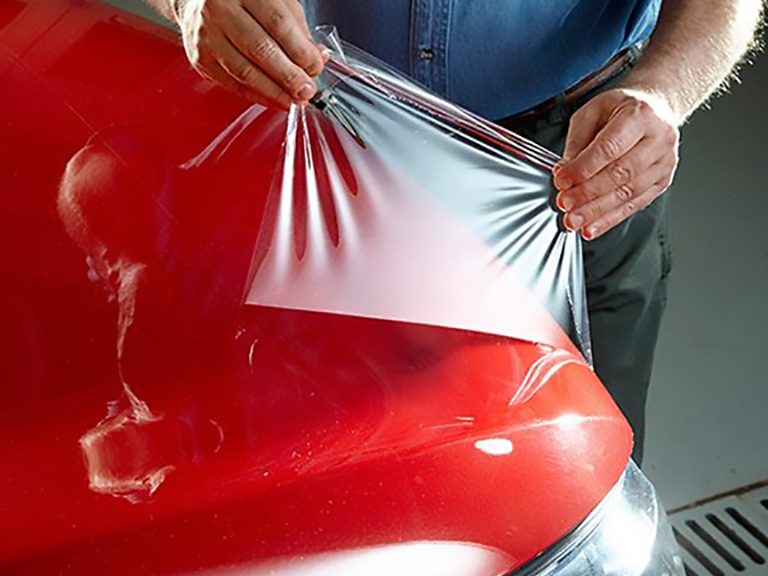
6. After a Year, Peel off the Film
Our expert says that the paint protection film can last a bit longer than one year but may yellow from UV exposure. However, the longer you wait, the harder it is to remove, so don’t push your luck.
Pop the hood and peel the film loose around all three edges using your fingernail. Then remove all the film. Lift up a top corner and pull the paint protection film down toward the bottom of the hood to release as large a piece as possible. Then use both hands to pull the old film up and across the hood.
Wipe the excess off the edges with a rag. Apply a fresh layer of protection film following the steps shown.
Troubleshooting Your Car’s Paint Protection Job
* If bugs or leaves land on the wet spray, pluck them off immediately with a pair of tweezers.
* If the spray is solid white, has lumps or develops sags, you’ve applied too much. Stop spraying and let the product dry. Then peel it off and start over, moving a bit faster and applying less product.
* If the wet spray has a “dry” look or you’ve missed areas or pinholes, you can apply more product. But do it quickly. You only have a 10-minute window. Wait too long and the product loses its self-leveling quality and you can wind up with a textured look.
Check out more do-it-yourself car maintenance tips!
Explore Reader’s Digest Cars.