Animal Albums
 Updated: Sep. 28, 2018
Too many pictures, too little space? Personalized animal albums will keep them all in one spot.
What you will need:
Photo album with hard cover and removable pages
15-inch x 20-inch sheet of handmade or decorative paper for back and front covers
15-inch x 20-inch sheet of contrasting paper for inside covers
15-inch x 20-inch sheet of contrasting paper for binding (spine)
Craft knife
Fabric or craft glue
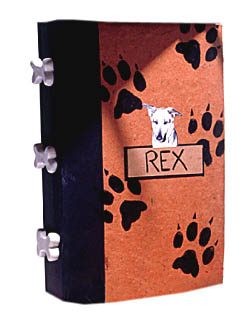
Paw-shaped stencils or rubber stamps, acrylic paint, and other decorations, as desired
Glue gun
Step 1:

Remove pages from album. To make outside cover, measure front cover of album from edge until the point where the binding (spine) starts. Trace rectangle with those measurements on wrong side of decorative paper. Add 3/4-inch border to top, bottom, and right side (see illustration A). Cut out with craft knife. Repeat with back cover, this time adding a 3/4-inch border to top, bottom, and left side.
Step 2:
Trim top right corner of front cover and left corner of back cover at 45-degree angle (this will allow you to fold edges smoothly together).
Step 3:
Apply glue sparingly to front cover (making sure to apply to all edges). Place album front onto front paper cover and quickly fold over 3/4-inch edges in the following order: top, bottom, side. Repeat procedure with back cover.
Step 4:
Measure length and width of binding. Add 3 inches to width and 1/2 inch to the length (illustration B). Trace rectangle with those measurements on wrong side of decorative paper.
Step 5:

Measure and mark 1/2-inch borders along each long side. Measure and mark 1/4-inch along each short side (top and bottom). These lines will serve as guides for gluing the binding in place. Apply glue sparingly to inner rectangle you’ve created, and carefully align binding with each edge. Then fold over long sides onto front and back covers.
Step 6:
Open album, and using craft knife, make a vertical slit over each binding fold (2 on the top, 2 on the bottom), so that paper cover will lie flat when folded over. Fold over top and bottom edges, and glue in place.
Step 7:

To make inside cover, measure inside cover and subtract 1/4 inch from all edges (illustration C). Cut measured square from paper of choice and glue into cover. Repeat for back cover.
Step 8:
Decorate covers with paw-shaped rubber stamps or stencil and acrylic paint, as well as color photocopies of your pet, ribbon, and other decorations that you can attach with a glue gun. Let dry completely, then return pages to album.
PHOTO: © Joshua McHugh