How to Install a Pre-Formed Pond Liner
 Updated: Sep. 28, 2018
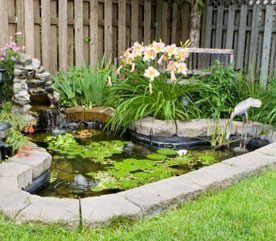
Are you thinking about adding a pond to your landscape? Ready-made ponds come in all shapes and sizes, and even the smallest can be planted in an appealing way.
Simple Steps to Successful Installation
Rigid, pre-formed pond liners are generally made from moulded plastic or glass fibre. They are quick and easy to install, creating an attractive feature with a minimum of work. Site a small pond in a partially shaded corner that is visible from the house. Nearby seating and lighting will enable you to enjoy the pond at any time.
Watch Out!
If siting a pond in a lawn, do not allow the grass to grow right up to the water’s edge. Lay a strip of paving or gravel around the pond to protect the edge of the plastic liner during mowing and to prevent grass clippings from falling into the pond.
Place the pond liner in its planned position. Dig out a hole 30cm wider than the circumference of the liner, trying to make the depth and shape of the hole match that of the pond liner as closely as possible. Bear in mind that you will need to cover the base of the hole with a 2.5cm layer of sand. Lay a straightedge across the hole and use a tape measure placed at right angles to the straightedge to measure the depth of the hole at different points to check that it matches the depth of the pond liner.
Remove any sharp stones or roots and cover the base of the hole with a layer of sand. Lower the liner into the hole and check it is level and flush with the edge of the ground. Don’t fill the pond with water in one go, but do it gradually, backfilling around the liner as the water level rises (see steps, far left) to prevent air pockets occurring.
| PLANT | FLOWER COLOUR | WATER DEPTH |
|---|---|---|
| Water speedwell (Veronica anagallis-aquatica) | Blue | up to 10cm |
| Arrowhead (Sagittaria) | White | up to 10cm |
| Common spikerush (Eleocharis palustris) | Brown | up to 50cm |
| Japanese water iris ( Iris ensata) | Purple, blue, white | 20-50cm |
| Narrow-leaved water plantain (Alisma gramineum) | Pink | up to 20cm |
| Flowering rush (Butomus umbellatus) | Rose pink | 100cm |
| Water forget-me-not ‘Icepearl’ (Myosotis scorpiodes ‘Icepearl’) | Blue, white | up to 20cm |
| Marsh spurge (Euphorbia palustris) | Dark yellow | up to 50cm |
If you are planting marginal plants directly in beds within the pond rather than in baskets, spread a layer of pond compost or loam on the ledge before the water level rises that far. Insert the plants and cover the soil around them with a layer of fine gravel. Finish filling the pond, then install the equipment for any fountains and lighting, taking care to conceal electrical cabling safely .
Lights, Pumps and Fountains
Ensure that only approved electrical fittings are used and that a qualified electrician checks and certifies any wiring installations, in accordance with Part P of the Building Regulations. Pumps for fountains can be run from the mains supply at 240 volts or via a transformer that reduces the voltage. If your fountain pump is submerged in the pond, raise it on a couple of bricks to avoid it clogging with the silt that collects at the bottom. Solar-powered fountains and lights are available, but are less powerful.
As well as powering a fountain, pumps circulate the water, helping to keep it oxygenated for plants and fish. The fountain and pond must be compatible in size to ensure that the water lands back in the pond even in windy weather, although plants at the edge of the pond will benefit from the higher humidity generated by the spray. When choosing plants, note that some, such as water lilies (Nymphaea), do not like being placed near moving water.
30-Minute Task
– Fit the rigid liner for a small pond into a prepared hole
– Plant up a bog zone around the edge of the pond.