Do-It-Yourself Auto Maintenance: How to Replace Headlights, Bulbs and Fuses
A burnt-out bulb or fuse is the root cause of most vehicle lighting problems. The good news is, replacing headlights, bulbs and fuses is a relatively easy job that should take no more than 10 minutes.
Before your replace headlights, bulbs and fuses, make sure you’ve assembled all the tools you’ll need for the job:
- Fuse puller
- Phillips screwdriver
- Slot-head screwdriver
- Pair of pliers
- Small wire brush
- Rag or gloves
- Flashlight
- New/spare bulb or fuse (Consult your vehicle’s owner’s manual or your local NAPA store to ensure you’re using the right replacement bulb or fuse.)

How to replace miniature bulbs in your vehicle
Miniature bulbs can be found throughout your vehicle, and come in a variety of shapes and sizes. They’re used to light everything from the instrument panel and glove box to the turn signals and brake lights. When these bulbs burn out, you can usually see the broken filament inside the glass.
CAUTION: Make sure the switch in the circuit is off before replacing any miniature bulb. For safety, use a rag or glove to protect your hand in case the bulb breaks.
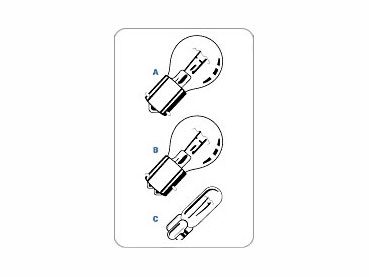
To remove a single (style A, above) or double (style B, above) contact bayonet bulb from its socket, push in slightly and turn counterclockwise.
To insert a single contact bayonet bulb, place the base of the bulb in the socket. Make sure the index lug on the base is lined up with the slot in the socket. Then push in slightly and turn clockwise.
To insert a double contact bayonet bulb, place the base of the bulb in the socket. Make sure both index lugs on the base are lined up with the slots in the socket. If the lugs are staggered, make sure the short lug is lined up with the short slot and the long lug is lined up with the long slot. Then push in slightly and turn clockwise.
No turning is necessary to remove a wedge base bulb (style C, above) from its socket. Instead, pull the bulb straight out of the socket.
To insert a wedge base bulb, gently push the base straight into the socket. For safety, use a rag or a glove to protect your hand in case the bulb breaks.

How to replace headlights
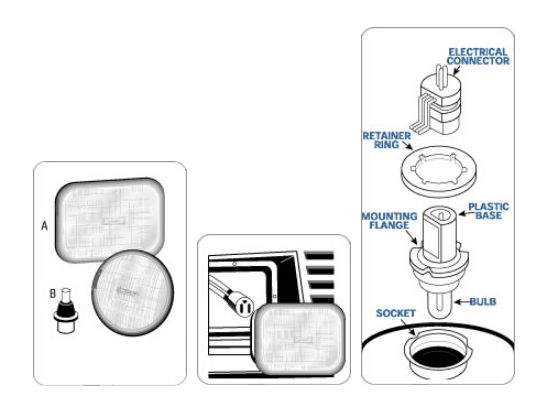
There are two types of vehicle headlight systems: Sealed beam systems and replacement bulb systems. In the sealed beam systems, the headlamp bulb is permanently enclosed in a round or rectangular headlamp body (A, above left). When the headlamp bulb burns out, the entire unit must be replaced. In replacement bulb system, sometimes called composite headlamp assemblies, a replaceable halogen bulb is used (B, bulb). When it burns out, it can be removed from the back of the headlamp body and replaced.
CAUTION: Make sure the headlight switch is off when replacing a headlamp body or halogen headlight bulb. Always wear eye protection.
To replace a sealed beam headlight:
- Remove any screws, housing, trim, retaining rings or molding from around the headlamp body.
- Remove the wiring plug from the back of the bulb. Do not disturb the adjusting screws used to aim the lamp (centre, above).
- Reverse the steps to install the new bulb, making sure the bulb is firmly and properly seated.
To change a replaceable halogen bulb:
- Open the hood and locate the bulb in the back of the headlamp (right, above).
- Gently remove the electrical connector from the back of the bulb. If a retainer ring is present, remove it.
- Without twisting the bulb, carefully pull it straight out of the socket. Handle the bulb by its plastic base only. DO NOT touch the glass part of the lamp. The bulb contains halogen gas under pressure and it may shatter if scratched or broken.
- Line up the new bulb in the socket and push it in until the plastic mounting flange on the bulb touches the back of the socket.
- Reinstall the retaining ring, and reconnect the electrical connector to the back of the retaining ring.
Is it possible your dim headlights are just cloudy? Here are step-by-step Instructions for Cleaning Headlights!

How to replace fuses
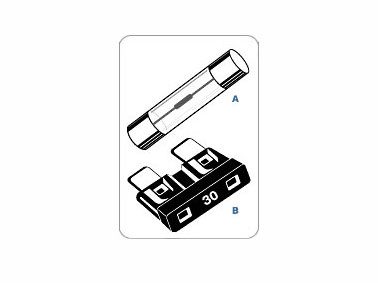
Fuses come in two basic types (see above). Older vehicles use fuses made of glass (A, above). Newer vehicles use miniature plastic blade-type fuses (B, above). Both consist of a thin piece of zinc or wire, which melts when overloaded. Normally fuses are located under the dashboard, in the engine compartment or in the trunk. Refer to the owner’s manual for the exact location of the fuses in your vehicle.
Fuses can be removed with a fuse puller, an inexpensive tool available at your local NAPA Auto Parts store.
When replacing a blown fuse, always use a new fuse with the same load amperage. The amperage is printed on the fuse. If the fuse continues to blow, have the circuit tested for defects.
Originally published as Headlights, Bulbs and Fuses Replacement on NAPA Canada.
For more great tips on how to maintain your car and to find the parts you need, visit NAPA Canada.